
Sustainability: Batteries & Solar | Water | Heating
DIY 12V Power | Batteries & Solar | Battery Recharging | Appliance Power Consumption
-
- See also: 12V Basics | 12V Wire & Cabling
- Case Studies: 12V power cut-outs | Battery not charging
No Charge
 Friends recently contacted us about the battery charging in their slide-on camper – or rather the lack of charging. They were regularly experiencing almost-flat house batteries after short off-grid excursions, despite having recently installed two Lithium batteries and a new DC-DC charger.
The only time they saw their battery charge increase was when their van was connected to a mains power supply. Neither their vehicle’s alternator nor their solar panels appeared to be charging the house batteries.
The original setup
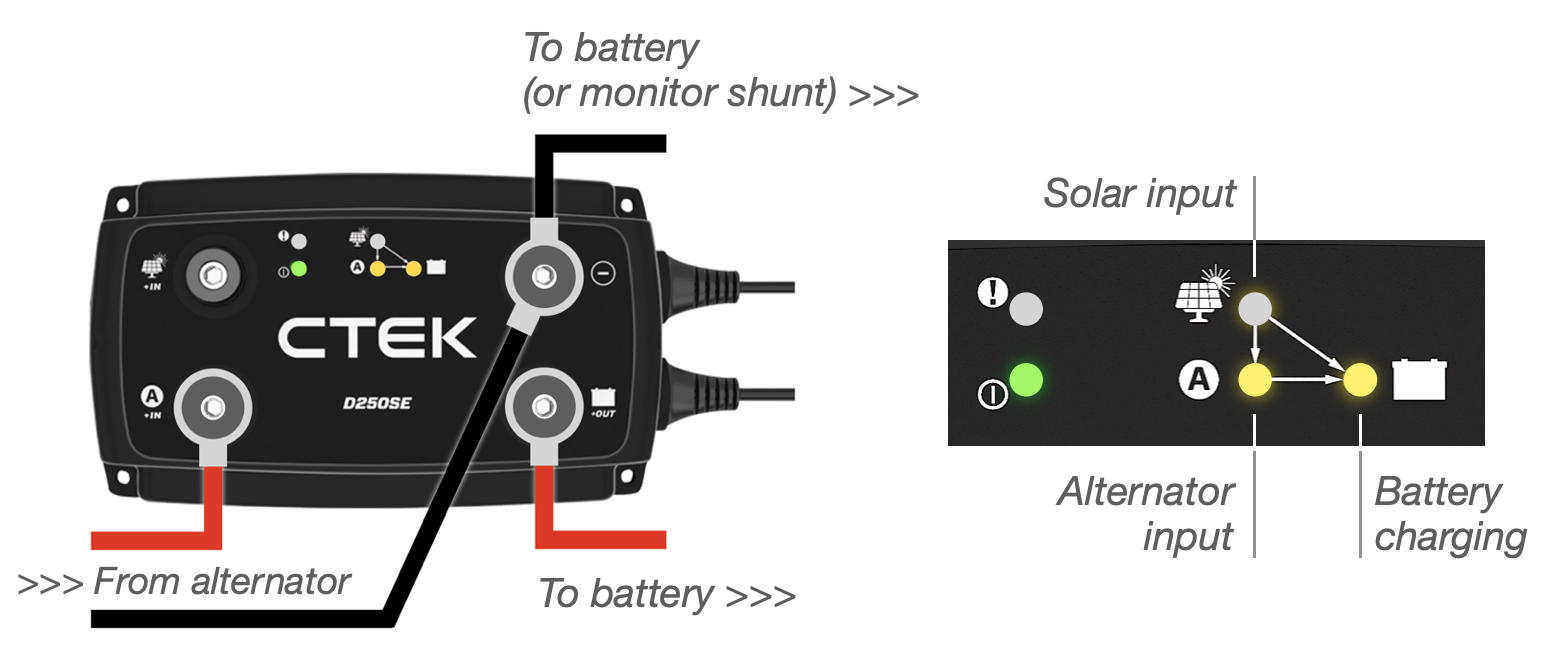
A new CTEK D250SE DC-DC charger had been installed, replacing the factory-fitted VSR isolator, which had originally been considered a possible culprit when diagnosing the charging issues. The CTEK charger can deliver 20 amps to the Lithium house batteries from the vehicle alternator, when the engine is running. But it was delivering zippo.
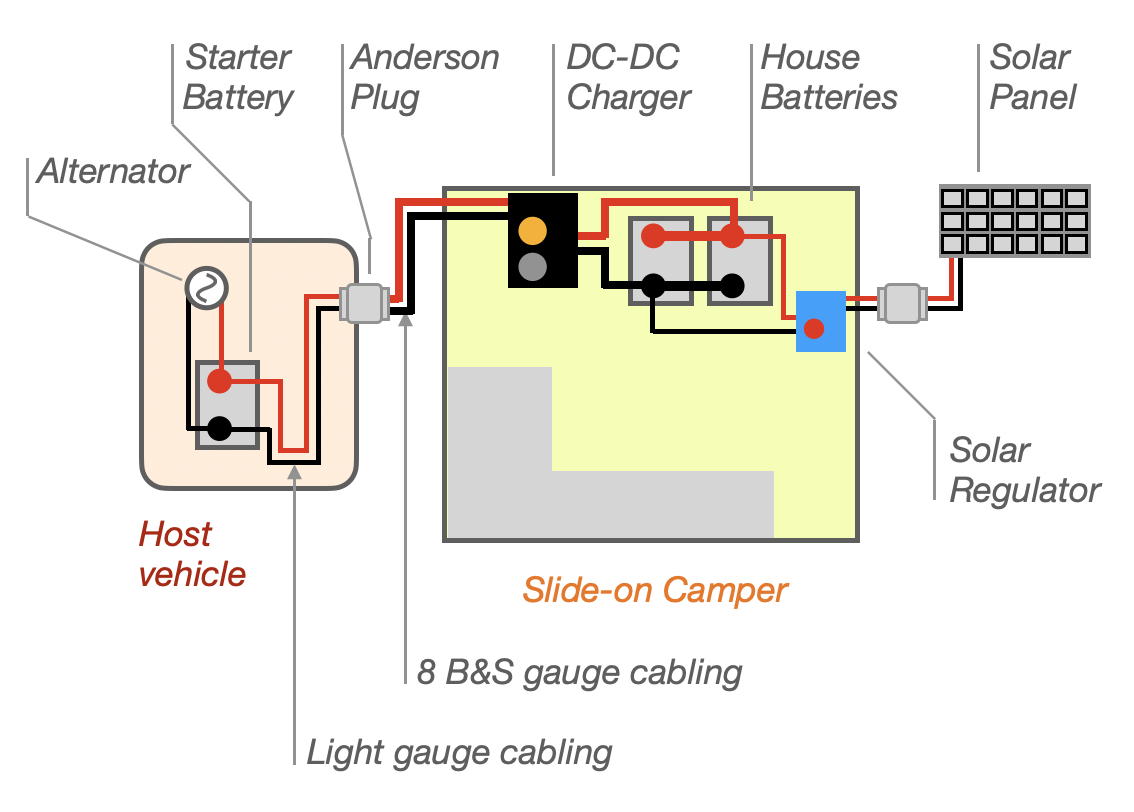
A roof-mounted solar panel was connected to the batteries through a separate PWM (Pulse Width Modulation) regulator using the supplied cables, which included an Anderson plug adaptor with alligator clips to connect to the battery. It too was delivering zero amps to the batteries.
On paper, the batteries should be charging when the engine is running and/or the sun is shining. (Even though the alligator clip arrangement on the solar connection isn’t ideal for a permanent setup.)
So why aren’t the batteries charging?
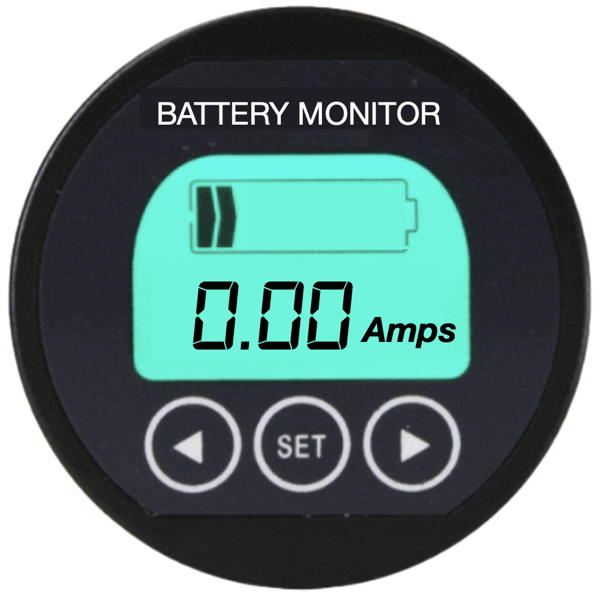
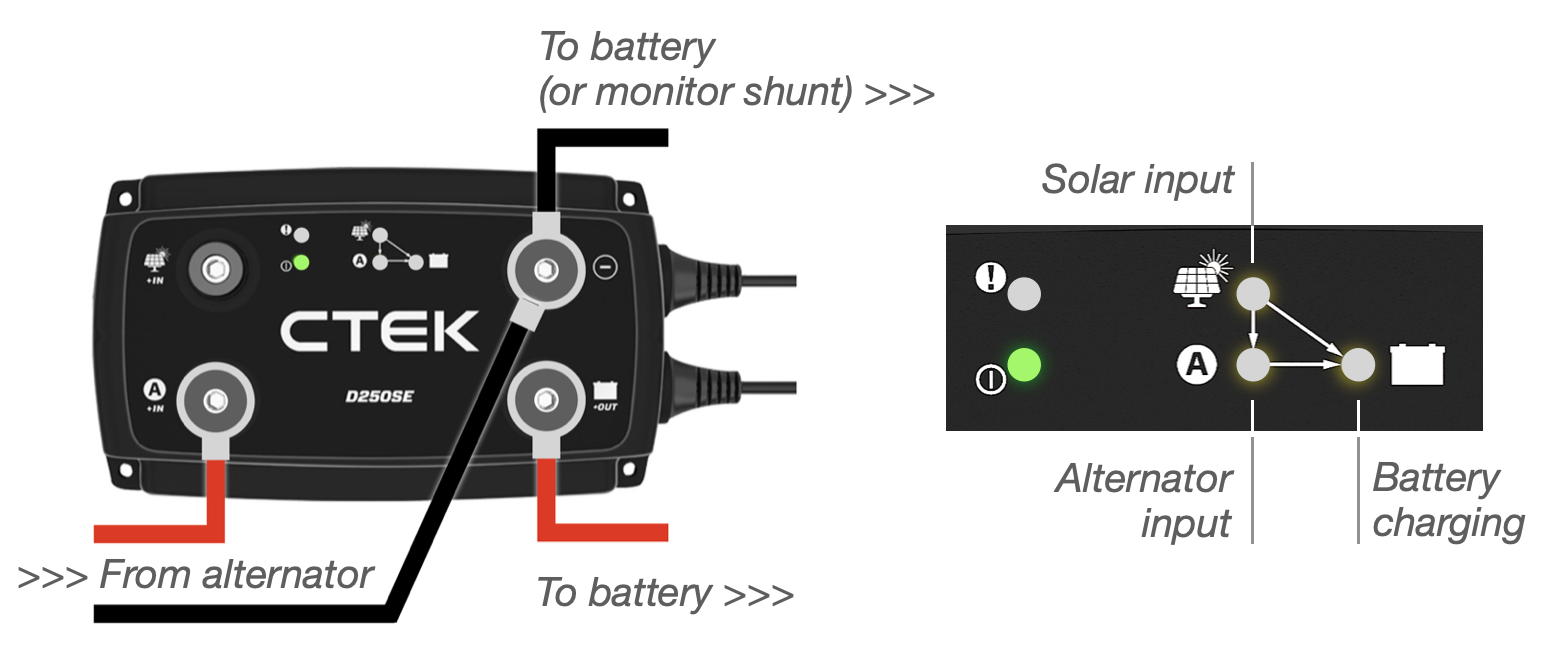
The DC-DC charger (CTEK D250SE) displayed a green LED, indicating that it was receiving electrical power, but the yellow LEDs indicating Alternator and Solar input were unlit. The battery monitor showed zero amps coming into the batteries from the alternator (via the CTEK charger) when the engine was running.
So, was there a problem with the cabling between the charger and the batteries? Was the battery monitor reporting incorrectly? Was there a problem with the solar panel connection? Was there a broken connection in the alternator cabling? Was there one fault somewhere causing all the other issues?
To cut a long investigative story much shorter, we used a multimeter to check all the cables and connections between the vehicle’s battery / alternator and the house batteries – ditto for the cables connecting the solar panels to the house batteries.
Working in the camper, we disconnected the cables coming from the alternator to the DC-DC charger, (via an Anderson plug fitted between the vehicle and the removable camper) and used the multimeter to check the voltage in the cables. The multimeter indicated a voltage of 12.8V when the engine was off, increasing to 14.6V when the engine was running.
So that seemed OK.
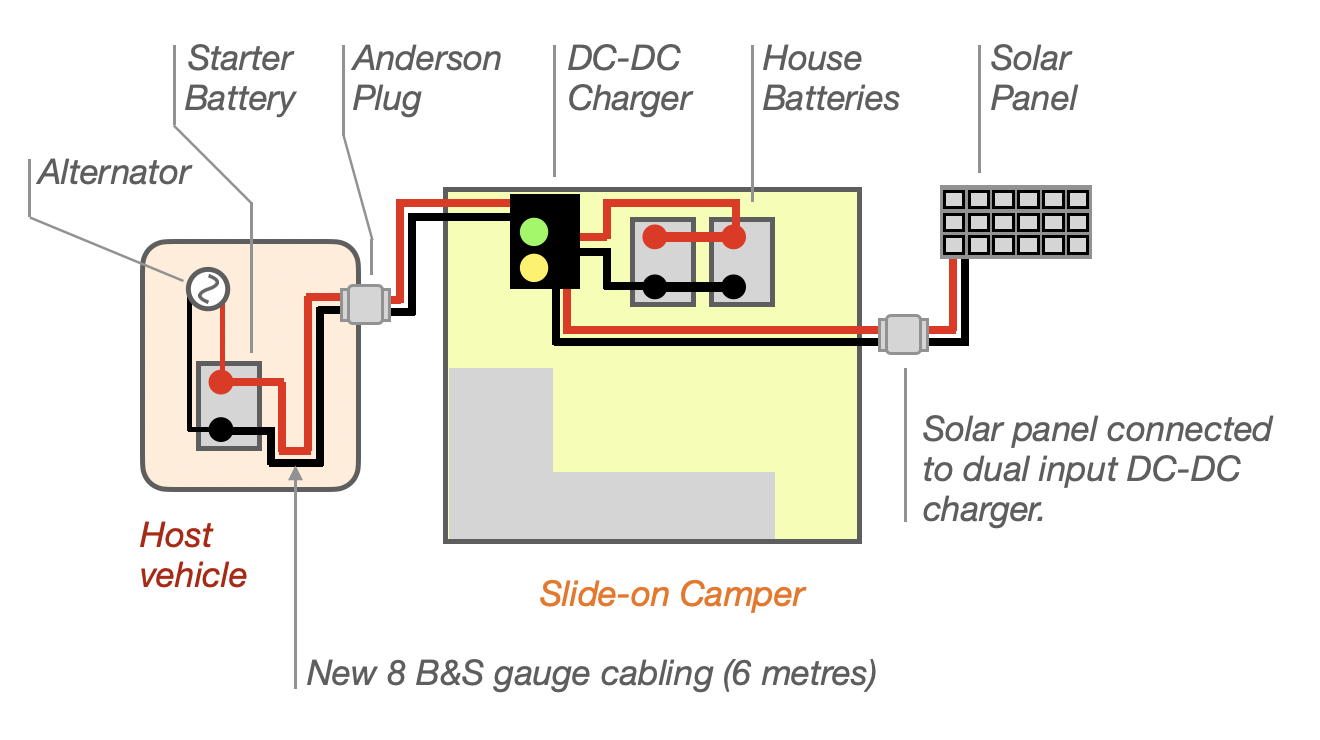
However, further investigation under the bonnet revealed a cabling anomaly – the cables in the engine bay, connecting the starter battery (and by default the alternator) to the external Anderson plug at the rear of the vehicle cab were older and a noticeably lighter gauge than the cables on the camper body running from the Anderson plug to the battery charger (8 AWG).
More exploration revealed that these cables were even lighter than they first appeared, with two layers of plastic insulation (making the cable appear heavier) enclosing a very light copper core.

A quick hookup of a heavier duty bypass cable (a modified 230V extension lead) from the vehicle battery directly to the charger in the camper resulted in the appropriate LED indicator on the charger being illuminated, and the battery monitor indicating that current was charging the battery when the engine was running – only about 4 amps, but we had only bypassed the +ve cable. (Electrical current flows from the battery to an appliance via the -ve cable, and returns to the battery via the +ve cable, so both cables need to be up to spec to ensure adequate current flow.)
After a trip to the local auto electrical store to purchase 6 metres of 8 AWG twin flex cable (around $11 / metre), an Anderson plug and a couple of eye terminals, we ran new cabling from the vehicle battery / alternator, under the vehicle (secured with cable ties) through to the location of the external Anderson plug, replacing the existing cabling. We then fitted the Anderson plug at the camper end of the new cable, and the eye terminals at the battery end of the cable, and connected it all together.
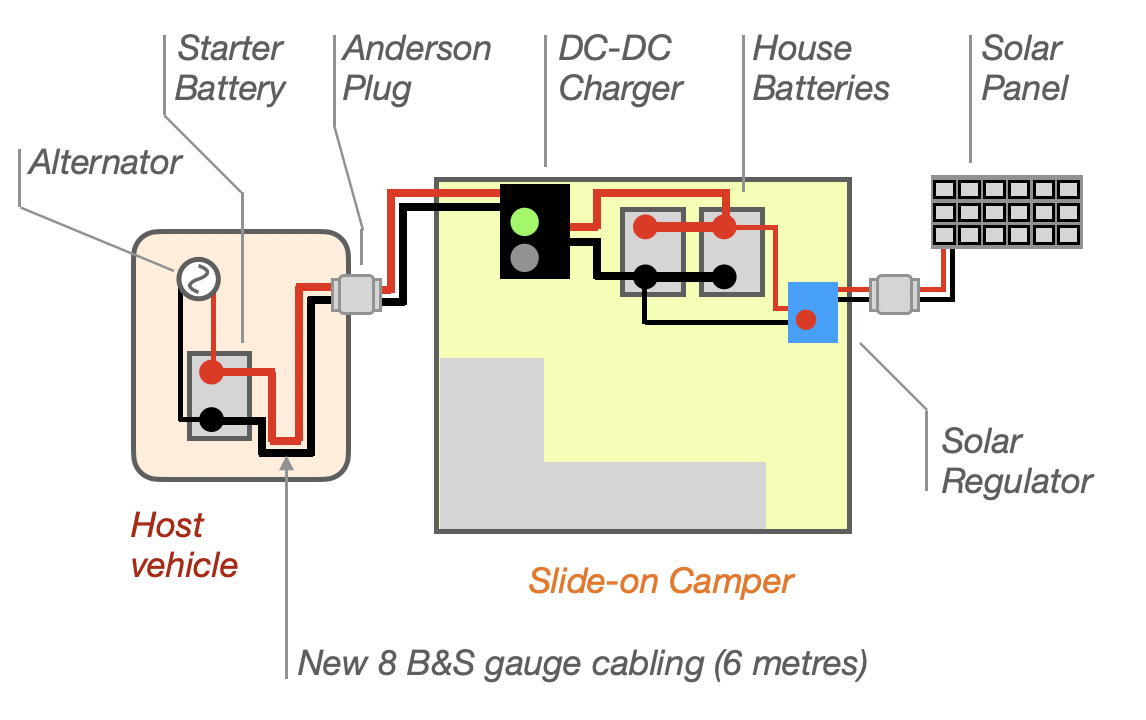
We started the engine, and after a few nervous seconds waiting for the charger to initialise, the appropriate LEDs illuminated on the charger and the battery monitor confirmed that we had 20 amps of electrical current charging the Lithium batteries. (The CTEK charger includes a Lithium configuration wire).
| Note: An important take-away from this exercise is to understand that a voltmeter connected to light gauge cabling will still display 12.8V if the cabling circuit to the battery is intact, even though the cable may not be able to carry the heavy current (Amps) required to support the load connected to the cabling. |
-
- See also: 12V Wire and Cabling >>>
How about the solar panel?
Although we now had current feeding in to the batteries when the engine was running, there was still no current coming in from the solar panels – critical for free-camping.
The solar panels were connected to the batteries independently of the DC-DC charger. They were connected through a separate PWM regulator, joining to the battery with alligator clamps via an Anderson connector. Hooking up an in-line ammeter indicated that there was no current flowing to the batteries from the solar panel.
Some investigating with a multimeter soon found that a solder joint inside the handle of one of the alligator clamps had completely failed. And let’s be honest here – the alligator clamps are really only suitable for a temporary connection anyway.
The CTEK charger also has a solar input terminal connecting to a built-in MPPT controller, which is a better charging option than the PWM technology in the standalone charger. A trip to the local Jaycar store to pickup an Anderson plug adaptor with fitted eye terminals and we were able to connect the solar panel directly to the CTEK charger.

Fortunately it was a sunny day and we were working outside – the LED solar indicator on the CTEK charger immediately came to life and the battery monitor indicated that (even though it was late in the day) an additional 4 amps of electrical current was now flowing into the batteries from the 150W solar panel.
All sorted
The vehicle alternator and the solar panel now both charge the batteries as per their published specification.
The battery monitor indicates that the alternator is charging when the engine is running and the solar panel is charging the batteries when the sun is shining.

-
- See also: Installing a Battery Monitor >>>
The moral of the story?
-
- Don’t skimp with 12V cabling.
- Use the correct gauge cable, especially over longer cable runs.
- Check cabling charts for current/length/gauge.
- Ensure all cabling connections/terminations (both crimped and soldered) are secure, robust, and fully functional.
- All cable terminations should be physically robust (crimped/clamped), even if also soldered, as soldered joints can deteriorate over time in a vibration-prone environment.
-
- See also: 12V Basics | 12V Wire & Cabling
- Case Studies: 12V power cut-outs | Battery not charging
DIY 12V Power | Batteries & Solar | Battery Recharging | Appliance Power Consumption