Sustainability: Batteries & Solar | Water | Heating
See also: Water usage | Install a Shower head extension | DIY Mini Projects
Do we really need town water?
When travelling we spend maybe fifty percent of our time staying in formal camping grounds, with mains electricity and town water availability.
These sites also provide access to shared amenities such as bathrooms and camp kitchens. The shower, toilet and kitchen facilities in modern caravan parks and campgrounds are often first class – though in some out-of-the-way places this is not always the case.
We have always had an external 230V power inlet socket, to hookup to mains power when available, to run appliances and charge our batteries, but until recently no town water inlet.
On a trip to the high country last winter we stayed a few nights in a top-notch caravan park with excellent on-site amenities. However, those amenities were a couple minutes walk via a gravel track. Quite an enjoyable stroll – until the temperature dropped to around 0ºC and the rain turned to horizontal sleet!
These conditions made our on-board shower look a whole lot more attractive when considering taking the crispy trek to and from the park showers in the rain – even though our ‘wet bathroom’ is a compact space and was dependent on our underfloor water tank.
This experience of a cold, wet walk to (and from) the amenities prompted us to install a town water connection in the van. Not to be used all the time, but just when we need it.
A town water connection provides the option of having a ‘regular’ shower in the van without consuming our on-board water supply. The park amenities are still there for use most of the time, but a town water connection provides a convenient alternative when required.
Making it happen
 Adding the plumbing for a town water connection to the existing plumbing in a van is not too difficult to do, and not too expensive – around $50 to $70 for the SHURflo inlet panel, plus maybe $50 for a few metres of water hose, some John Guest push-on elbows and joiner fittings, a non-return valve, hose saddles, cable ties, and a day crawling around under the van.
Preparing for a DIY installation, I dropped by our local Motorhome fit-out gurus – who had initially fitted out our van a few years ago – for some advice. When they advised that “it only takes an hour or so”, that they had all the parts on site, that they installed these regularly, and offered to supply and install the inlet and related plumbing for the cost of the parts plus an hour or two labour (a couple hundred bucks all up), I happily handed the job over to their experienced installers!
Retro-fitting to non-pressurised plumbing
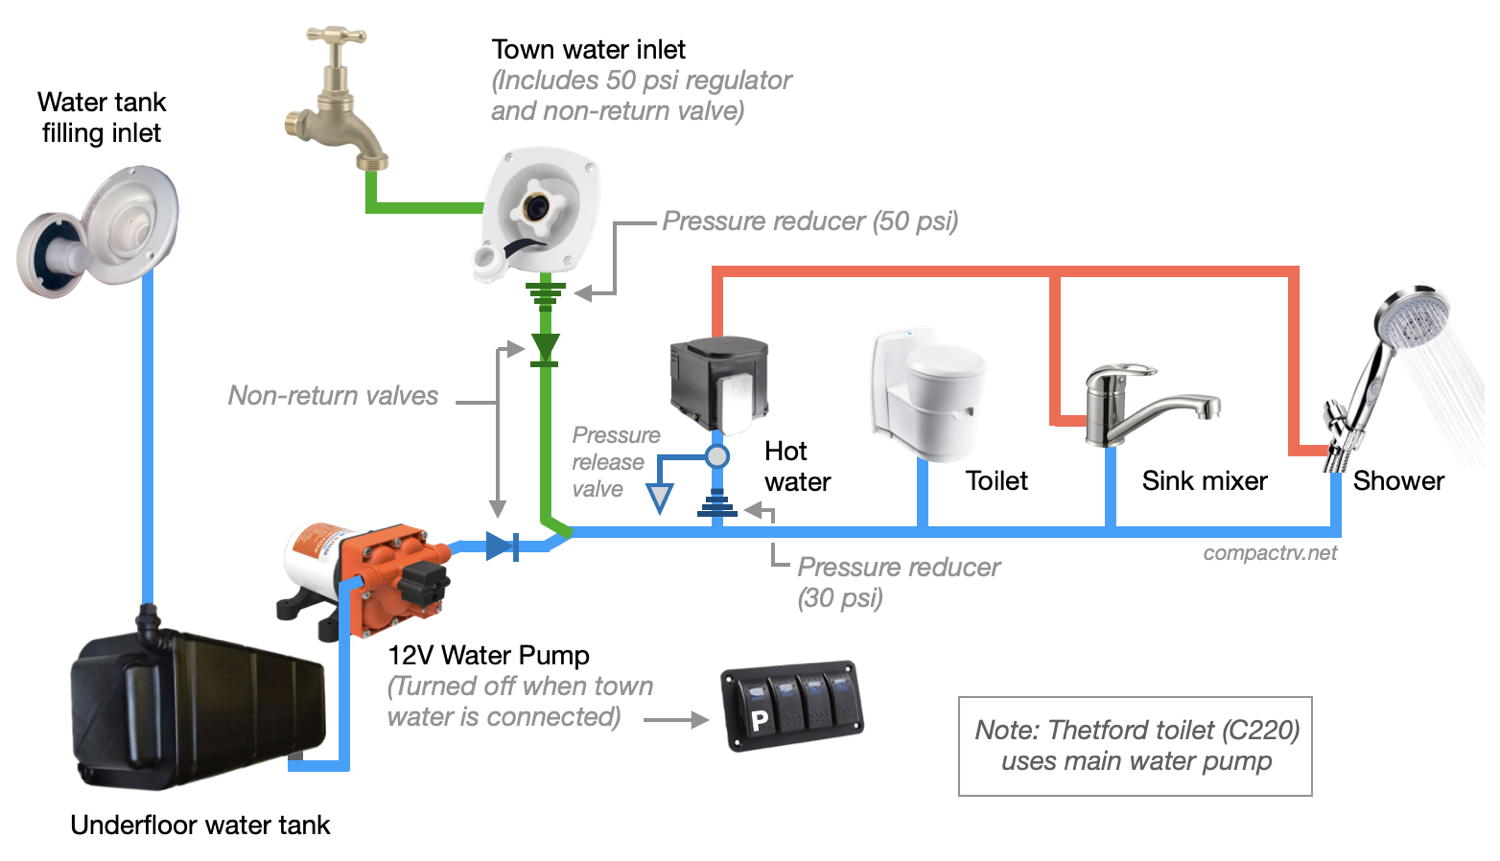
Note that in the scenario described here, the town water inlet joins the existing local plumbing system after the on-board water tank (and 12V water pump) – the on-board water tank is not pressurised, and the town water connection doesn’t add water to the onboard water tank. This tank still needs to be filled independently.
Non-return valves and pressure reduction valves are installed where required to protect the existing plumbing. Non-return valves and and pressure reduction valves are available through most caravan parts suppliers.
The DIY OptionIf you go down the DIY path, the only scary part of the job is cutting an (approx) 85mm hole in the wall of your van to install the inlet plate. (See Greg Virgoe’s video). Alternatively, fitting a click-on inlet connection (and pressure reducer) under the floor bypasses this issue, though the inlet fitting may be exposed to road damage, and could be more difficult to access when connecting and disconnecting the town water hose.
You will need enough pipe to run from the new inlet to the existing plumbing – connecting to the existing plumbing on the ‘appliance side’ of the 12V pump – plus a John Guest non-return valve, elbows, a Y-divider (to join the pipe from the new inlet into the existing plumbing), locking clips, etc. A stainless steel braided water hose (as used under kitchen sinks and bathroom vanities) is handy for the connection directly to the rear of the wall-mounted inlet panel, providing some flexibility in bringing the plumbing through multiple body panels. This hose is in turn connected (using an appropriate adaptor) to the 12mm semi-rigid poly plumbing which runs under the vehicle (secured with hose clamps and cable ties) to where it joins the existing plumbing – via a ‘Y connector’ on the ‘appliance side’ (outlet side) of the 12V pump. (See schematic diagram above.) |
 Connecting the new water inlet to the existing plumbing is straightforward. Our van is plumbed with readily-available
 Location, location, location
The physical location of the inlet on the wall of the van is a critical consideration. Ideally (but not always!) caravan parks provide water and drainage facilities on the driver’s side of a Campervan (when you reverse onto the site), or in a pod near the rear of the van, servicing multiple sites. This avoids having hoses and cables draped through the under-awning living area on the ‘house’ side of the van.
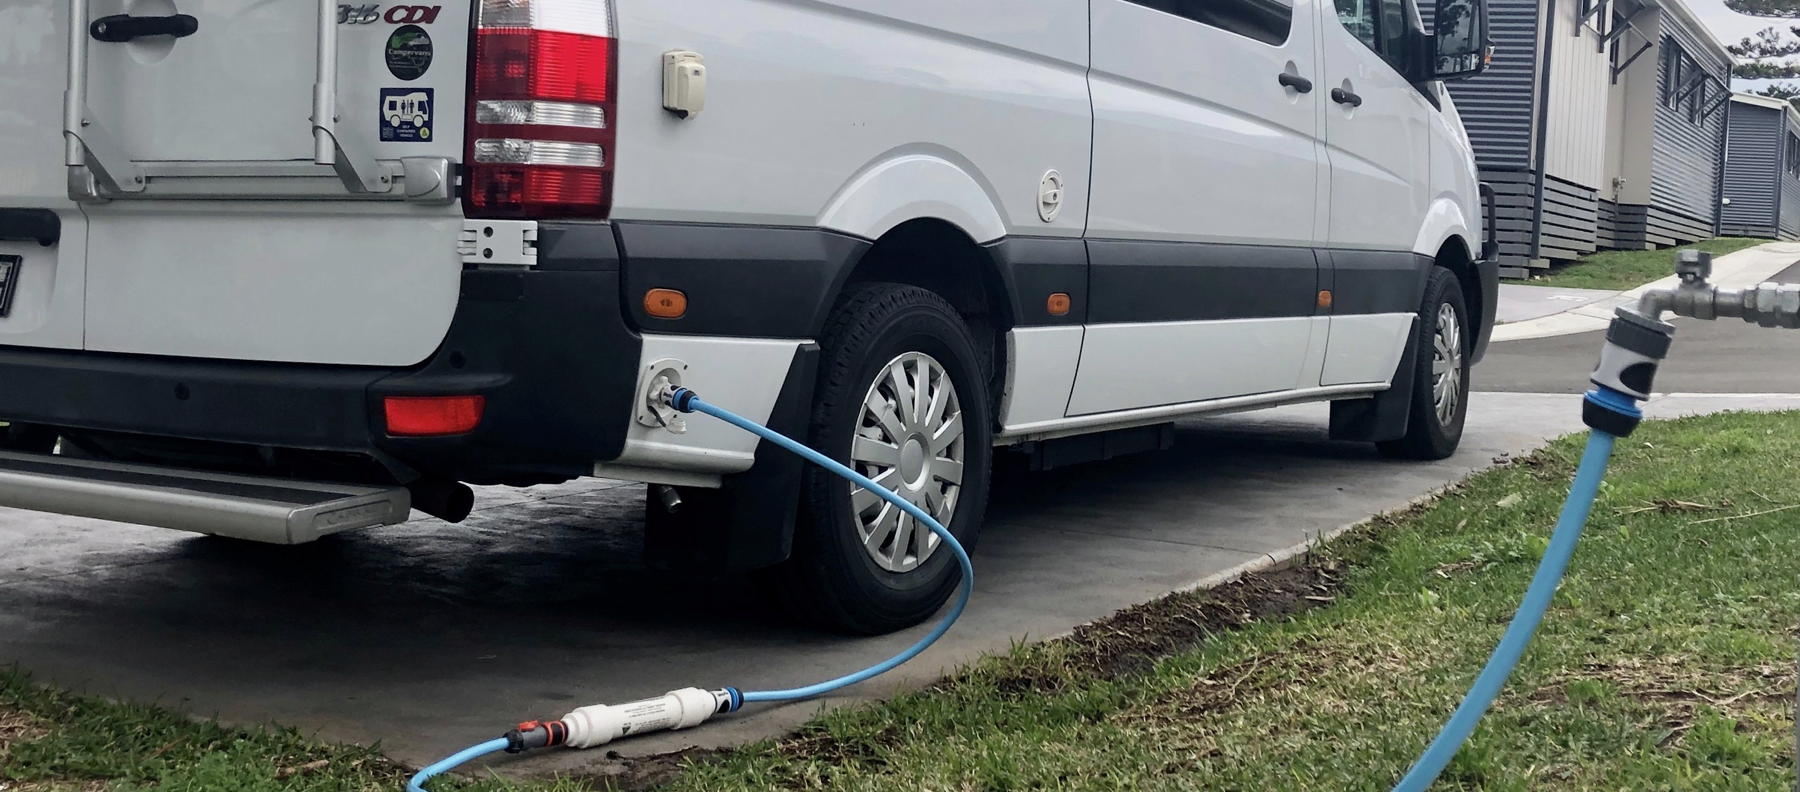
Our Sprinter van also has a sliding door on the driver’s side, so the inlet has to be mounted clear of the sliding door. Which makes the only suitable location (other than an underfloor mount) towards the rear of the vehicle.
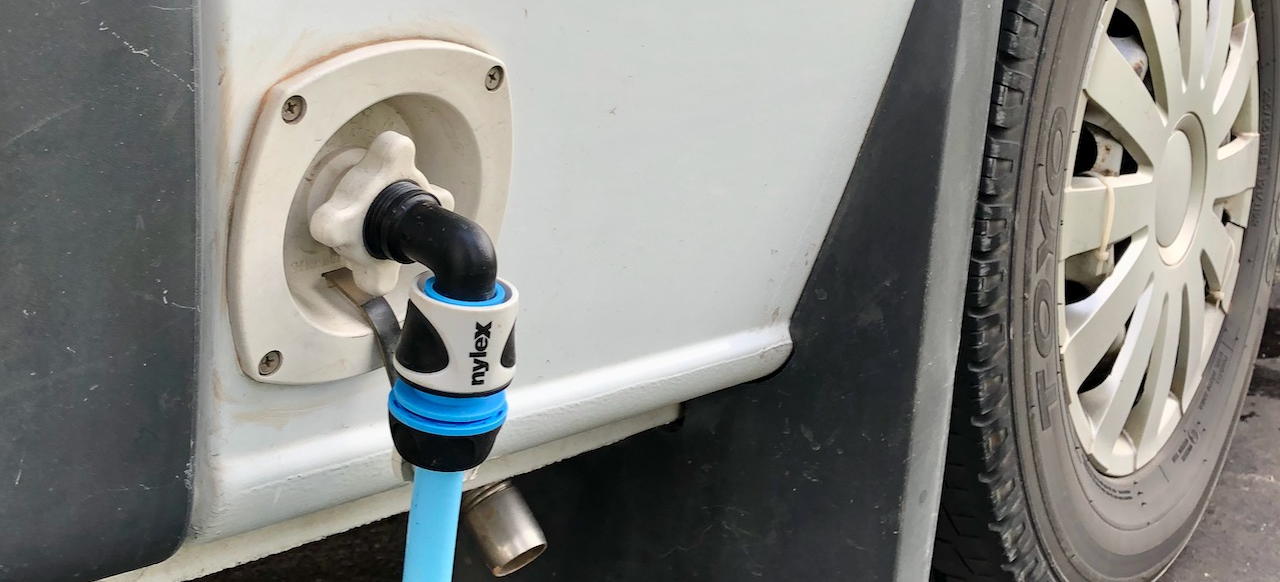
Given that all the van’s water plumbing is under the vehicle, the mounting location is narrowed down even further – down low on the rear of the driver’s side of the van becomes the obvious position (on our van) to retro-fit an inlet connection – in our case in the small panel just behind the rear wheel.
Under pressure
Water pressure and water flow are both important considerations when installing a town water connection in a van that already has plumbing fitted – plumbing designed for use with a low pressure 12V water pump.
 The Shurflo town water inlet includes a pressure regulator to reduce the incoming water pressure to 50 psi (~350 kpa) so the internal plumbing in the van isn’t compromised by a high pressure town water connection. (‘Standard’ town water pressure in Australia is around 70 psi, but can be as high as 100 psi).
The Shurflo inlet fitting also includes a non-return valve so that when the on-board pump is in operation (when not connected to town water) water isn’t pumped out through the town water inlet.
Note: We have experienced some pressure-related issues since installing this inlet, including with water leaking from the rear of the inlet panel itself when connected to high pressure outlets, albeit in very cold conditions – so we are not 100% sure how well the inlet’s pressure reduction mechanism works in these situations. Hence the ‘extra pressure protection’ of the inline pressure reduction valve discussed below.
Hot water heater: Hot water units are sensitive to water pressure, and will most likely already have a pressure reducer installed. Our Truma UltraRapid unit has an inline pressure regulator fitted to further reduce the incoming water pressure to 30 psi (~200 kpa).
Check your installation – ensure that your HW unit’s pressure reducer is installed on the ‘supply side’ of the drain valve, otherwise your drain valve may leak when connected to town water at 50 psi. (Our existing HW pressure reducer was plumbed on the tank side of the drain valve, and the drain valve leaked when mains water was connected, even though it was reduced to 50 psi by the inlet fitting. We fitted an additional 30 psi pressure reducer on the supply side of the drain valve, which resolved the issue.)
12V Water Pump: The town water inlet joins the existing plumbing on the outlet side of the 12V water pump. We fitted a John Guest non-return valve on the outlet side of the 12V pump (between the pump and the mains water Y-connector) to prevent pressurised town water from ‘pushing back’ into the pump (see schematic diagram above). Remember, these devices are designed to operate in low pressure environments. Even the reduced pressure from the SHURflo inlet panel (50 psi) may be too high for low pressure pumps. Non-return valves are available from most caravan parts suppliers for around $25.
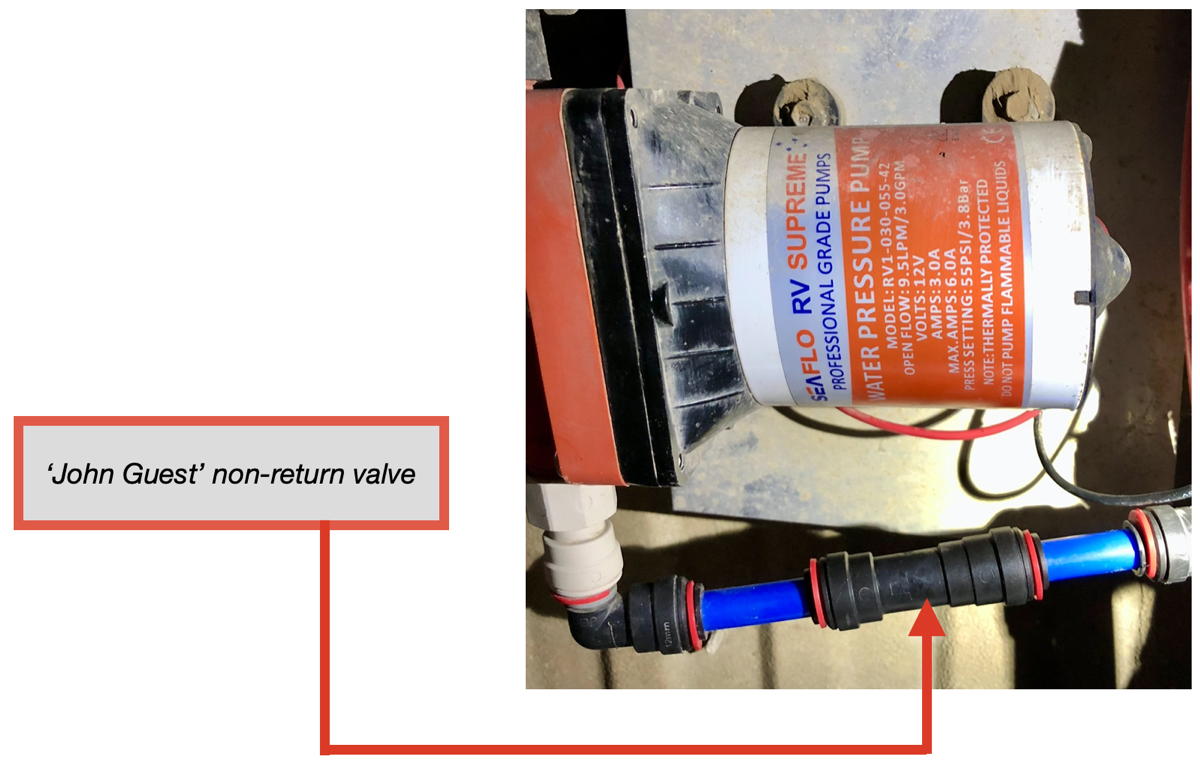
Update: A representative of Seaflo’s Australian distributor (Ian) has advised that Seaflo pumps now include a non-return valve in the pump discharge outlet, to protect the pump from high pressure water incursion. Ian also advised that although the pumps have this valve fitted, the installation of an external non-return valve is still ‘good insurance’ against mains pressure water impacting the pump.
Extra pressure protectionOK, this may be going to the extreme level just a tad, but if you regularly visit areas with a very high pressure mains water supply this might be worth some consideration. This external pressure reduction would also be useful if you plumbed a DIY snap-on inlet under the van, rather than using a pressure-protected Shurflo inlet panel…. On a recent trip through the Victorian high country, in winter, we experienced a couple of hose connection / leaking issues when connected to some town water outlets. These outlets appear to have been supplying water at higher-than-normal pressure, in temperatures around 2°C (which may have also been a factor).
The adaptor shown above costs around $48 from DK Stainless in Brisbane, and is adjustable from 50 psi (350 kpa) down to 20 psi (150 kPa). (Similar valves may also be available from other suppliers.) In the case of the valve above, you will also need a 1/2” Hex Socket and a 1/2” Hose adaptor to connect to regular click-on hose fittings. These adaptors are also available from DK Stainless. Also worth packing in your hose connection kit is a tap adaptor with a 1″ female fitting and 3/4″ male fitting, for connecting the pressure reducer to older campground faucets with 1″ threads. (Just have to make sure you don’t leave it all behind when you disconnect!) |
 We have now added an adjustable pressure reducing valve to our kit (pictured), for an extra layer of ‘pressure protection’ where required. Just in case. The regulator fits on the campground faucet, supplying our water connection hose with a reduced-pressure water supply, and should insulate our whole water system from overly high pressure supplies. (Yet to be tested!)
Getting Connected
 An adapter is required to easily connect your external hose, with click-on fittings, to the screw fitting on the Shurflo water inlet panel.
The Shurflo inlet panel features an American NPT-3/4″ thread (National Pipe Taper). This tapered thread requires a connector with the same thread.
Appropriate adaptors, with the required American NPT-3/4” thread, are available from most caravan and RV equipment supply stores. Include one of these in your order when you purchase the inlet panel.
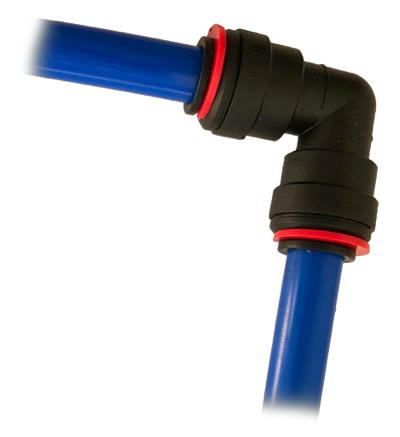
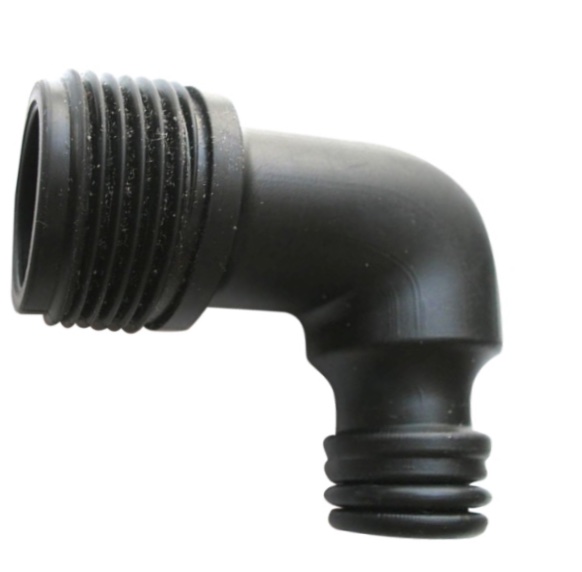
We use a 90º elbow fitting, as shown in the image above. (Though we did initially use a regular ‘straight’ brass fitting, which was fine too.)
The 90º elbow adaptor keeps the external hose closer to the van, reducing the potential for a trip hazard, and removing some of the downward leveraging pressure caused by a heavy hose weighing down on a horizontal connection on the side of the van.
The only fitting of this kind that I have been able to find is made from black PVC – which raises some questions in my mind about its long term use for drinking water if the plastic degrades due to heat, etc. However, the thread is a true American NPT tapered thread, and it is designed and sold for use in this particular environment, so maybe my concerns are misguided. (See: Coast RV or CampSmart).
Parts suppliers can also supply regular (straight) brass or plastic adaptors with the appropriate American NPT thread, if you prefer this option.
I would suggest buying a couple of adaptors, leaving one in the spares box for when one inevitably goes missing. Ditto for other hose fittings, especially tap adaptors.
There are adaptors – and there are adaptors…
The dimensions of this thread are almost the same as the more commonly available (here in Australia) BSP thread (British Standard Pipe). Almost – but not exactly the same. Just to make it even more confusing there are BSP parallel threads and BSP tapered threads, the latter of which will ‘kinda’ fit the Shurflo panel, and can be used at a pinch. Adaptors with a BSP thread are widely available at local hardware and gardening supply stores, generally sold as sprinkler adaptors. Some of these adaptors have a standard BSP parallel thread, and others appear to have a BSP tapered thread.
While adaptors with a parallel thread look the same, and appear to fit the Shurflo inlet panel OK, they do not seal effectively and will leak under the pressure of a mains water connection. Adaptors with a BSP tapered thread may fit and seal OK, but it is very much ‘hit and miss’. My advice – save yourself a headache and buy an adaptor with an American NPT 3/4” thread through a caravan parts supplier. Example: Caravans Plus – Click-on Fittings Whichever adaptor you choose, check the fit in the Shurflo panel socket with a hose connected, and turned on, to be sure it doesn’t leak – before heading off on your first trip. |
 The Shurflo inlet panel features a tapered screw thread – an
Hooking up
You will need a ‘drinking water quality’ hose to hookup to the town water connection in the campground. These hoses are usually blue in colour and are available from caravan equipment suppliers.
We carry two of these hoses – one can be used for close-by hookups, while the two hoses can be joined with a two-way coupling for that occasional extra long run to a distant tap.

Keep it clean
A wide range of water quality is on tap across the country, especially when you get off the beaten track. We always connect a B.E.S.T in-line water filter between the park tap and the external water inlet, just in case. These filters are available from most caravan parts suppliers.

Under control
Another useful addition to the hose connection setup is a flow control valve, fitted to the ‘van end’ of the hose. This can make connecting and disconnecting the hose from the van’s town water inlet easier, especially where the mains tap outlet is some distance from the van.

The flow control valve can also be used to reduce incoming water pressure.
These fittings are widely available in most garden supply centres and hardware stores
Up and running
 Once installed and connected, the only preparation for using town water is to turn off the 12V on-board water pump at the control panel switch – the pressure of the town water connection replaces the need for the local pump.
We are now able to take showers in the van, when connected to town water, without depleting our on-board water supply. The town water supply is also available at the sink outlet for washing dishes and cleaning teeth, and to flush the toilet (our toilet doesn’t have its own pump).
Of course, the down-side of being hooked up to town water is having to disconnect and roll up hoses if leaving the site temporarily.
Note: Our Thetford C220 toilet uses the main van pump. Check your van’s electrical wiring to ensure power is still available to your toilet flush switch when the main 12V water pump is turned off. Most modern vans have these units on separate circuits.
 Connecting a sullage drain hose to your grey water tank drain tap is also recommended, as your grey water tank will fill quickly when using town water for longer showers. (Our shower head delivers warm water at around 4 litres per minute when connected to town water.)
The Truma hot water tank in our van heats water to 70ºC (on mains power) and holds 14 litres, which is mixed with cold water by the mixer tap in the shower. This provides enough warm water for around 7 to 8 minutes of continuous showering – which is way long enough for both of us to have showers of a reasonable duration. (It only takes a few minutes to reheat between showers if required).
Showering times could be extended with a larger hot water tank (eg a Swift 20/28 litre system) or an ‘instant’ water heating system, although I hear mixed reports about the performance of the instantaneous systems. Of course, a larger tank consumes more physical space and more of your GVM. (1 litre of water = 1kg.)
Frozen moments
 If staying in locations where overnight temperatures drop to below freezing, water laying still in nylon water hoses can easily freeze, and hoses may be damaged as a result. The couple of times we have used our town water connection in these conditions we have drained and rolled up our hose and stored it under the van for the night, reconnecting to the campground faucet in the morning.
Some more DIY…One thing leads to another….
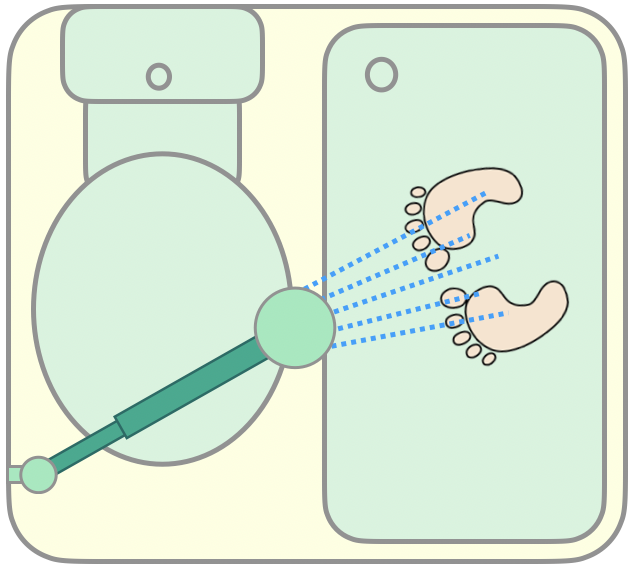
We have added a short extension post to the shower head mounting bracket in our ‘wet bathroom’ to bring the shower head further into the bathroom cubicle, reaching out over the toilet for more comfortable showering. This involved manufacturing a small extension post from PVC pipe >>> |
 A town water connection provides an option for ‘normal’ continuous showering.
On the level
 Another useful accessory, if using the on-board shower more frequently in caravan parks (on nearly level sites), is a set of levelling ramps to ensure that the shower drains to the floor waste.
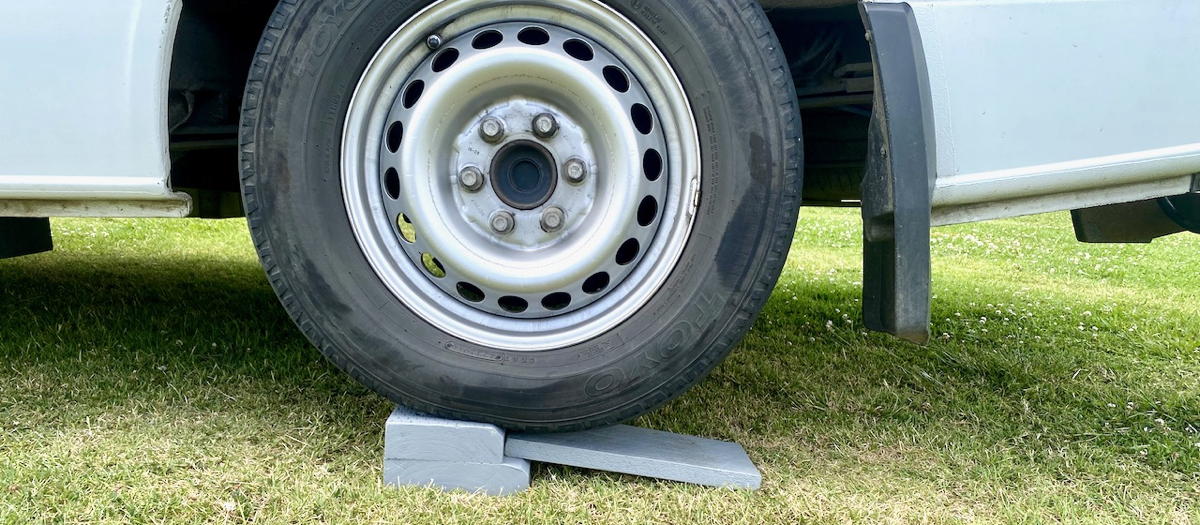
We also carry a more portable mini-ramp, made up of pieces of H3 timber offcuts – a small step and a ramp – which is easier to store and quickly deploy when required to assist the shower draining on ‘nearly level’ sites. (We built this ramp to specific dimensions to suit a particular unused storage space in our van.)
Sustainability: Batteries & Solar | Water | Heating