Fit-out: Layout | Appliances | Accessories | Suppliers
See also: DIY Mini Projects >>>
On the Road
As discussed in previous pages, we spent some time investigating a variety of van options, before choosing a medium wheelbase Sprinter as our base vehicle. The 6 metre length fitted neatly with our idea of a van that could be used around town while still providing all the conveniences for extended trips away.

Next step was to fit out the interior with all our creature comforts – lots of decisions, lots of looking around at all the options, and plenty of compromises!
|
A Professional Fitout
They were great to work with, and were happy to customize their base design to suit our individual requirements. All cabinetwork is constructed from 12mm plywood, finished with a laminate surface. The weight of the materials used in the fitout is a critical factor in keeping the van within its registered Gross Vehicle Mass (GVM) of 3550 kg. Another important consideration was that the Campervan Australia guys were able to install and certify all the electrical and LPG equipment to meet government registration regulations. |
 While we had a fair idea of our preferred layout options, the living area of our van was fitted out by Ben, Paul and the team at
 The Base Layout
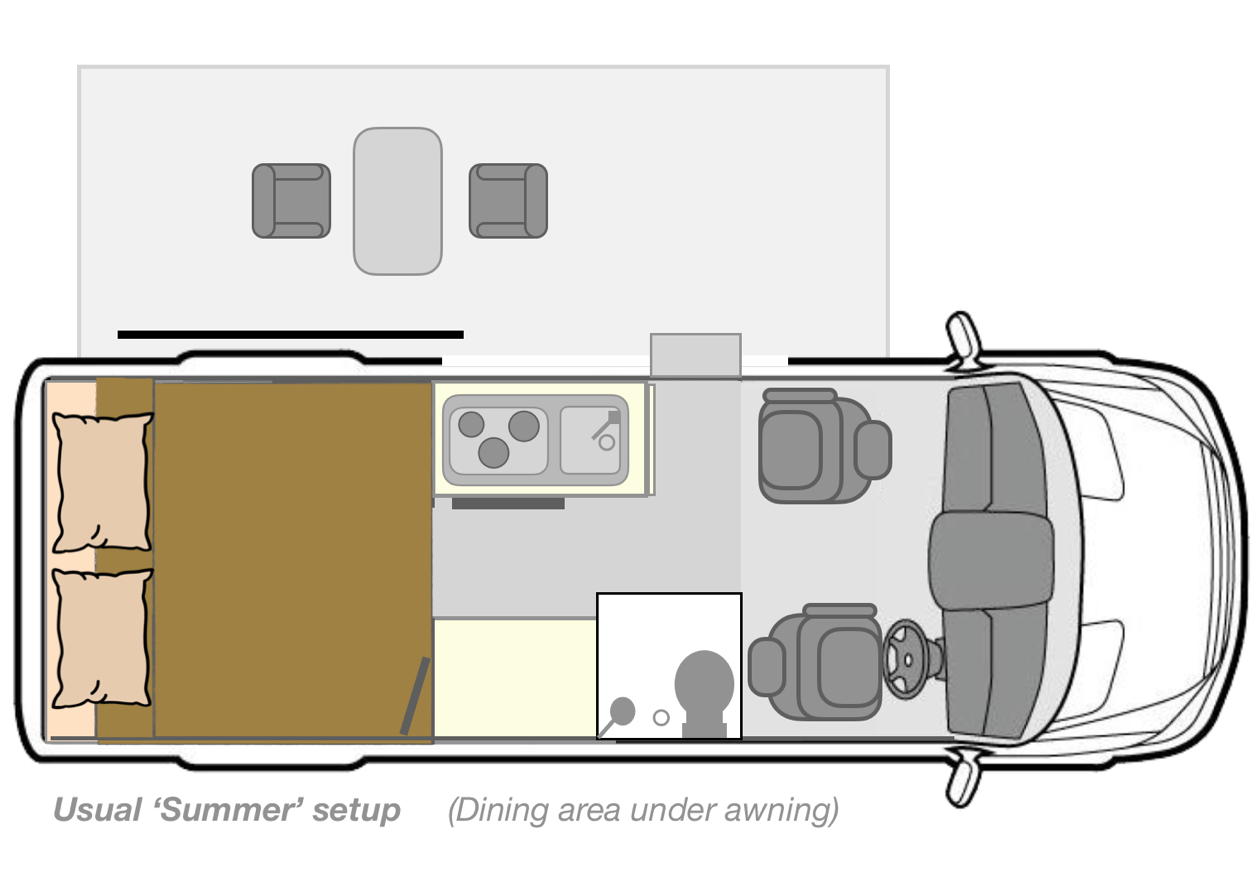
The dimensions and structure of the medium wheel-base Sprinter van (6 metres overall length) generally define the options available for a standard campervan fit-out with kitchen / dining / bathroom / sleeping areas. There aren’t too many unique arrangements for cabinetwork and furnishings in a 3.5m x 1.8m rectangle.
Here is the interior layout of our van….

Up front we have a full walk-through from the cab. For us this was an essential feature – for site arrivals in crook weather and easy lunch stopovers in highway rest areas. The passenger seat swivels to extend the living area into the cab space, in combination with a fold-up table at the end of the kitchen bench.
The bathroom unit (combined shower / toilet) is installed directly behind the driver’s seat. This location makes use of the sliding door on the driver’s side of the van to access the toilet cassette and to house the LPG bottle, without cutting into the walls of the van (see photo at the bottom of this page.) The bathroom door includes a full height mirror.
Directly behind the bathroom unit is a floor-to-ceiling storage unit, divided into cupboards and drawers, housing kitchen utensils, a microwave oven, electrical controls and monitors, and a wardrobe. (We have since converted the wardrobe compartment to shelving – who needs to hang clothes when camping!) The rear wall of this unit is fitted with a TV / DVD screen viewable in the bed / dining area.
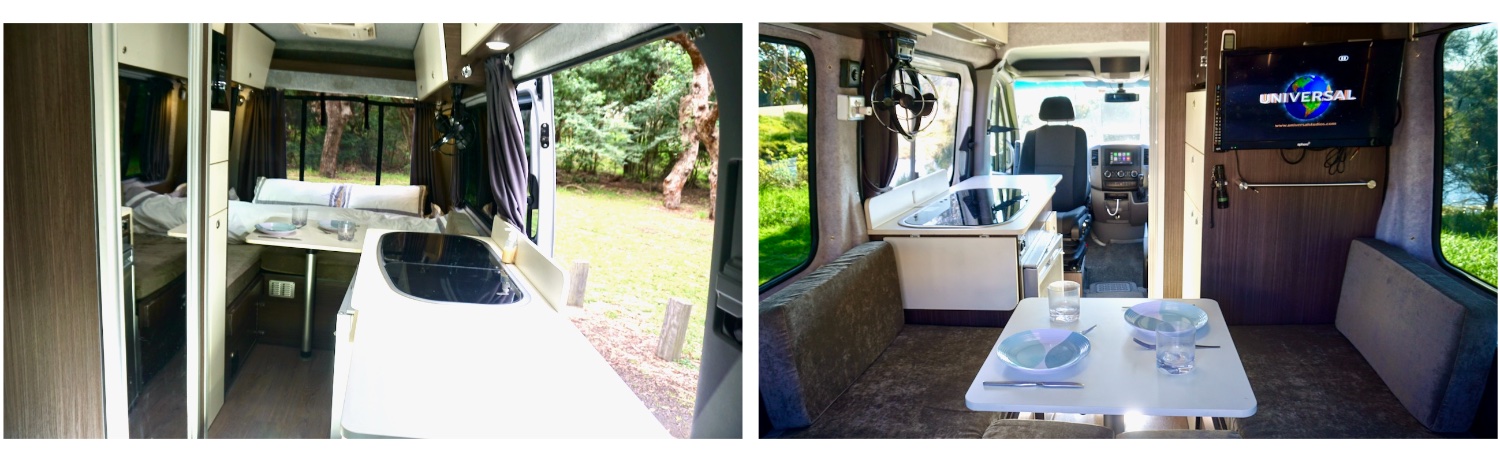
The kitchen unit – refrigerator, cooktop, slide-out pantry and sink – is fitted on the passenger side of the van, opposite the bathroom and microwave oven unit, taking advantage of the ventilation and access offered through the kerbside sliding door.
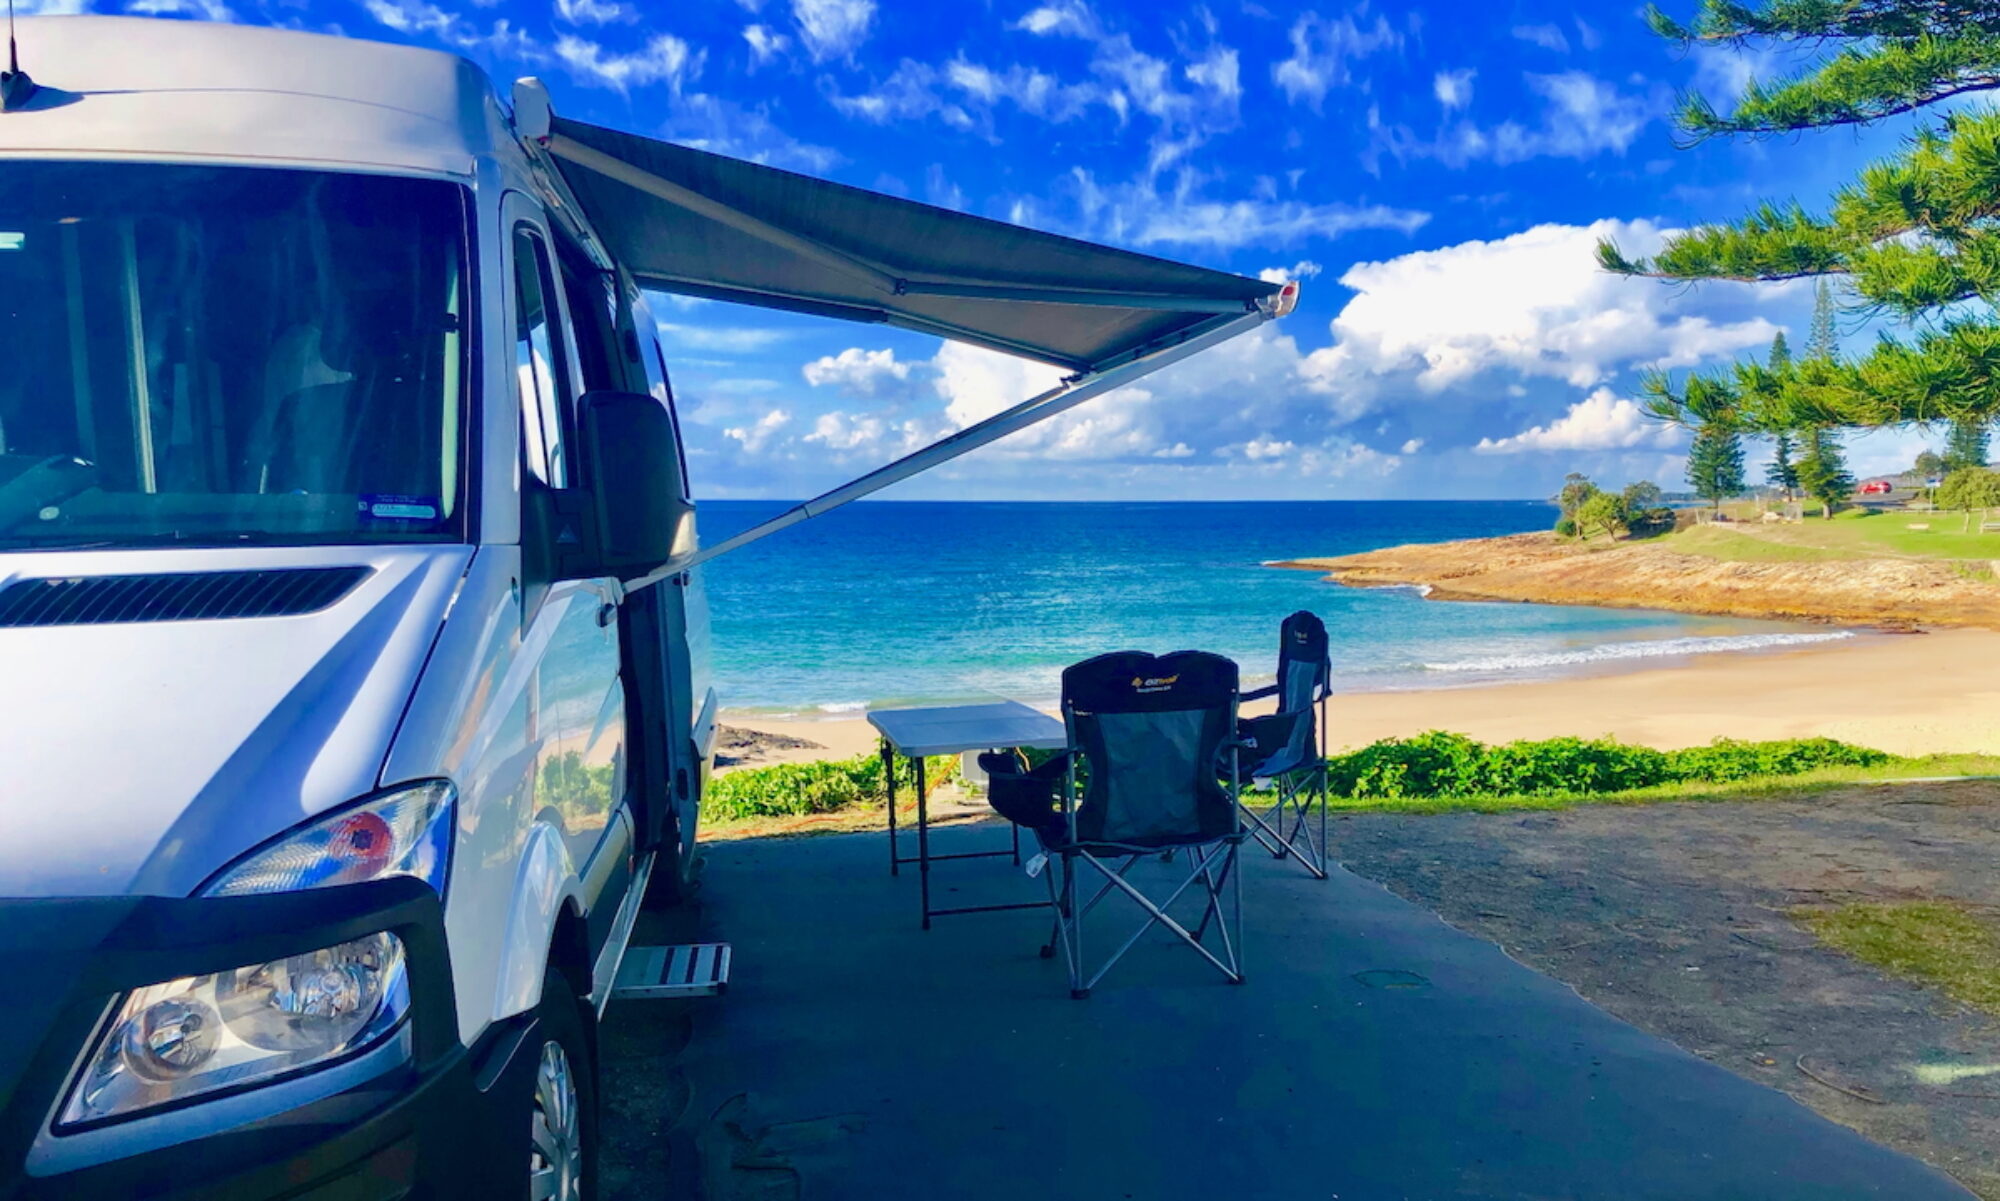
This galley location integrates neatly with the outdoor living area, which is enhanced with a Fiamma wind out awning fitted to the side of the van.
-
-
- See also: Awning privacy screens >>>
-
This is how we use the van most of the time, particularly in summer – the bed permanently made up, and the living / dining area setup under the awning outside the van. It is only in cold or rainy weather that we roll back the bed to setup the dining table or create more living space inside the van – which only takes a minute to do.

Back inside the van, fold-up tables fitted to each end of the galley cupboard extend the kitchen bench area. The front-most fold-up table can also be used as a dining / utility table in conjunction with the passenger seat when the seat is rotated 180° to face the rear of the van – extending the usable living area inside the van.
The Overheads
The original metal roof of the van has been replaced with a high-top fibreglass roof. The top of the roof is fitted with a Winegard TV antenna, a 200W Redarc solar panel, two roof vents (bathroom and living area) and a Dometic air-conditioning unit.
Although replacing the roof is not essential, the increased height provides not only more headroom, but also accommodates valuable cupboard space for clothes over the dining / sleeping area, and for kitchen / cleaning utilities above the galley. Of course this could also be achieved by using an original high-top van.
Climate Control
Off-grid heating is provided by a thermostatically controlled diesel-fuelled heater installed under the bed in the rear of the van, ducted to an outlet adjacent to the table.
The van is also fitted with a rooftop air conditioner, though we don’t use it very often. It has been handy for nights in summer when the temperature has been up over 40ºC, taking the heat out of the van and helping us get some sleep. We use the Sirocco fan more regularly, to provide air movement on warm nights.
Rattling around
|
 We have fitted small felt pads to every cupboard door and any contacting surfaces, as well as carefully adjusting all catch mechanisms, to eliminate (or at least minimize) cabinet rattles on rough roads.
A Permanent Bed
All the above is a widely accepted ‘standard’ layout in this type of van. Another common bed/seating arrangement is to have bench seats on each side of the living area, sliding out to form a double bed at night. Our van was originally configured with this layout, with a very convenient electrically operated mechanism that moved the bench seats into place to form a double bed at the touch of a button.

To create a double bed, this layout requires a complete remake of the bedding each evening – something we were hoping to avoid. However, maintaining a permanently made-up bed while preserving a separate seating / dining area is a big ask in a compact van.
We initially experimented with a permanent ‘east-west’ bed across the rear of the van, with a dining area between the bed and the kitchen area. This arrangement also provided a much-needed storage space for large items under the permanent bed area – storage not available with the two bench seats.
Unfortunately, our first night away confirmed that the east-west bed setup didn’t provide enough head room and stretch-out space. For us, the Sprinter van is simply too narrow to sleep across, even for our modest body frames. The east-west bed arrangement also requires the person sleeping at the back of the van to climb over their partner to get out of the bed.
We have now settled on a compromise bedding / lounge arrangement, by having the same basic U-shaped layout as with an east-west bed, with the bottom of the ‘U’ (the ‘east-west’ part) made up as part of the semi-permanent north-south bed.
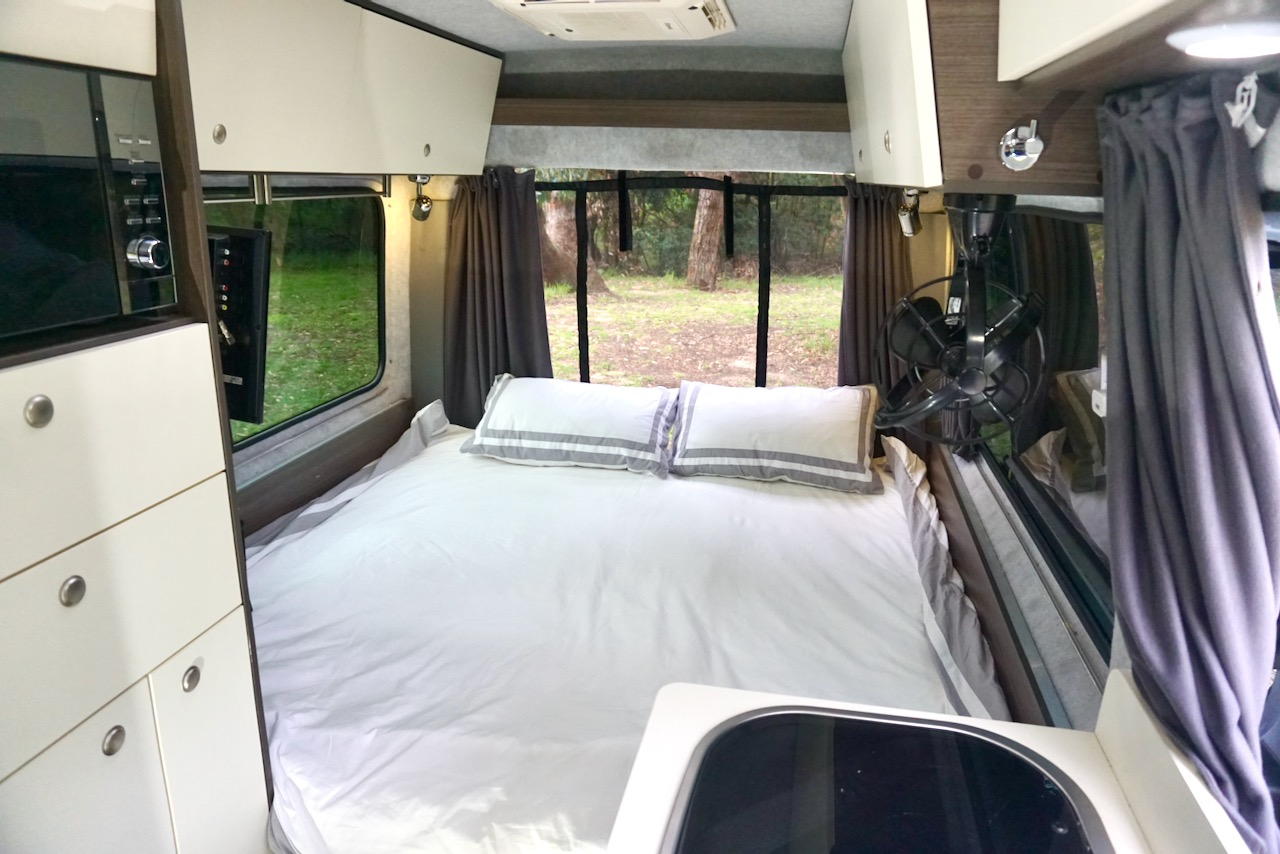 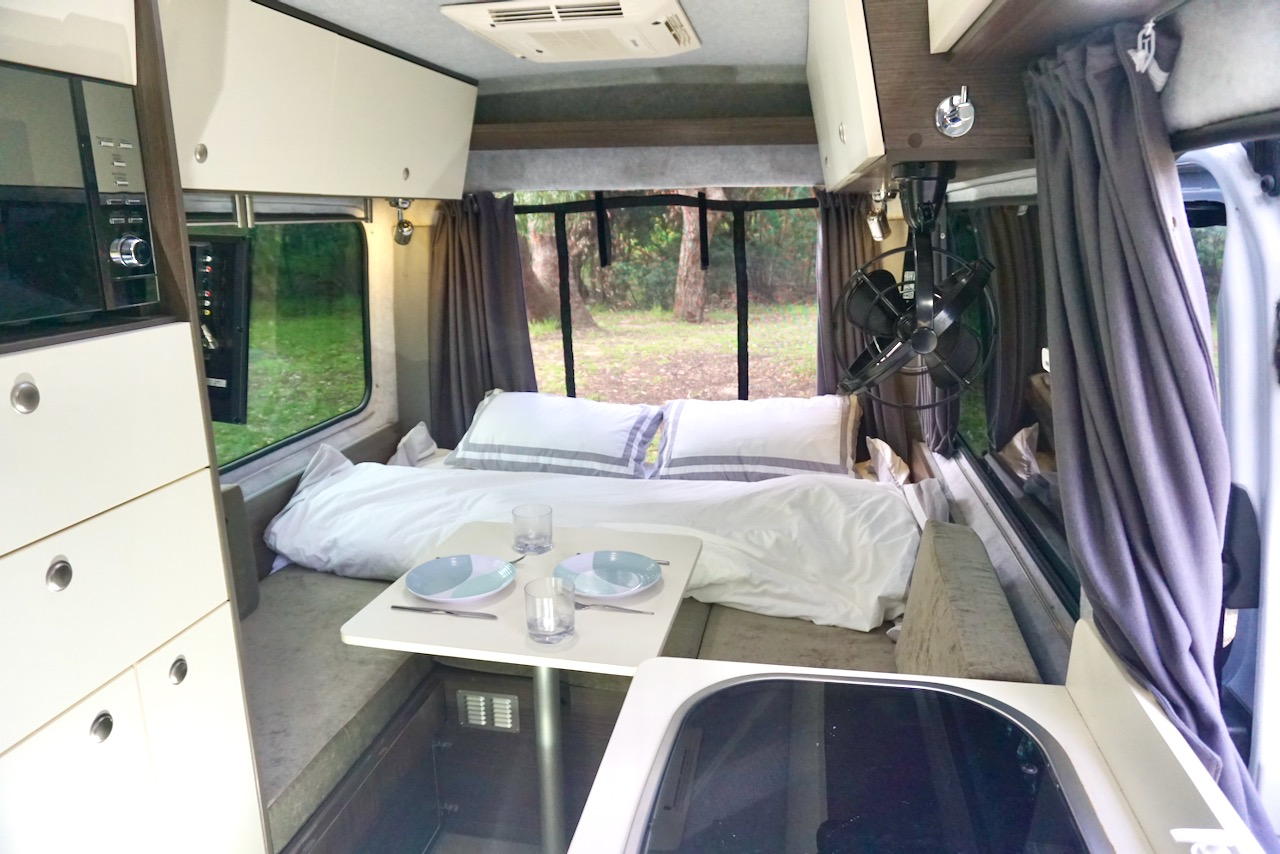 |
The ‘arms’ of the U form dining seating when required. The dining table, stored behind the driver’s seat when travelling, fits neatly between the seats to complete the internal dining area (see pictures above).
At night the table drops snugly into position to fill the centre of the U, topped with the seat-back cushions, to form a full-size north-south bed (1670mm W x 1850mm L). The bedding covers roll forward to complete the Queen-size-width sleeping area. These covers are easily rolled back to reclaim the dining area when required.
This isn’t too much of an issue for us. The bed remains fully made up most of the time, as we live outside the van in the warmer months. It is only when conditions are unsuitable for outside living that we need to roll back the bedding to create the internal lounge/dining area – usually as a result of cold or rainy weather, early winter darkness, or insects. Or maybe a late night arrival in a road-side rest area.
This could be simplified even further if you preferred to use sleeping bags or Duvalays rather than a fully made up bed with sheets and blankets or a doona. Of course, if two single beds were required, this would be even less of an issue.
-
-
- Sleep on it – Details of our bed / storage modification >>>
-
Cargo Storage
Regardless of whether the bed remains fully made up, or rolled back to provide an inside dining area, we have a permanent storage compartment under the centre section of the main bed – used to store bulky items such as levelling ramps, our portable solar blanket, a fold-up table, camp chairs and a Weber Baby Q oven.
This area can also be easily modified (through a clip-out divider at the front end) to extend access to the inside of the van. This is a useful option for carrying long items such as surfboards, skis, or snow boards for weekend trips, or accessing the storage area from inside the van.
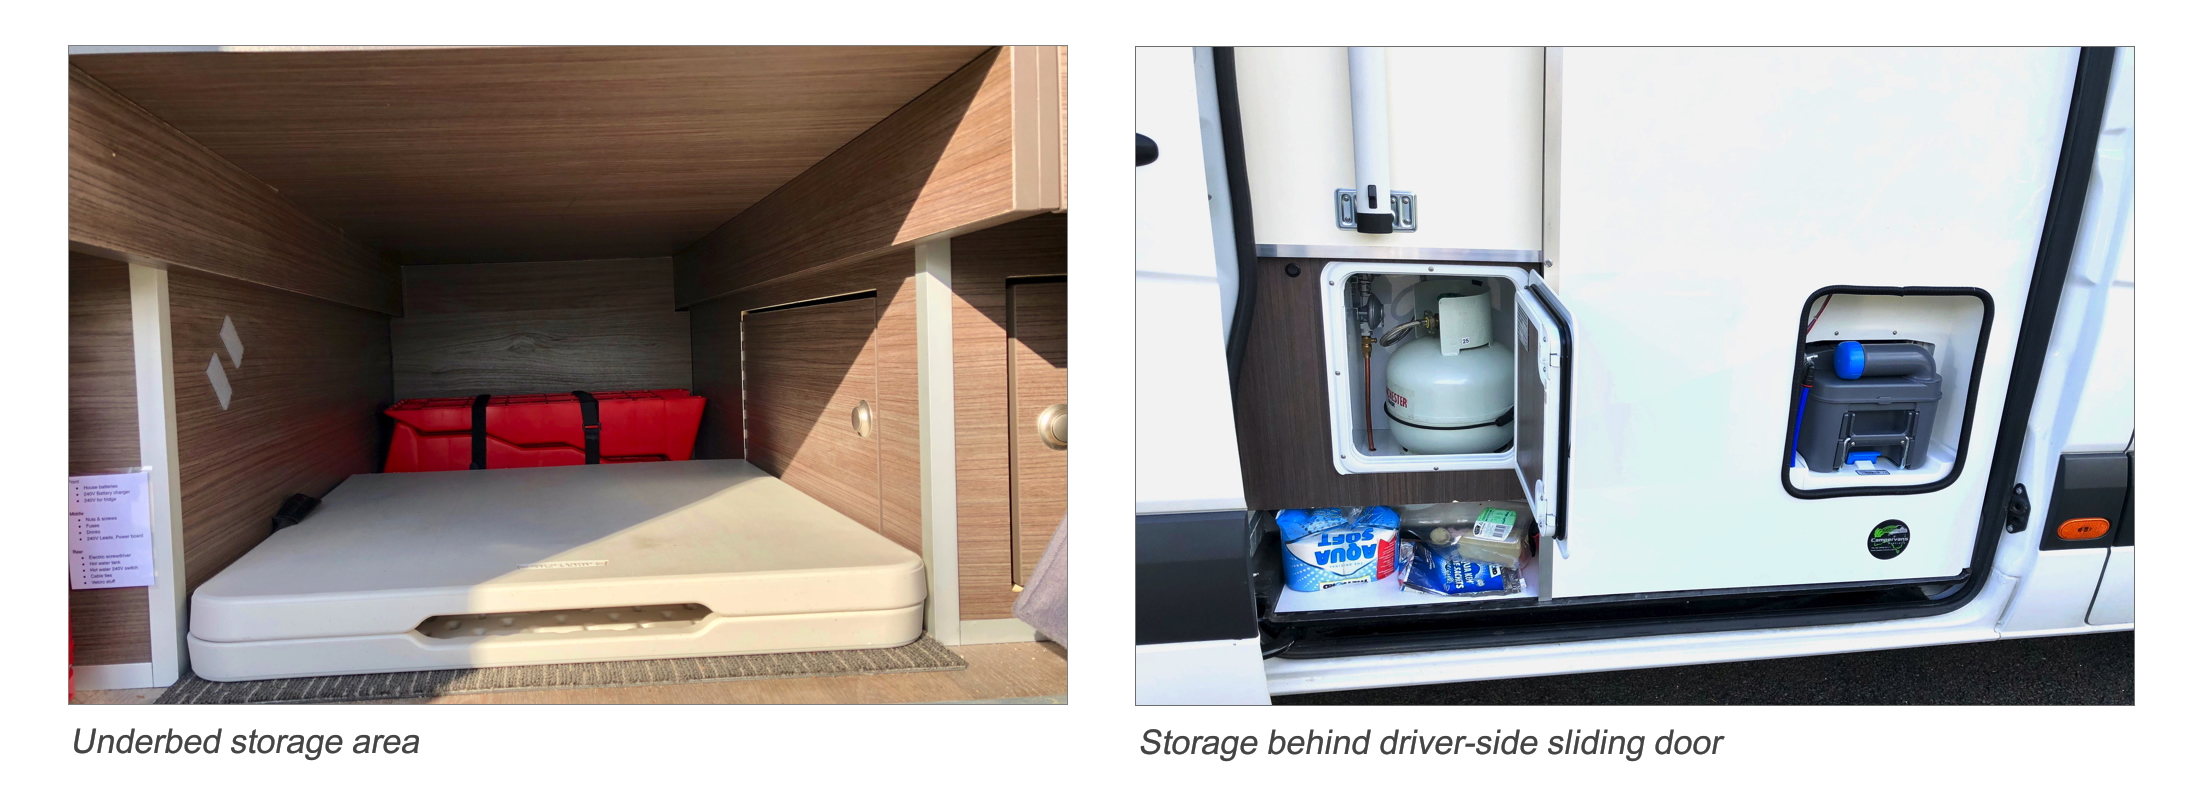
Separate storage areas are also available under each side of the bed, these spaces being used to store less frequently accessed items such as water hoses, electrical leads, etc.
The space behind the sliding door on the driver’s side of the van is used to store a second outdoor table, along with tools and toilet supplies, while providing secure access to the LPG bottle and the toilet cassette (see photo above).
Water and Waste
![]() As mentioned elsewhere in these pages, the secret to the success of any compact Campervan or Motorhome fit-out is mastering the art of compromise – juggling ‘needs’ and ‘wants’ with respect to practical limitations.
As mentioned elsewhere in these pages, the secret to the success of any compact Campervan or Motorhome fit-out is mastering the art of compromise – juggling ‘needs’ and ‘wants’ with respect to practical limitations.
Our van is fitted with a 75 litre (L) fresh water tank and a 40 L grey water tank, both located under the floor. While it is possible to install tanks with a larger capacity, the additional weight of the extra water being carried would need to be considered in relation to the vehicle’s legal Gross Vehicle Mass (GVM). (And you don’t want to be keeping ‘grey’ waste water for too long anyway – it gradually deteriorates and becomes ‘black’!)
If required, for extended trips away from fresh water refilling sources, the built-in water supply can be supplemented with portable water containers. (Which of course still adds weight to your GVM calculations). We carry 2 x 5 litre containers that we use as a ‘reserve’ supply when required. Many supermarkets also stock 10L pre-filled water containers. (10L of water weighs 10kg). Carrying these additional containers inside the van also provides easy access to water in the case that the underfloor water supply becomes inaccessible due to an electrical malfunction or damage to the tank. Hasn’t happened yet, but just in case!
Water from the under-floor tank is delivered to the kitchen, bathroom and hot water unit by a 12V electric pump, also located under the floor. We have purchased a B.E.S.T. portable inline water filter to use when refilling the water tank.
Toilet waste (black water) is held in a removable 18 litre cassette, accessible through the driver’s side sliding door, for disposal at appropriate dump points.
Update: We have since fitted a town water connection, so we can take extended showers in the van when staying in caravan parks or campgrounds when the weather is crook, or the shared amenities are inaccessible.
See also:
Gross Vehicle Mass (GVM)
-
-
 2840 kg – The original ’empty’ Tare weight of the MWB Sprinter;
- 3040 kg – The weight of the van with the base conversion fitted;
- 3550 kg – The legal maximum GVM;
- 510 kg – Based on the above, this is our travelling cargo capacity (3550kg – 3040kg = 510kg) including both driver and passenger.
-
Packed and ready to leave on our first trip, we headed off to the weighbridge at our local recycling centre….
Fully loaded with a full fuel tank, full water tank, topped up LPG bottles, fully stocked refrigerator and pantry, chairs, Weber oven, additional camping gear, clothes, bedding, extra blankets and tarps, tools, ramps, surf gear, driver and passenger, etc, the van checks in at 3470 kg, giving us 80 kg of ‘breathing space’ under the legal maximum GVM.
(Payload update: We have replaced our original AGM batteries (62 kg) with Lithium batteries (25 kg). This has given us an extra 37 kg of cargo capacity.)
|
See also: |
Fit-out: Layout | Appliances | Accessories | Suppliers