Lithium battery upgrade | Install an inverter | Install a battery monitor | DIY Projects
One thing leads to another
We recently upgraded some of the electrical infrastructure in our van….
-
- Swapped our AGM batteries for Lithium batteries;
- Installed an Inverter;
- Installed a battery monitor;
These upgrades and additions provided an opportunity to re-think, re-organise and update some of the associated cabling and battery housing infrastructure.
Important: ADR Battery Storage Update (2023)
These regulations apply to the installation of electrical equipment in vehicles and relocatable accommodation, and apply to the RV Industry. In relation to battery installation, all batteries installed in ‘habitable living areas’ (ie inside a Campervan, Caravan, or Motorhome) must now be installed in separate storage enclosures. In a similar fashion to the storage requirements for LPG bottles, these storage compartments must be sealed off from the interior living space and provide external ventilation. In addition to the storage location, all Lithium batteries will be required to have a battery management safety system, located not less than 600mm from the battery, designed to prevent over-voltage, over-current and excessive temperature changes. All batteries must be protected from short circuits or over-current situations through the installation of fuses or circuit breakers. All cables connected to the battery terminals must be connected at the terminals provided by the battery manufacturer. No more than four cables can be connected to each battery terminal.
|
 New Australian Design Rules for ‘Connectable Electrical Installations’ were released in November 2022. (Australian Standards AS/NZS 3001.2:2022).
If a job is worth doing…
![]() The upgrades listed above (Lithium batteries, inverter and battery monitor) highlighted a number of associated bits ‘n’ pieces in our van’s electrical system that needed some attention…
The upgrades listed above (Lithium batteries, inverter and battery monitor) highlighted a number of associated bits ‘n’ pieces in our van’s electrical system that needed some attention…
1. Battery Housing: Our batteries were originally contained in plastic battery boxes, in a difficult-to-access area in a side cupboard under the bed. This is a good location in an electrical sense – right next to the fridge, our biggest user of the batteries’ stored energy.
Although we don’t access the batteries very often, when we did need to it was a real pain getting access inside the boxes.
Remedy: Replace the plastic battery boxes with an alternative (and more durable) housing that provides easier access to the batteries when required. Updating the battery housing to the new ADR standard also required sealing the lid/cover and adding a conduit vent through the floor.
2. Battery cabling: Once we removed the battery boxes and tidied up the battery housing area it was apparent that the cables connecting the two batteries in parallel wandered around a bit, and could have been shorter and of a heavier gauge.
The cables connecting two parallel batteries together need to be heavy gauge and as short as possible. In reality, the original cables were probably doing the job OK, but shorter and thicker is always better. Especially now that we will be using an inverter that might be pulling over 100 amps from the batteries.
Remedy: Replace the existing inter-battery cabling with shorter, heavier gauge cables.
3. Cabling: When we installed the new sealed battery housing, it became obvious that the only way to easily and safely connect cabling to the batteries, located inside the housing, was to install terminals external to the housing.
Remedy: Install external distribution posts with suitable gauge cabling to the battery terminals inside the housing. This provides the added bonus of more easily connecting additional cables in the future if required.
Replacing the battery housing
First job was to ditch the plastic battery boxes. Although they did their job in their day, they were a bit clunky. We replaced them with a more sturdy and durable marine ply housing, providing easier access to the batteries when required, while also providing a stable storage platform above.
-
- Be sure you are familiar with the 2023 ADR update on battery venting, etc (discussed above). This is not retrospective to existing installations, but comes into effect if you upgrade an existing installation
We re-used the existing strapping mechanism, securing the batteries to the floor of the van using seat-belt webbing and a locking plate, but without the battery boxes. The new batteries are now sitting on (and have fitted between them) 10mm poly-foam packaging material to absorb the transmission of transport shocks and bumps. The battery housing is fitted with a screwed lid, sealed with foam, and a 20mm conduit vent added through the floor.

On the level
The lid of the marine ply battery housing provides a solid platform on which to mount the new power inverter, in an ideal location close to the batteries. In our situation this area also has good ventilation for the inverter.

The platform could, of course, be used for all sorts of storage, if an inverter isn’t required.
Making the connection
The existing cables between the parallel batteries were 600mm long, 6 B&S (16 mm²) cables. This sizing was probably best suited to navigating the ins and outs of the battery boxes. With the boxes gone, we were able to replace these cables with shorter and heavier gauge cables – 250mm long, 2 B&S (32 mm²).
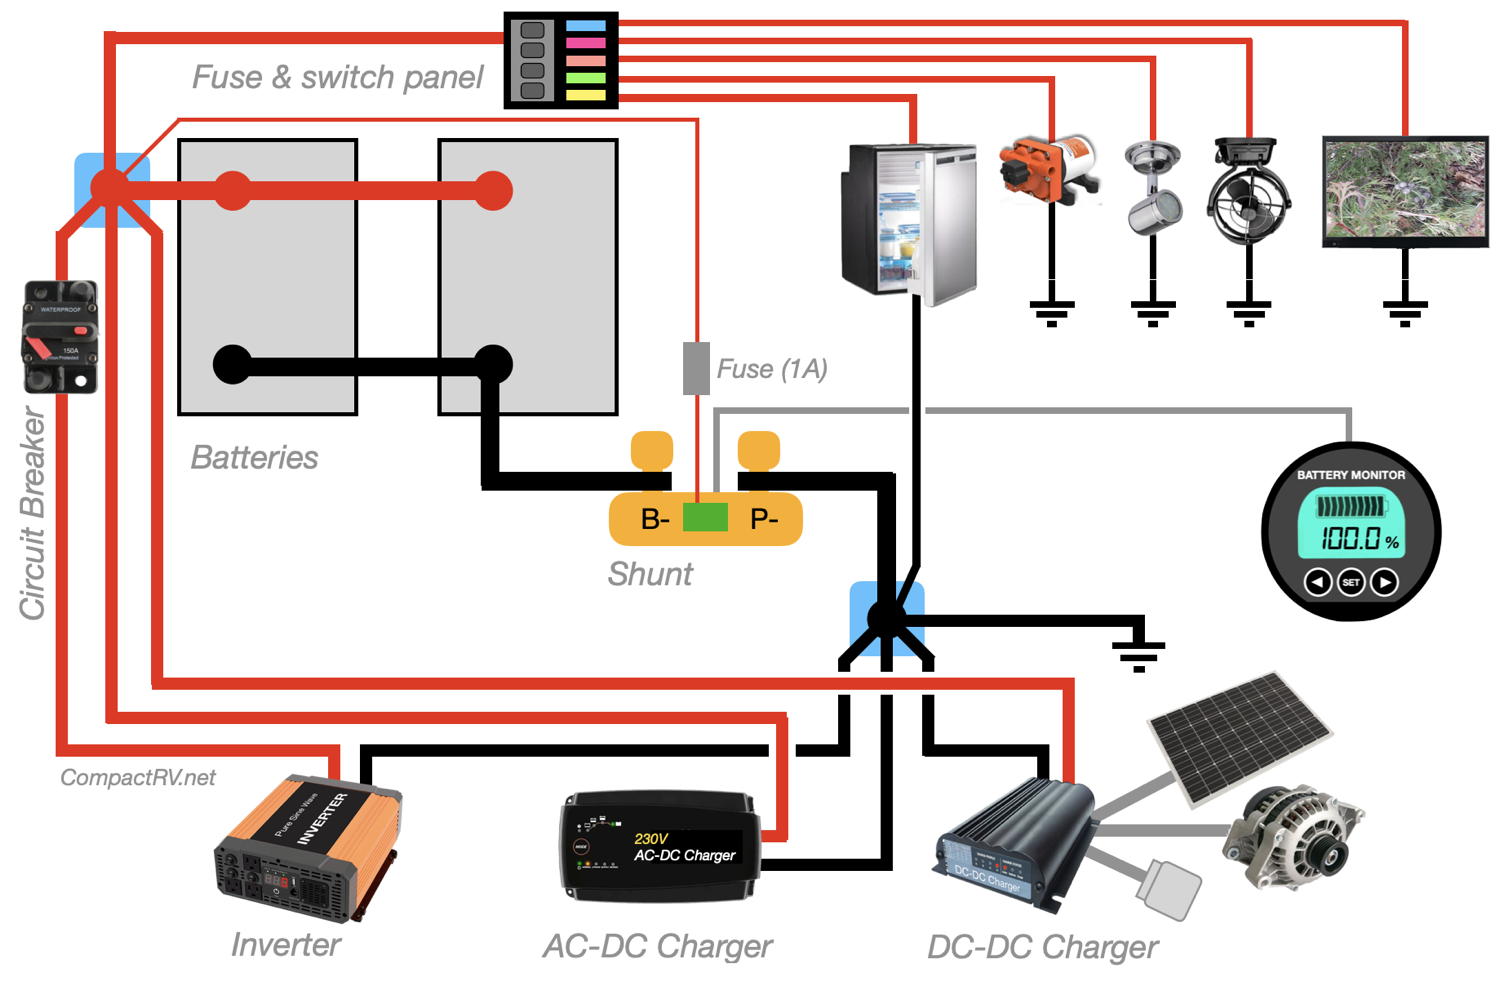
The battery terminals are connected to distribution posts (see below), to which all appliances and chargers are now connected.
Of course, the batteries in a parallel setup remain directly connected to each other.
Accessible connections
 Please note: We installed these external connection posts prior to the introduction of the new ADRs listed above. Check with your auto electrician regarding application of the ADRs.
Rather than have all cabling connected directly to the battery terminals inside the housing, we installed a couple of external distribution posts (Jaycar – $15).
These distribution posts are fitted outside the battery housing and connected to the batteries with short heavy gauge (2 B&S) cables.
These cables are readily available in various lengths in the battery section of your local auto parts store for around $20. Though for some unknown reason, red cables are difficult to find in auto stores. Black and blue seem to be the popular colours.
All appliance and charger cabling is now connected to the distribution posts, (via fused links), rather than directly to the batteries.

This provides much easier access to existing cabling connections, and easier hookup of any new connections – all accessible without opening the housing lid. This is also the ideal location to fit a battery monitor shunt.
Important: Ensure that these terminals are well insulated / protected from each other and from an any possible external short circuit scenario.
The Hookup
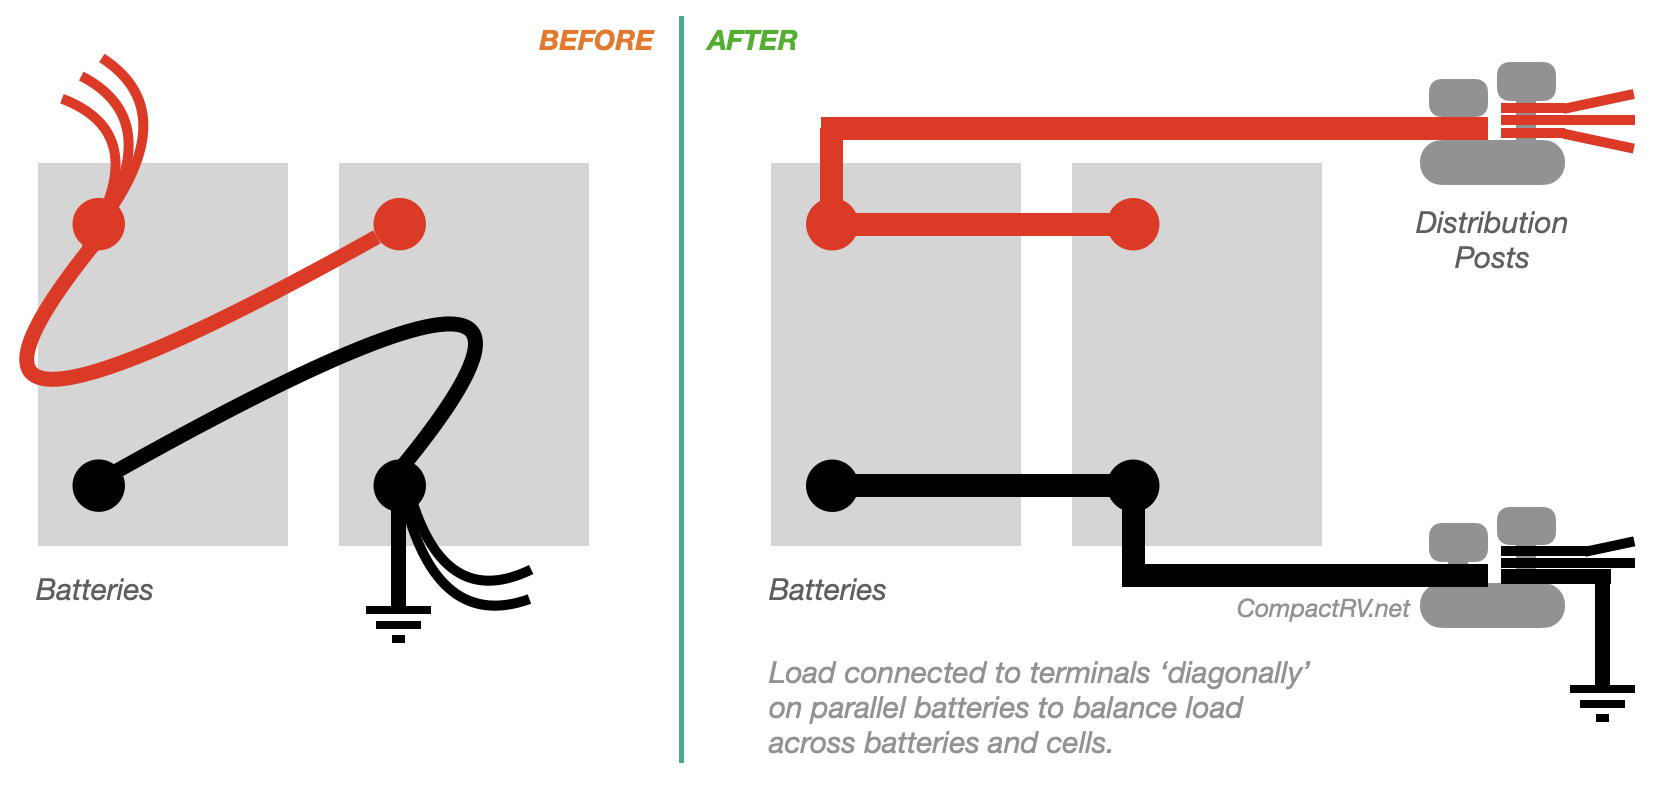
Once your batteries are re-housed, and distribution posts are in place, all cables previously connected directly to the battery terminals should be connected to the distribution posts – except for the cables connecting multiple batteries together in a parallel battery setup.
Note that the distribution posts are connected to ‘diagonally opposite’ terminals in a parallel battery installation – negative from one battery, positive from the other battery. This arrangement assists in ‘balancing’ charging and discharging across the batteries. More info at our Parallel Universe page.
(Distribution posts shown in blue in diagram above)
Lithium battery upgrade | Install an inverter | Install a battery monitor | DIY Projects