
Sustainability: Batteries & Solar | Water | Heating
Batteries | Consumption | Battery Recharging | Solar Charging | How Long Without Sun? | Alternate Charging Options | Solar Regulators | The Bottom Line
|
See also…
|
|
Inverter installation – Important Info
If you are fitting out an RV from scratch you should have the inverter and associated electrical infrastructure installed by a licensed electrician, especially if your inverter includes an Automated Transfer Switch (ATS) which has a permanent connection to the 230V AC power in the vehicle. |
What is an Inverter?
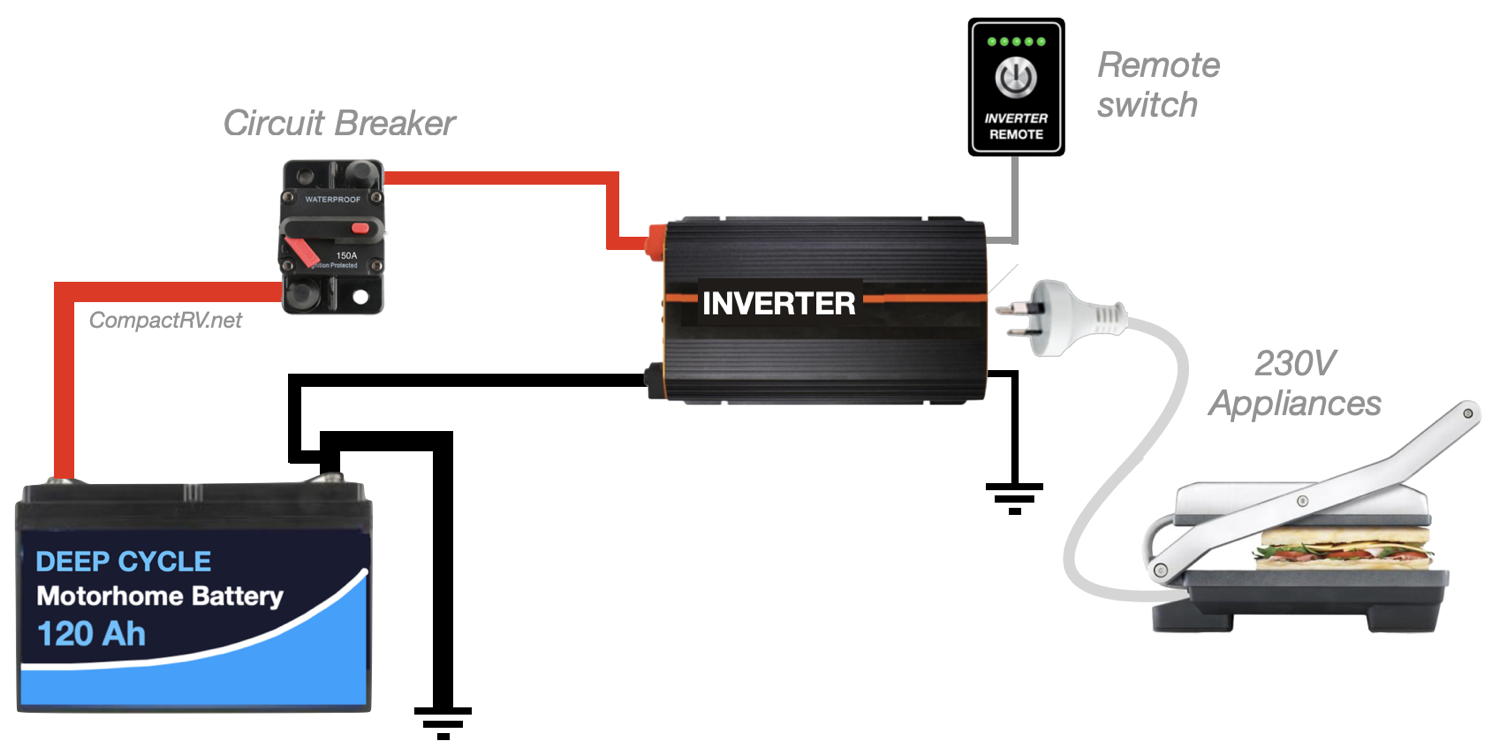
An inverter is an electronic device that converts (or rather ‘inverts’) electrical current from 12V DC to 230V AC. This provides the option of running regular mains-powered household appliances from your 12V batteries.
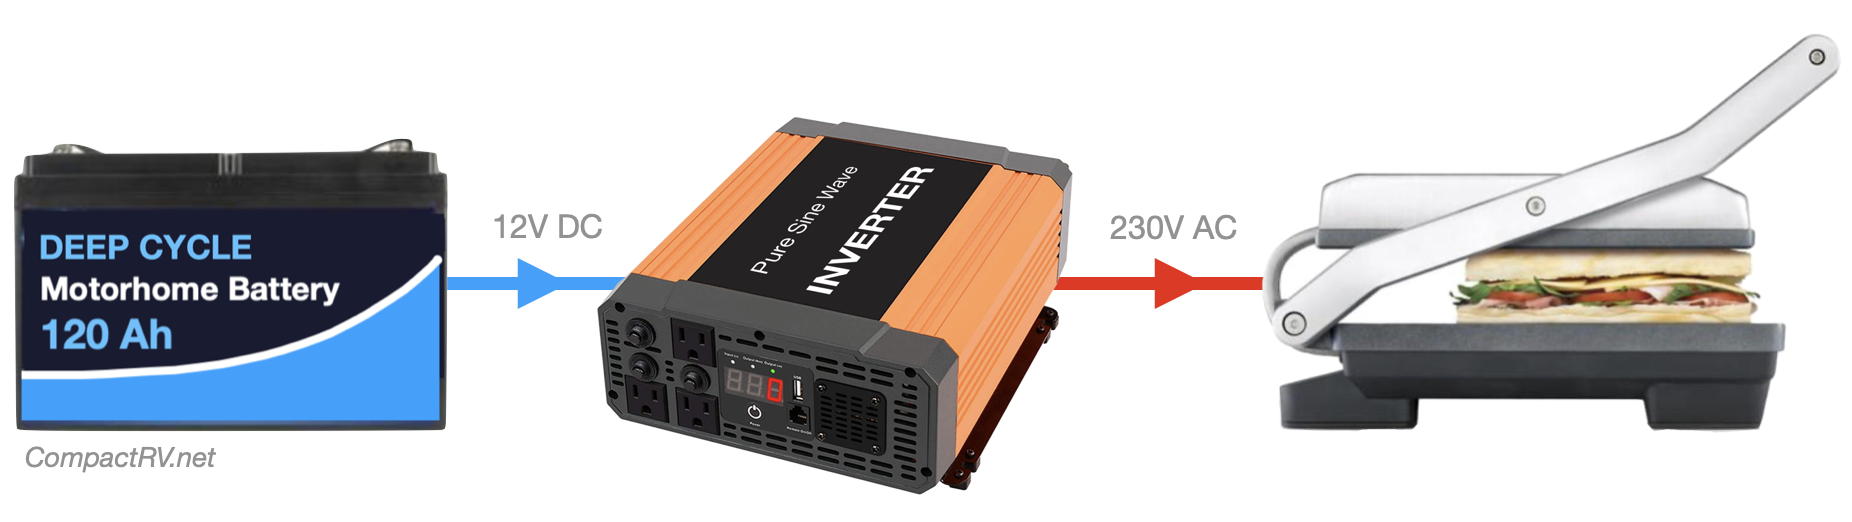
Sounds like magic, and it is certainly very clever technology. But there are limitations – most importantly, the capacity of your batteries (and 12V cabling infrastructure) to supply the continuous high current required to run 230V AC appliances through the inverter.
Important: Updated Rules for Inverters (2024)
These ADRs apply to the installation of electrical equipment in vehicles and relocatable accommodation, and apply to the RV Industry. In relation to inverter installations, the new ADRs stipulate that inverters installed in RVs must now include a Residual Current Device (RCD). RCDs are designed to immediately disconnect power if someone (or something) comes into contact with a live 230V power cable. This is similar to the requirements for electrical circuits in residential installations.
This page will be updated when more information (and updated inverters) become available.
|
 Updated Australian Design Rules (ADRs) for ‘Connectable Electrical Installations’ were released in November 2022. (Australian Standards AS/NZS 3001.2:2022).
Amp it up
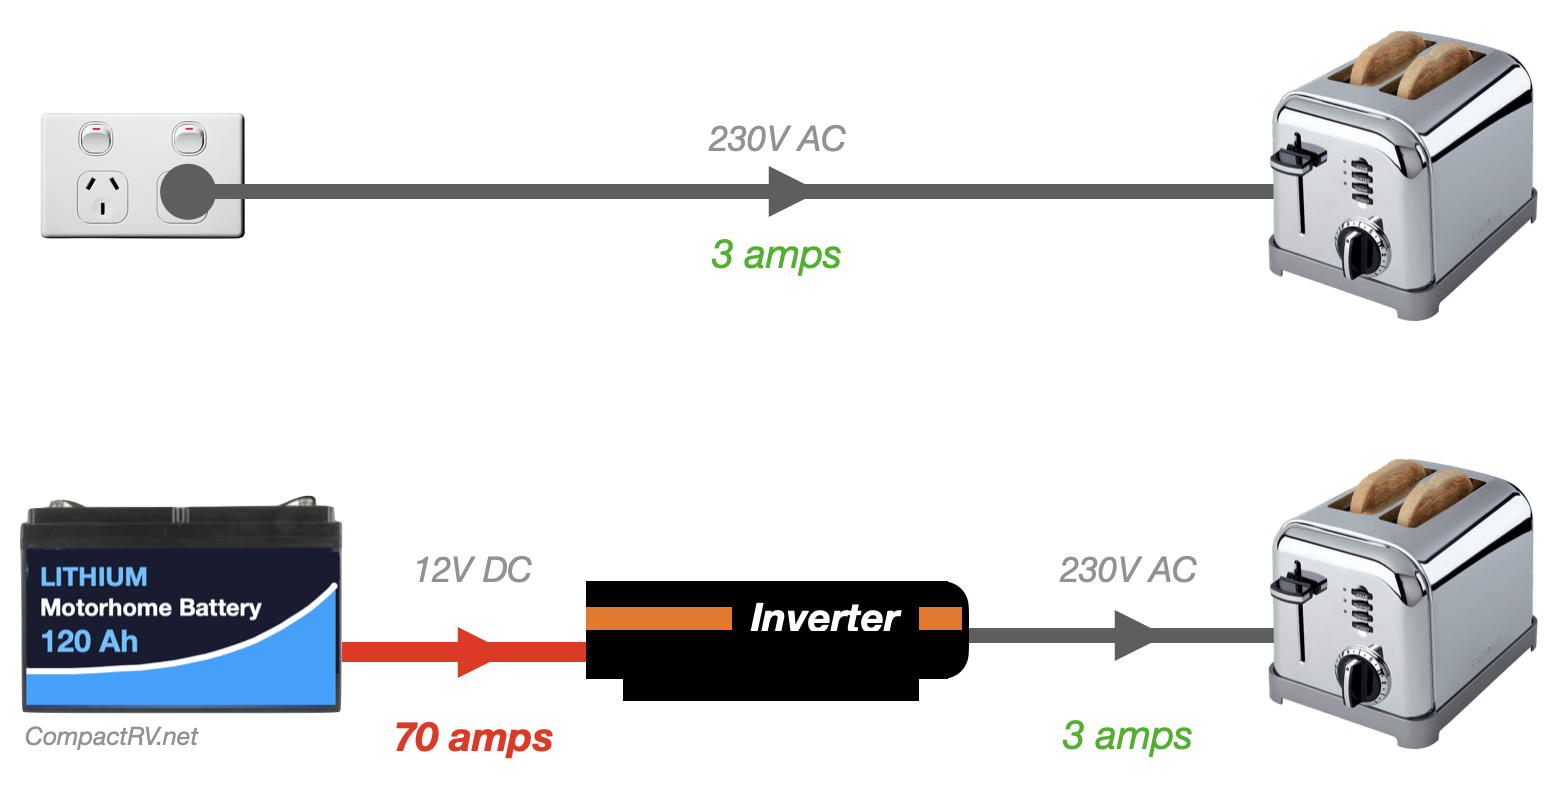
230V electrical appliances draw a lot more current from a 12V battery (running through an inverter) than they do when connected directly to a 230V AC power supply.
For example, a small 230V AC toaster (two slice, 750W), draws around 3 amps of current when connected to a domestic mains supply, but when the same toaster is connected to an inverter it is pulling 70 amps from your 12V battery/s – and this heavy current is also moving through the cables connecting your inverter to the battery/s.
Our previous lead-acid AGM batteries’ combined maximum continuous current capacity was around 50 amps, so we never really considered an inverter as an option for running 230V domestic appliances in our Campervan when not connected to mains power.
We recently replaced our two AGM batteries with two Lithium batteries, which have the capacity to deliver up to 200 amps of continuous current. The increased capacity of the Lithium batteries opened the door to installing an inverter.
Parallel batteries = Increased continuous current
Just as importantly (when we start talking about inverters pulling large amounts of current from batteries) is that connecting two batteries in parallel can also provide double the continuous current (Amps) than that available from the individual batteries. This information is not widely published (that I have been able to find), but industry representatives I contacted – from Redarc, Baintech, Renogy and Sphere – have confirmed this to be the case. So I am going with them! Note: I expect that the extent of this increased current capacity in parallel battery setups is likely to be dependent on the quality of the batteries and the specifications of their inbuilt Battery Management System (BMS). The 2 x 120Ah Lithium batteries in our van (Sphere brand) are each rated to be able to supply 100 Amps of continuous current. We have the two batteries connected in parallel so they should be able to supply a continuous 200 Amps to the inverter. I have measured them supplying 170 Amps continuously to the inverter, according to our battery monitor. While it is comforting to know that the 200 Amps capacity is available, we will probably impose our own limit of 150 – 170 Amps, so as not to push the batteries to their limit. And given an 85% efficiency rating of our 2000W inverter (see below), that will probably be around the maximum current that the inverter will pull from the batteries anyway. |
Which inverter?
Here’s what to look for if you are shopping for an inverter:
 Appliance Power Rating: Check the power consumption of appliances that you will be using with the inverter (measured in Watts). This is usually shown on a label on the appliance, or listed in the product specifications. (Consider the combined power rating of multiple appliances if you are planning on using those appliances at the same time.)
A laptop computer, for example, can draw as little as 50 Watts, while an electric kettle might be drawing over 1800 Watts.
Note: Microwave oven specs often list ‘output power’ of around 800 – 900W. This is the ‘cooking power’, which is much less than the power that the oven is drawing from the power supply – likely to be around 1500W.
 Inverter Power Rating: Choose an inverter with a power rating higher than the highest power rating of any of your appliances.
In reality, inverters are not 100% efficient, in part because they use some of the available power to run themselves. Most inverters are between 80% and 90% efficient, depending on the load. So, a 2000W inverter might only be capable of supplying an actual continuous output of 1700 Watts.
Of course, the inverter can only supply its rated continuous power output if enough continuous electrical current is available from the 12V battery to which it is connected…..
 Battery Capacity: Check the continuous discharge capacity of your 12V battery/s. There is little point installing a 3000W inverter, which is capable of drawing up to 300 Amps from your battery, if your battery is only capable of supplying continuous current at a rate of 50 Amps.
A 1500W inverter, for example, is capable of drawing up to 150 Amps of continuous current from your battery/s (based on the calculation P=VI or, as a general rule of thumb, dividing the Watts by 10). Most 12V Lithium batteries, when two batteries are connected in parallel, are able to combine their continuous current capacity to effectively double the available continuous current discharge capacity rating of the individual batteries in the battery bank (see panel above). This discharge rate is governed by the Battery Management System (BMS) in the batteries.
Also check that the battery / inverter combination is able to supply the ‘peak’ startup power that may be required by some equipment – generally power tools, or anything with an electric motor. (Extra energy is required to get a motor up to speed from zero revs.)
Of course, keep in mind your battery/s will need to have enough storage capacity (Ah) to cater for the ongoing energy needs of these appliances, and still have enough capacity remaining to keep your fridge and other 12V appliances running over multiple days if you are free camping. This also has implications for your battery recharging facilities.
Note: The discharge specifications for AGM batteries often only list the ‘maximum’ or ‘peak’ 5 second discharge rate, as it is an impressive number over 1000 Amps. If you are able to dig deep enough into the specs, you will find that the maximum continuous current discharge for 100 Ah AGM batteries is around 30 Amps. (See KickAss 120Ah AGM battery specs as an example.)
Pure sine wave output: The only type of inverter to buy is what is known as a Pure Sine Wave Inverter. These inverters deliver a very ‘smooth’ electrical output, similar to the quality of your home mains supply.
Older (cheaper) inverters produce a Modified Sine Wave output, which is OK for power tools and the like, but unsuitable for use with many modern appliances containing a microchip (such as laptop computers and microwave ovens). Availability of these older models is becoming less common in the RV market.
If an advertisement for an inverter doesn’t specifically state that it is a Pure Sine Wave inverter, then it probably isn’t.

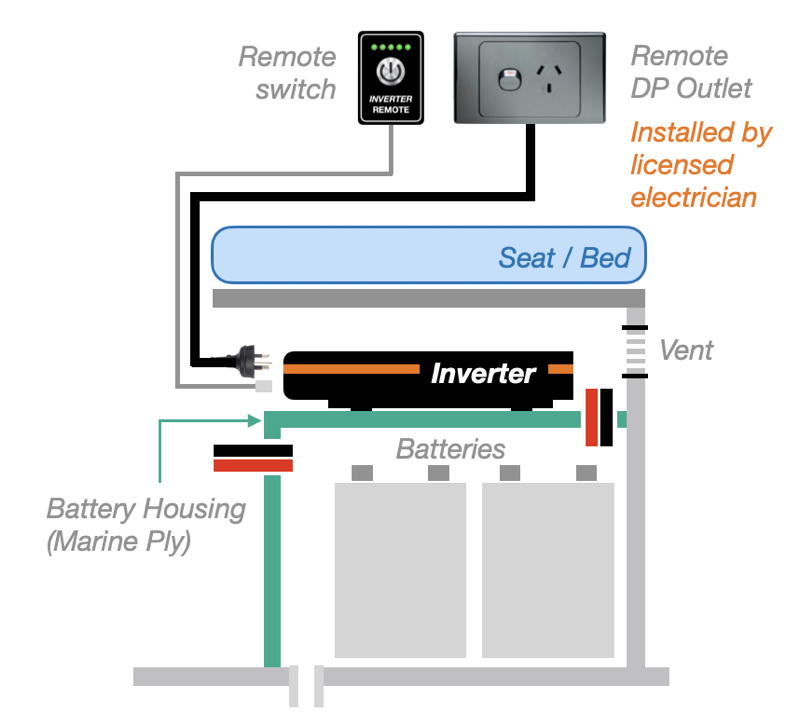
 Remote power switch: Inverters are physically large devices that should be installed close to your battery/s – in a Campervan or Motorhome this often means they are installed out of sight, in a cupboard or under a seat or bed.
This hidden location can make the inverter difficult to access when you need to turn it on or off – and you do need to turn an inverter off when not in use, because it consumes current from your battery when on ‘standby’ (around 0.5 / 0.8 amp for a 1500 / 2000 watt inverter). Cooling fans may also activate if the inverter is left in standby mode for extended periods, further depleting 12V battery storage.
So, look for an inverter with a remote switch and connecting cable. These are often sold as an optional extra. A remote switch will make it easier to power your inverter on and off without lifting the bed, or delving into confined spaces under cupboards, etc. (More information below.)
 Physical dimensions: Most inverters are relatively large pieces of equipment,
especially those of a higher electrical capacity. Check that the space you have available for an inverter will accommodate your preferred brand/model. In particular, check the height of the inverter, if it is to be installed under a bed or seat, etc. There should also be adequate space around the inverter for air circulation for cooling (50-60mm).
Price: Pure Sine Wave inverters have become more widely available and more affordable over the last couple of years. Though, just to make things that little bit more complicated, there are inverters of a similar power rating (for example 1500W / 2000W) ranging in price from $200 to $1500.
It has been my experience that equipment at the cheaper end of the range is usually cheaper for a reason – most likely with compromises in engineering quality and materials which will impact on the performance of the equipment in the longer term.
Residual Current Device (RCD): See update panel above – new inverters (post 2023) should be fitted with an RCD to shut off power immediately if someone or something comes into contact with a live 230V connection.
Automatic Transfer Switch (ATS): An inverter equipped with an ATS is wired into your 230V power circuit, passing 230V AC straight through to power outlets when available, or automatically inverting 12V DC to 230V AC when mains power is not available. In such a setup, all 230V power outlets are always active, regardless of whether or not you are connected to mains power. Your van will need separate 230V power circuits for outlets supplying the hot water heater (if you have a 230V/LPG water heater), fridge, and battery chargers. With this in mind, an ATS inverter is best installed in a new van fit-out, rather than retro-fitted to an existing RV – without a lot of re-cabling work!
Taking the plunge
 Note: We installed an inverter in our existing van pre-2022, prior to the availability of RCD-equipped inverters.
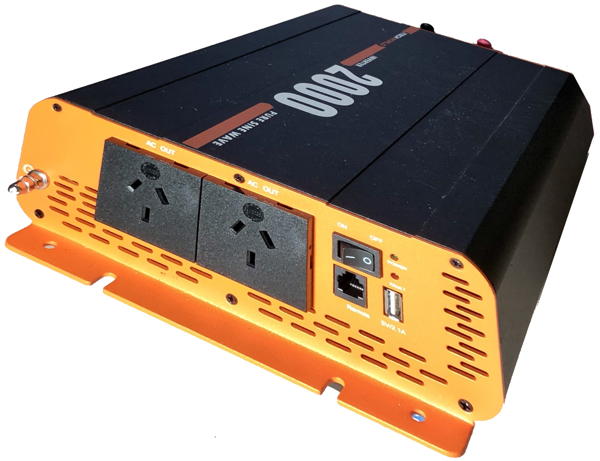
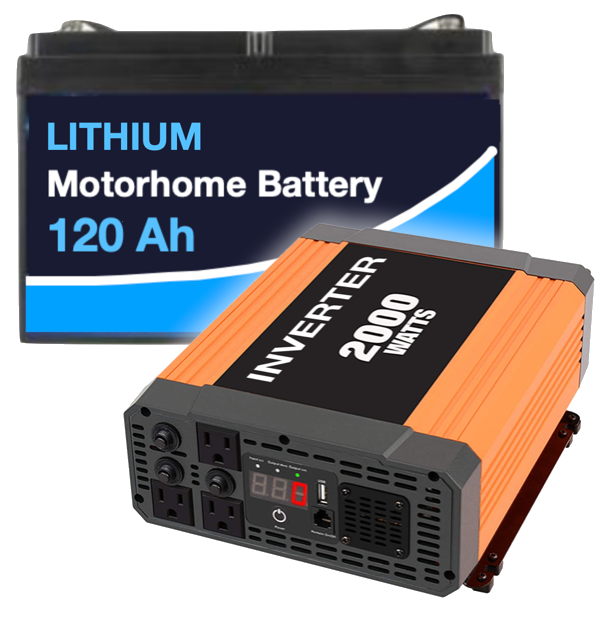
We purchased an iTechWorld 2000W inverter. This model was mid-range on the cost scale (keep an eye out for ‘Black Friday specials’, etc), and comfortably covered the power requirements of the appliances that we would be using – toaster, sandwich press, microwave oven and hair dryer. (More info below.) (Note: The inverter we purchased has since been superseded by the new iTechWorld 2000W inverter.)
Importantly, our Lithium batteries and 12V cabling infrastructure are able to accommodate the high current demands of an inverter of this size.
This inverter is still running in our van, and does the job exactly as advertised, completely transparently. We don’t even notice it running.
Our batteries are each rated to be able to supply 100 Amps of continuous current. This results in the availability of up to 200 Amps of continuous current when the two batteries are connected in parallel (see panel above).
We were initially looking for a 1500W inverter, which we figured was all we really needed. A model of that capacity was not available from iTechWorld, so we opted for their 2000W inverter. In hindsight we are glad we went up to the 2000W model – it covers the power requirements of our microwave oven (1400W), which we have found ourselves using more often than we expected.
If pushed to their limits our Lithium batteries are (theoretically) able to supply the 200 Amps of continuous current that the 2000W inverter is (theoretically) capable of drawing at full capacity. In reality the 85% efficiency rating of the inverter probably limits the 2000W inverter to about 1700W, or 170 Amps.
The upside of this ‘excess’ power capacity is that we won’t be pushing the inverter or batteries too hard if we are only running appliances up to 1400W.
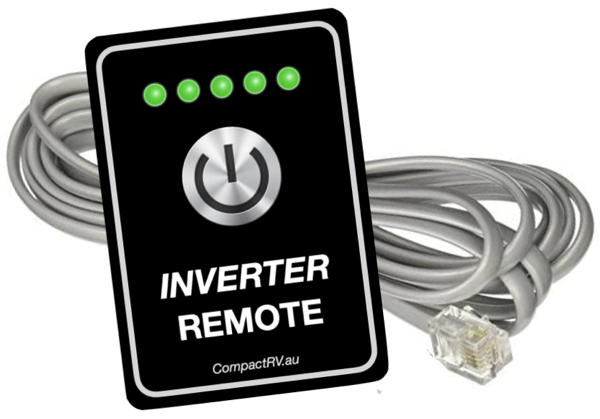
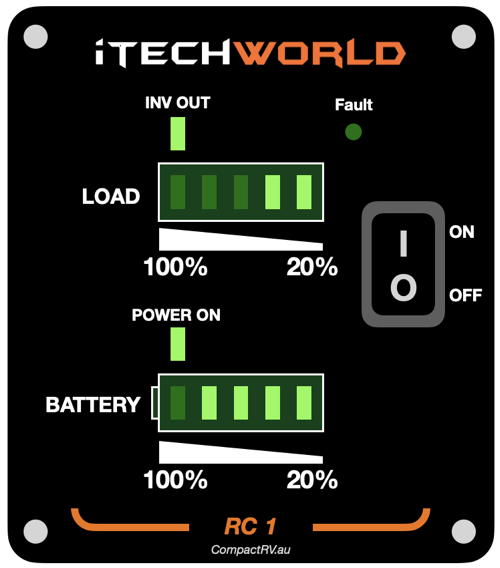 Remote switch: An important consideration that influenced our purchasing decision was iTechWorld’s (optional) remote power switch (~$80, or ~$50 ‘on special’). It is not too large or garish, and although the panel includes LED indicators, they are not lit at all when the inverter is powered off – which is important in a small space that needs to be dark at night!
Dual outlets: Another factor influencing our purchase was the twin 230V outlet sockets on the iTechWorld inverter. We have connected each of these outlets to separate remote outlet locations in our van (installed by a licensed electrician), though we don’t use both outlets at the same time.
More power? Most retailers also offer a 3000W model, which could power more energy-hungry appliances. But at top power, a 3000W inverter is (theoretically) capable of drawing 300 amps continuously, so there is little point in purchasing one of these units when our two batteries can only supply up to 200 amps of continuous current. Higher capacity inverters are also physically much larger, requiring more installation space. To power a 3000W inverter, start thinking about a larger battery installation – maybe 2 x 200 Ah Lithium batteries.
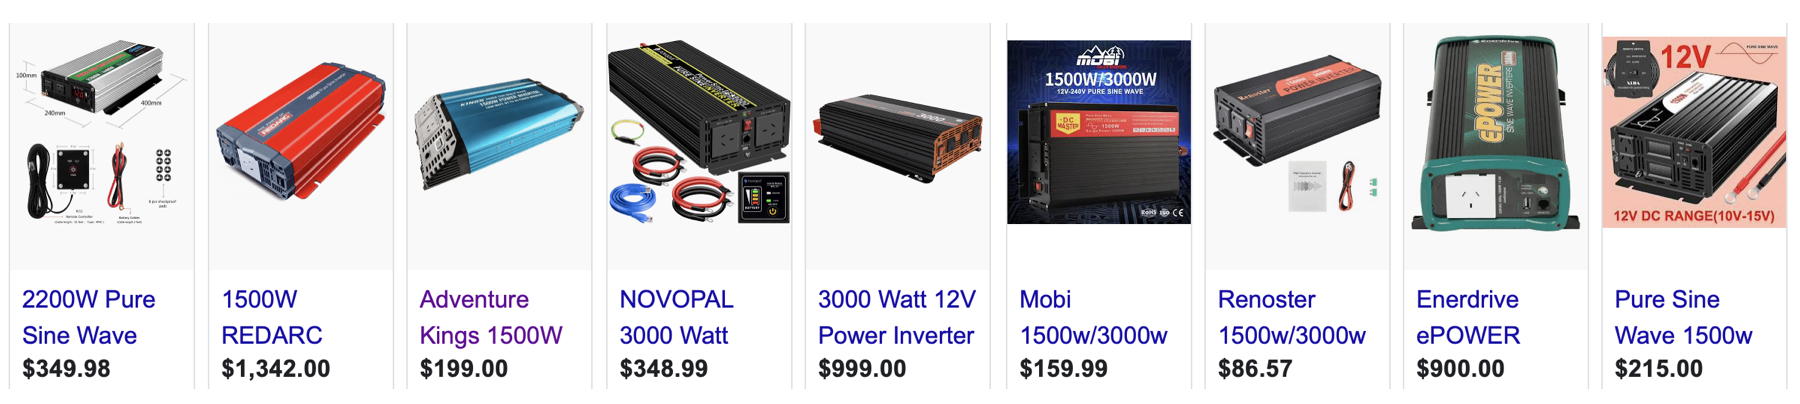
| Other similar Inverter options (Australia)….. | |||||||||||||||||||||||||||||
– Keep an eye out for ‘show specials’, EOFY sales, etc – |
|||||||||||||||||||||||||||||


-
- See also: Installing a battery monitor | Lithium battery upgrade
Installing the inverter
 An inverter should be installed as close as possible to the battery/s, to minimise the length of the 12V cable run and any associated voltage drop when the inverter is under load.
There must also be enough space around the inverter for air circulation to provide for the dissipation of heat that may be generated by the inverter.
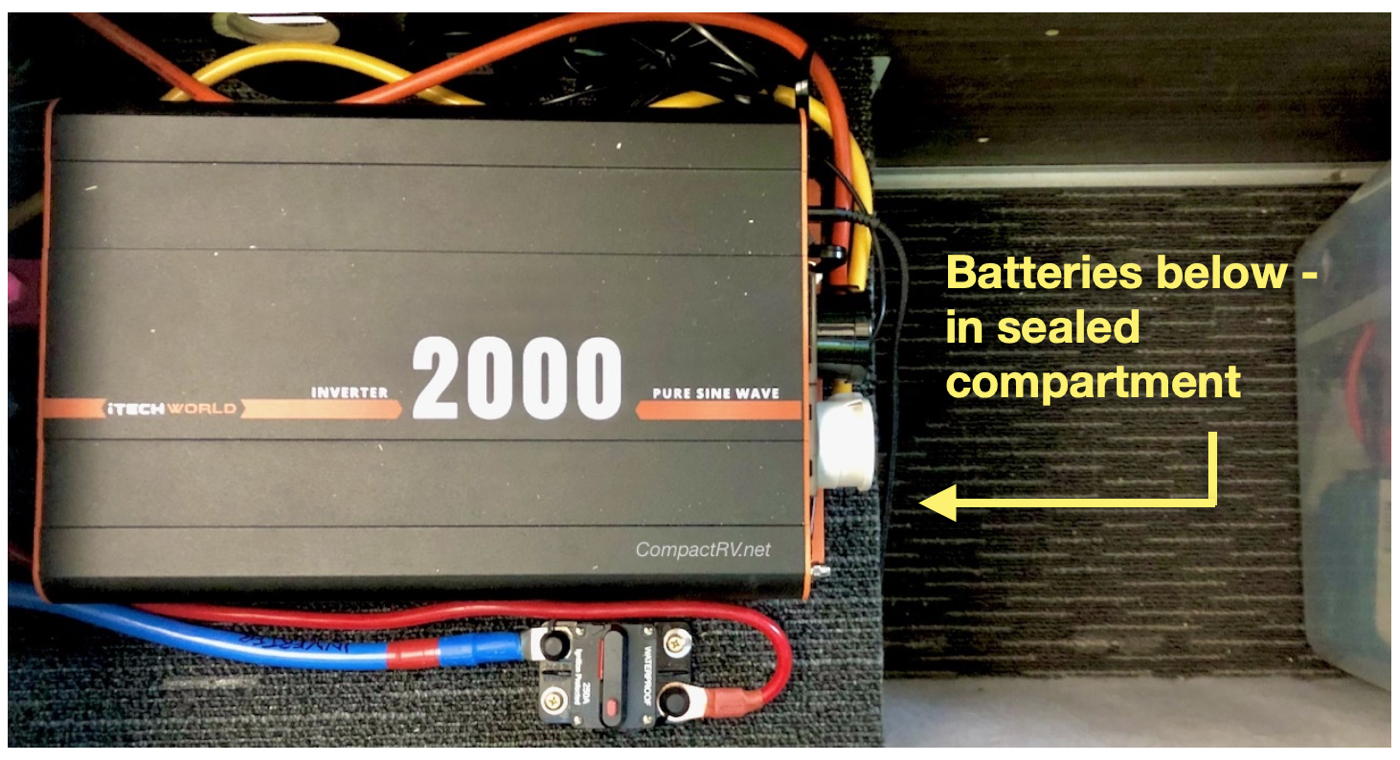
We have a battery housing that provides a solid platform above the batteries, under the rear seats. The inverter was easily fitted on that platform, connecting to the batteries with the supplied cables (6 B&S, 600mm in length).
There is enough space here for the inverter, along with adequate surrounding ventilation space – at least 60mm is required each side and above the iTechWorld inverter. We have also fitted an additional vent in the cabinet wall below the seats, adjacent to the fans on the inverter, just to be sure. The fans are temperature and load reactive. Though, with our relatively light use of the inverter we haven’t heard the fans kick in yet. We always turn the inverter off when not in use.
In such a situation, a remote switch and power outlet is a ‘must-have’, to power the inverter on and off and connect portable appliances without lifting the bed / seat, or delving into the back of cupboards.
As recommended in the iTechWorld manual, we installed a 250W circuit breaker on the inverter’s positive supply cable. This was not supplied with the inverter, but they are widely available online for around $20.
A circuit breaker will prevent damage to the inverter from short circuits, or overloading by appliances, which could result in overheating and a fire. (Most of which should also be covered by the inverter’s built-in overload / overheating protection.) The circuit breaker can also be used to easily disconnect the inverter from the 12V electrics in the van, if necessary.
You will require an additional heavy duty cable to connect the circuit breaker to the battery. Use a cable at least as heavy as the cables supplied with the inverter (6 B&S or 16 mm²). We used a 2 B&S lugged cable (32 mm²) from the local auto parts store. I have read reports about cables running warm if an inverter is used for extended periods with light gauge cables.
Important – Read the ManualAn inverter outputs 230V AC, which is potentially lethal if handled carelessly. Before commencing installation, carefully read the manual accompanying the device and be sure that you fully understand the installation requirements and safety precautions.
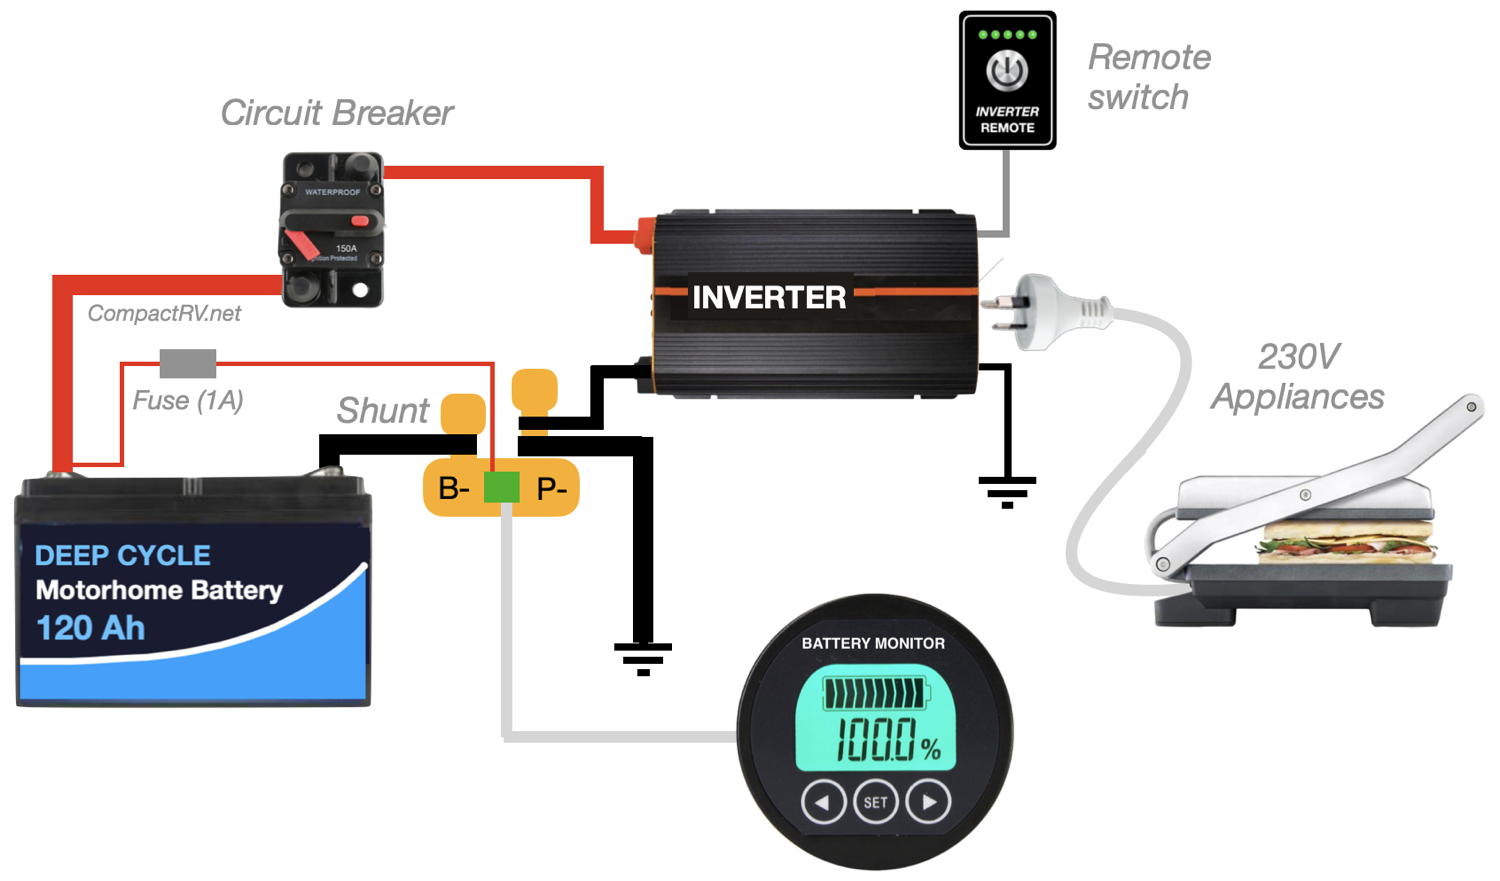
The negative DC input terminal is also connected to the vehicle chassis, via the P- terminal of the battery monitor shunt – so the chassis ground terminal and the negative DC input terminal are connected to each other through the chassis. While I am not totally cognisant of the electrical parameters of this connection, I understand it to be an electrical safety measure. It is the procedure recommended in the manual, so it is the procedure to follow! This information relates specifically to the iTechWorld inverter. Be sure to follow any relevant manufacturer installation advice and instructions for the inverter you install.
|
 As detailed in the installation procedures set out in the iTechworld manual, I have run a cable (4mm / 15 B&S) from the ground terminal on the front of the inverter to the vehicle chassis.
Remote access
As mentioned above, we also purchased iTechWorld’s remote power switch. We have installed this switch adjacent to a remote power outlet, which is connected to one of the 230V sockets on the inverter.

The iTechWorld remote switch includes an LED display providing an approximate indication of inverter load and remaining battery capacity. This appears to be based on amps (load) and battery voltage (capacity).
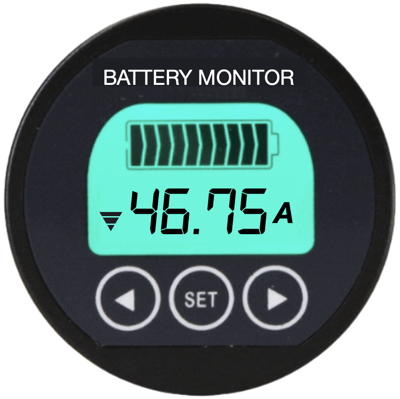 While the LED display is a neat idea, the data provided is very basic. A more informative and more accurate measure of power draw and remaining battery capacity is available through a dedicated battery monitor, which displays exactly how much current is being drawn by a 230V appliance running through the inverter, and the impact it has on remaining battery capacity. The two bars displayed on the remote switch panel in the image above (running a hair dryer on the Low setting) equates to around 47 amps displayed on our battery monitor.
-
- More info: Installing a Battery Monitor >>>
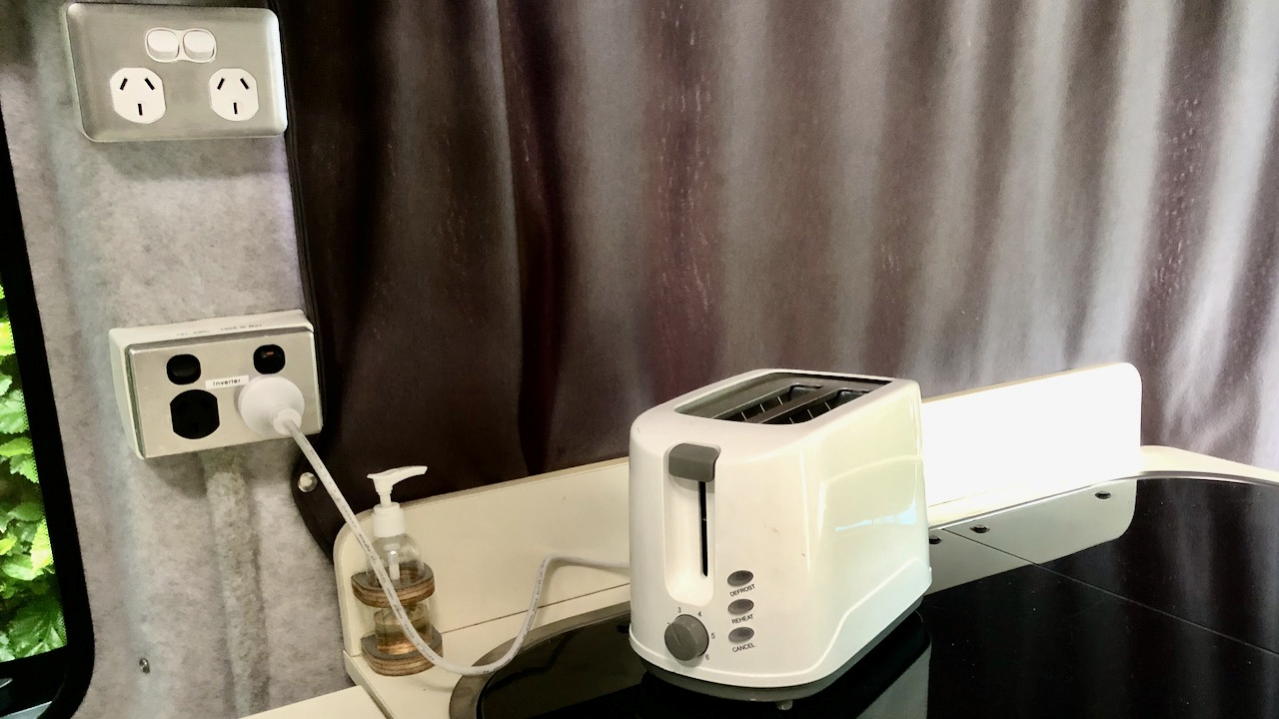
We have had a second power outlet installed (connected to the second 230V socket on the inverter) adjacent to the kitchen bench. This is convenient for connecting portable kitchen appliances – toaster, sandwich press, etc. (The inverter-powered outlets have black fittings to differentiate them from the regular mains-powered outlets. Our inverter is not auto-switching.)
Of course, you will only be able to use more than one outlet concurrently if running low-power appliances with a combined power consumption not exceeding the power rating of the inverter.
|
|
SAFETY REMINDER The 230V AC output from an inverter is just as potentially lethal as the output from a domestic power outlet. Any cabling or modifications on the 230V side of the inverter must be carried out by a qualified electrician. |
|

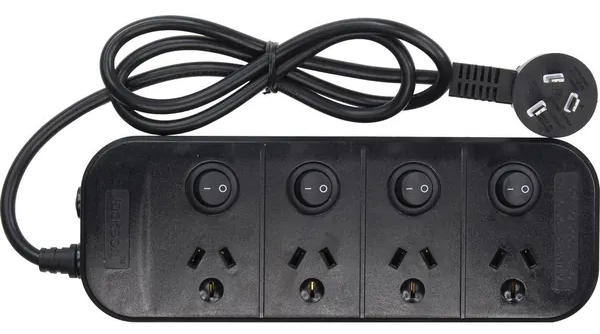
If a wired power outlet as shown above isn’t appropriate in your situation, a switched powerboard (possibly with a 1.8 metre lead) fixed to a solid surface will serve a similar purpose. Again, the use of multiple outlets concurrently is only suitable for low power appliances.
Keep your battery monitor in the loop
If your van has a battery monitor to measure battery capacity, and this monitor measures current flowing into and out of the batteries, you will need to connect the inverter’s negative input cable (black) to the P- terminal of the monitor shunt. This will ensure that current drawn by appliances connected to the inverter is measured by the battery monitor. Check that your monitor shunt is rated with a capacity higher than the maximum current drawn by the inverter.
Cabling ConundrumAs is often the case with these sort of projects, the process is not always as simple as you expect – one thing inevitably leads to another!
|
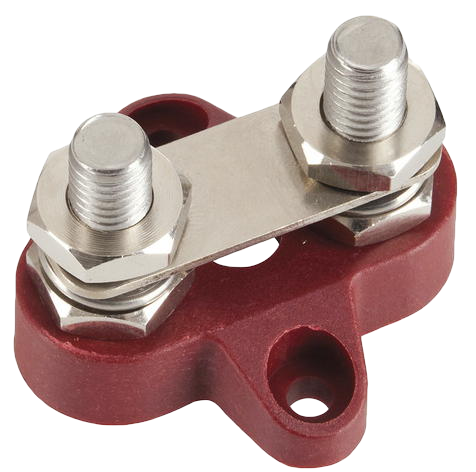 The new inverter’s cable was one more cable than our positive battery terminal could handle. With multiple appliance and charger cables connecting to the battery terminals, the screws on the terminals were struggling to accommodate yet another cable lug. To resolve this issue (and as part of our Lithium battery upgrade) we installed a couple of cable distribution posts (
Using the Inverter
 Once installed, turn the inverter on and plug an appliance into the 230V outlet. The appliance will operate just the same as when plugged into a domestic 230V outlet. Most importantly, exactly the same safety precautions apply as when using a 230V outlet at home. (Note: It is good practice to turn the inverter on and give it 10 secs to power up BEFORE connecting an appliance. Also, turn the power off on a connected appliance before turning the inverter off.)
If your battery monitor includes the facility to display amps in/out, you will be able to see how much current each appliance is drawing from your battery/s, through the inverter. You will also be able to see how much current the inverter is using when powered on in stand-by mode, with no appliances connected.
If your inverter is installed under a seat, in a cupboard, or in another out-of-the-way location (to be close to the batteries and/or for aesthetics) you will need to provide an easy connection option to access the power outlets.
The easiest DIY option in such a situation is to connect a switched power board to the inverter, with the outlets accessible in the kitchen bench area. Keep in mind though that the use of multiple outlets is governed by the capacity of the inverter; don’t get too carried away with running multiple appliances concurrently – you won’t be able to connect four high power draw appliances to the power board outlets and have them all running at the same time!
The 230V appliances we use with the inverter are a two-slice toaster (750W), a sandwich press (1000W), a microwave oven (1400W), and a hair dryer (500W / 2000W). These appliances draw a relatively large amount of current when powered from a 12V battery – they are all things that we don’t really ‘need’ when free-camping, but which we can flirt with now that we have the Lithium batteries. Camping edges towards Glamping!
Power choice: 12V DC or 230V AC?
Power delivered to an appliance directly from a 12V socket is a far more efficient use of your battery power than using an inverter to pump your 12V DC power up to 230V AC, and then have the electrics in the connected appliance scale it back down to the required low internal DC voltage. If a 12V power option is available, always use that option. Mobile phone or tablet charging is the obvious example – these devices can be connected directly to a USB outlet or cigarette lighter socket adaptor which is connected directly to your 12V house battery, rather than a 230V adaptor. A TV in a Campervan or Motorhome should also have a 12V option. Ditto for your fridge, which should only be connected to 230V when you are hooked up to mains power in a campground. |
 What appliances should I be running through an inverter?
Power it Up
Below is a summary of the current draw (Amps) and battery capacity depletion information (Ah) for our appliances when running through the inverter, as measured by our battery monitor. To put this information in perspective, our 110 litre 12V compressor refrigerator (not running through the inverter) draws 2.5 amps an hour, or 60 amps over 24 hours….
-
- Toaster (750W) – draws 70 amps. The toaster drains 2Ah from our battery capacity to toast two pieces of bread;
- Sandwich press (1000W) – draws 90 amps. The sandwich press uses a thermostat to maintain temperature – current is drawn only when actively heating. Drains 5Ah from the batteries to toast one sandwich (3-4 mins);
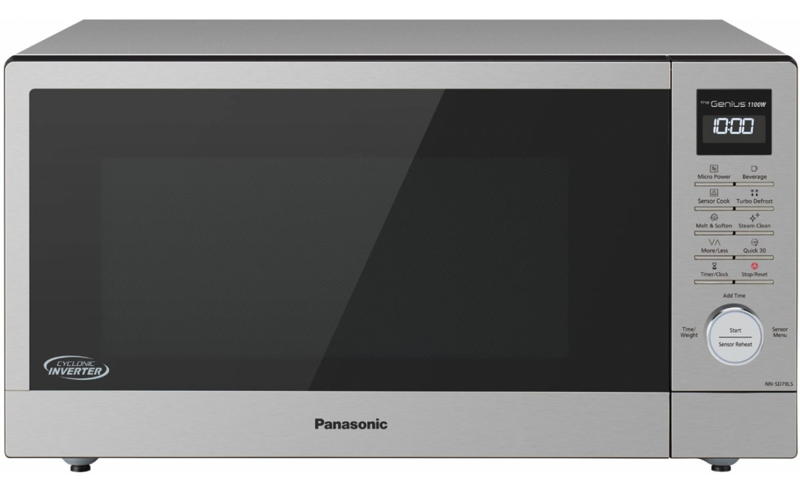
 Microwave oven (1400W) – draws 145 amps. Drains around 2.5Ah from the battery storage for each minute of use. Soaks up around 4Ah of battery capacity for a bowl of porridge. (Microwave oven specs often list ‘output power’ around 800 – 900W. This is the ‘cooking power’, which is much less than the power that the oven is drawing from the power supply.)
- Hair dryer (500W on Low, 2000W on High) – Used on the Low setting, the dryer draws around 47 amps. On the High setting it draws 165 amps. Uses 1Ah of battery capacity to dry hair on the ‘low’ setting (about 1 minute). Drains around 2.75 Ah from the batteries every minute it is running on the ‘High’ setting. (Note: We don’t use the dryer on the High setting.)
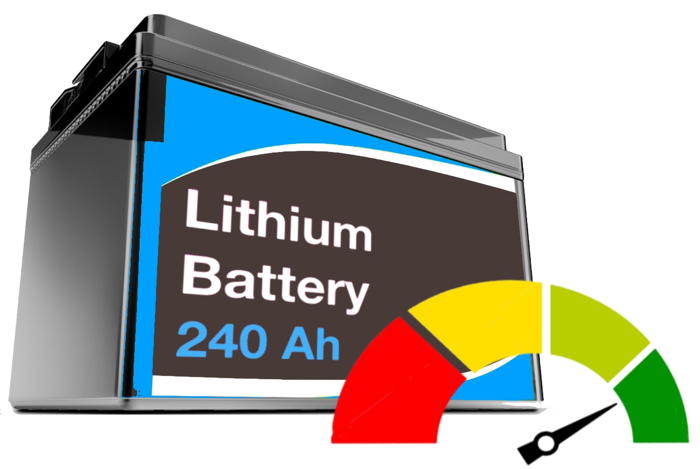
The first and most obvious conclusion from these observations is….. don’t run any of these appliances for too long! Our ‘usable’ battery capacity is 192 Ah – 80% of our total label capacity of 240 Ah.
None of these appliances have caused the inverter fans to kick in yet, so it has been completely silent. According to the inverter documentation the fans are temperature and load reactive.
If planning on free-camping in the one location for an extended period of time I would still be fairly hesitant to use the inverter too often, depleting precious battery energy storage (Ah), unless I was completely confident of our battery re-charging capabilities for the duration of our stay. I guess I still have the inverter slotted in the ‘luxury’ category, rather than the ‘essentials’ category.

Note: In the above graph, charge & discharge rates are displayed ‘per hour’, for direct comparison purposes. Though, in reality, while your fridge is running non-stop for hours, a 230V appliance (such as a microwave oven) will only be running for a minute or two.
-
- More info: Appliance power consumption >>>
Power Tools?
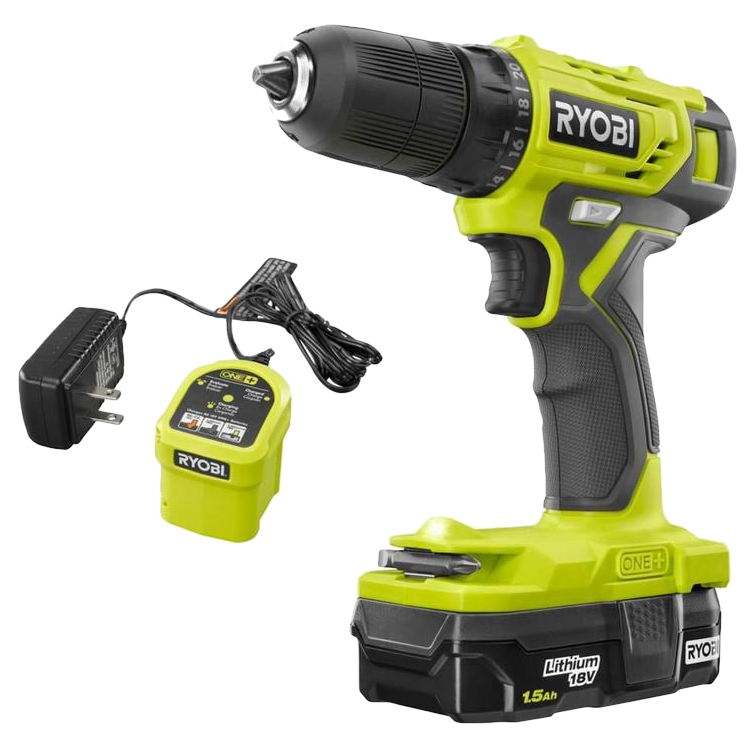
These days a wide range of portable power tools are battery powered. With occasional use and careful management, batteries for these tools can be re-charged from mains power when it is available, with no need to impose on your van’s battery capacity. If circumstances require re-charging power tool batteries from a 12V / 230V AC inverter, a basic battery-charger draws around 50W – 60W, and takes 1 – 3 hours to fully charge an 18V battery, depending on the capacity of the battery. Though only a partial charge may be required to get the immediate job done. (Carrying multiple charged batteries is useful too.) Or, you could purchase a 12V charger (Ryobi example), which can bypass the need for 230V mains power completely, for a far more efficient use of your 12V energy supply to directly charge power tool batteries. |
 In the past, those living in a mobile home for longer periods of time have used an inverter to run 230V power tools – drills, angle grinders, etc. A small mains-powered angle grinder can draw 700W – 900W.
Inverter Realities
 As you can see from the information above, it wouldn’t take too long for 230V appliances running through the inverter to drain the energy reserve of our 240 Ah battery bank. Fortunately the appliances we use only run for a few minutes.
To calculate the current (Amps) drawn by an appliance from a 12V battery through an inverter we can use the calculation:
-
- Amps = Watts / Volts
A neat rule of thumb is to divide the Watts by 10, instead of 12V. This is easier to calculate on the fly, and to some extent takes into account wiring and inverter inefficiencies….
-
- Amps = Watts / 10
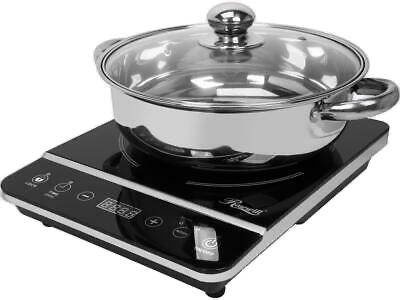 As an example, consider a portable induction cooktop. These 230V appliances are becoming popular for RV use, and are a great kitchen accessory when you are set up on a powered site – but will push the limits if powered from your 12V batteries through an inverter….
An 1800 Watt portable induction cooktop will need an inverter rated to supply at least 2000 Watts. An 1800W cooktop on the highest setting will draw around 180 Amps, draining 180 Ah from your 12V battery if left running for 60 minutes. So, if you are cooking for 20 minutes you will consume 60 Ah from your 12V battery’s stored energy supply. To put this in perspective, our 12V fridge, connected directly to the batteries, consumes 30 Ah over 24 hours.
This level of current draw is dependent on your battery’s continuous current capacity, but also has implications for your 12V cabling infrastructure and your circuit breaker’s load rating. And having said all that, some portable induction cooktops are rated at 2100W or 2400W.
Again, for some perspective, in a typical domestic environment an induction cooktop installed in your kitchen (usually with multiple cooking surfaces) requires a high capacity dedicated circuit to be installed directly from the cooktop to the household meter box, with its own circuit-breaker. How good is the electrical cabling in your van?
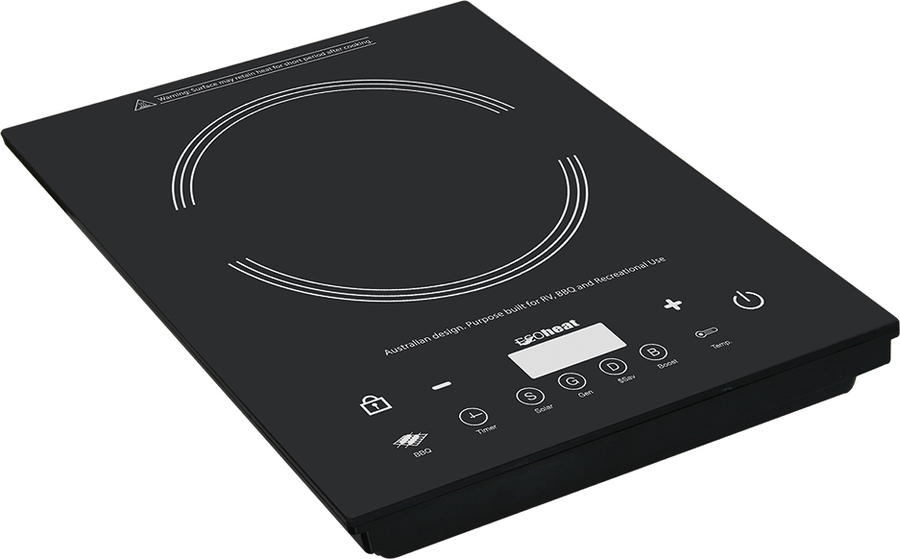 Induction Cooktops
This is one of those appliances that is becoming increasingly popular in Campervans and Motorhomes and, in doing so, replacing LPG appliances. Use of these appliances is made possible for use off-grid as Lithium batteries and more efficient solar panels (for recharging the batteries) become more affordable.
If you have an LPG cooktop in your van, a portable Induction Cooktop is also a handy backup if you run out of gas….
Off-grid Test: Our initial explorations with one of these cooktops, connected to a 2000W inverter, drew current as shown below on each setting (while boiling water)….
-
- Low – 500W: 2 Amps / 115 Amps (Thermostat on/off each 5 secs)
- Medium – 1000W: 120 Amps (Continuous)
- High – 1500W: 145 Amps (Continuous)
- Our initial observations – there is no shortage of heat! When preparing porridge, for example, the pot is too hot when the cooktop is set above 500W, burning the porridge. The 1000W setting will probably do the job for most camp kitchen tasks.
- Our second observation….. induction cooktops are probably great appliances for LPG-free cooking, but they really rip through 12V battery storage if running through an inverter. I still feel they are best suited for use on a dedicated 230V mains connection on a powered site – especially if you have an LPG cooktop for use when not connected to external mains power.
- Third observation (after a few weeks on the road, in winter) ….. Not really that necessary when we already have a built-in 3 burner LPG cooktop. (The induction cooktop has only one hot-plate.) Will be handy to run an extension lead out under the awning for outside cooking in summer though. Or for use inside in winter when not wanting to use LPG in an enclosed space with doors and windows closed.
Update: The availability of affordable larger battery and solar charging options are providing opportunities for vans to be fitted out with large capacity Lithium batteries – up to 600Ah – which makes the regular off-grid use of induction cooktops a realistic option.
‘Transparent’ Mains Power
These inverters are also known as ‘pass through’ or ‘AC Transfer’ inverters. All power outlets – except those supplying the fridge, air-con, AC-DC charger outlets, and hot water heater (if running on LPG when not connected to mains power) – are wired to provide 230V from the inverter. The inverter has two inputs:
If the van is connected to mains power in a campground, the inverter recognises that mains power is available, and passes the external mains power through to connected outlets/appliances, without activating the inverter. If there is no external connection to mains power, the inverter automatically kicks in and powers connected 230V appliances from the batteries. Example: Enerdrive 1120S-X 2000W with AC transfer (~ $1350) These inverters are not really suitable for retro-fitting to existing motorhomes. At least, not without hiring an electrician to re-cable all the power outlets in your van. Neat idea, and will be the way of the future. |
 An increasingly popular option in new motorhomes is the installation of a hard-wired ‘smart’ inverter, permanently connected to most power outlets throughout the van.
The Bottom Line
 It all gets down to what appliances you really need to run, if you have the battery capacity and cabling infrastructure to provide the power for those appliances, and then choosing an appropriate inverter…
AGM batteries: For every-day use I would be looking for a 400W – 500W inverter, and sticking to appliances with relatively low power requirements, such as charging a laptop computer, or an electric shaver, a drone, or camera batteries, etc. Or maybe a low power travel-style coffee maker. (Unless you have a large battery bank.) If you use a CPAP machine, check out the new 12V models that can run directly from your battery.
Lithium batteries: With two (parallel) batteries, a 1500W or 2000W inverter is an option, with the ability to run higher power items with a relatively short run-time, such as a toaster, travel kettle, hair dryer, sandwich press, or microwave oven – if you have enough battery storage capacity (at least 200Ah), and a robust battery re-charging capacity. IMHO, it is probably still best to avoid high current-draw appliances that require a long run time while free-camping. An induction cooktop, for example, is one of those ‘marginal’ appliances that may be an option, depending on the setting used on the cooktop, the capacity of your battery bank, and your battery recharging capability – and it only has one hot-plate. (An LPG cooktop has multiple burners and doesn’t impact your 12V storage capacity.)
High-power appliances: For more power-hungry heating and cooking appliances, I would suggest that LPG or diesel-fuelled alternatives are still a better option. We are not quite there yet with the average Campervan or Motorhome with one or two Lithium batteries. If you are thinking about running air-conditioning away from a mains power supply, start thinking about a generator!
More on inverters:
See also: |
See also: Lithium Battery Upgrade | Installing a Battery Monitor | Installing an Inverter | OLD – Kings Inverter remote power switch
Batteries | Consumption | Battery Recharging | Solar Charging | How Long Without Sun? | Alternate Charging Options | Solar Regulators | The Bottom Line