
Sustainability: Batteries & Solar | Water | Heating
Batteries | Consumption | Battery Recharging | Solar Charging | How Long Without Sun? | Alternate Charging Options | Solar Regulators | The Bottom Line
See also: Lithium Battery Upgrade | Installing a Battery Monitor | Installing an Inverter
Extra (for car camping): Install a Battery Monitor in a Portable Battery Box
 A comprehensive battery monitor is one of the most useful pieces of kit that we have installed in our van. No more guessing how much current is being consumed by appliances, or how much current is being recharged to the batteries, or wondering about the batteries’ state of charge. This monitor makes all that info available at the touch of a button. A comprehensive battery monitor is one of the most useful pieces of kit that we have installed in our van. No more guessing how much current is being consumed by appliances, or how much current is being recharged to the batteries, or wondering about the batteries’ state of charge. This monitor makes all that info available at the touch of a button. |
Background
 Most Campervans and Motorhomes are fitted with some sort of meter that monitors the battery’s state of charge – a fuel gauge for your 12V energy supply.
For vans with AGM batteries this is most likely a voltmeter, which (you guessed it) displays the voltage of the battery/s. The voltage available from AGM batteries declines in a reasonably linear fashion as the batteries discharge. This voltage / charge relationship permits an assessment of the State of Charge (SoC) of an AGM battery based on its voltage.
Lithium batteries however maintain a fairly constant voltage over their period of discharge, making an assessment of their State of Charge (SoC) based on a simple voltage reading impracticable. Assessing the SoC of Lithium batteries requires the use of a more sophisticated meter that measures not only the battery voltage, but also the current flowing into and out of the battery. These meters are known as Coulometers. (Coulomb is a unit of electric charge.)
Battery Capacity?
However, these monitors are not able to automatically detect the battery’s total capacity, but depend on this information being entered by you when initially calibrating the monitor. (Link to more info at the bottom of this page.) |
-
- See also: Our Lithium Battery Upgrade >>>
Upgrading
Our van was initially fitted with a voltmeter, installed in the electrical control panel cupboard. When we had AGM batteries, measuring the voltage of the batteries provided a reasonable estimate of the State of Charge of the batteries. 12.1V (when ‘resting’) was an approximate indication of having reached 50% of battery capacity – the suggested maximum discharge for AGM batteries to maintain a reasonable life span.
Seeking to be able to access more information about our 12V electrical system – particularly relating to the Current (Amps) flowing into and out of the batteries – we fitted a more comprehensive Coulometer battery monitor. This is particularly necessary for Lithium batteries.
The new monitor reports information about not only battery Voltage, but also provides a ‘live’ display of electrical current (Amps) into and out of the battery, the Ah capacity remaining in the battery, and the battery’s State of Charge as a percentage of a full charge..
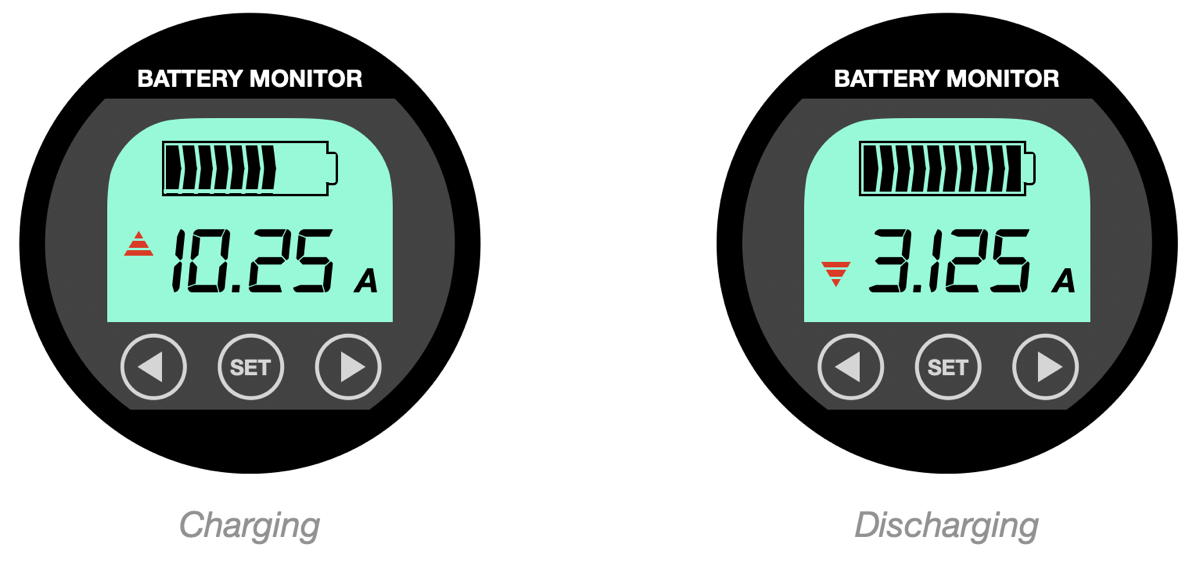
We find the Amps in/out function particularly useful – this can be used to check the current being consumed by particular appliances, as well as the input current being generated by the solar panel, or the alternator, or 230V charger.
|
This updated monitor appears to provide the same electrical information as the previous model, with the addition of a graphical display of the battery State of Charge (SoC) and an estimation of the charge time remaining at the current rate of discharge, without toggling between displays. I am not rushing out to replace our existing iTechWorld monitor with the new model – especially since the new monitor requires a rectangular cut-out (through laminated ply), rather than a nice simple round hole. Also, the new model is supplied with only a 3m cable, which would be a problem in our particular situation. For those installing the new model the installation information below is the same as the previous model, except for the shape of the mounting hole. If you would prefer to stick with a round monitor similar to the original ITechWorld monitor, check out the Kings Battery Monitor and Shunt, or the range of (top quality) Victron Battery Monitors. |
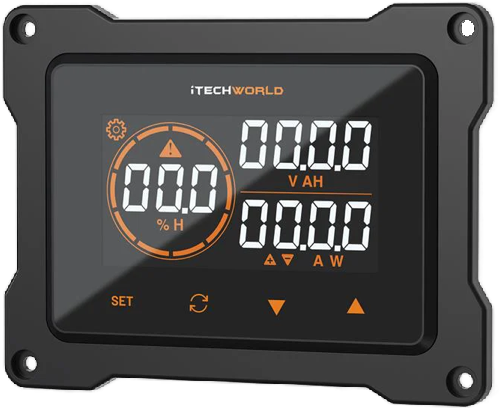 Update: Since those article was published, iTechWorld have introduced a new version of their
 Which Monitor?
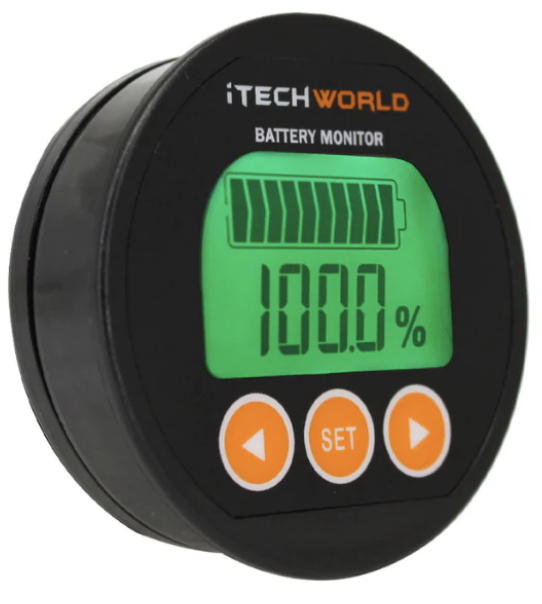 We purchased the original (round) ITECHBM500 battery monitor from iTechWorld (pre 2025 – as shown in the image on the right). The monitor is ideal for use with Lithium batteries, but functioned just fine with our AGM batteries prior to our Lithium battery upgrade.
The original iTechWorld monitor appears to be much the same as the QWORK battery monitor, or the AiLi Battery monitor, which are available from the regular online suppliers. Adventure Kings also stock a similar monitor.
The Renogy 500A Battery Monitor is similar to the rectangular iTechWorld model, for a similar price, while the Victron battery monitor is considerably more expensive, but includes Bluetooth and a connecting phone app.
All monitors are supplied with a shunt to connect directly to the battery, and a light multi-core cable to connect the shunt to the monitor display.

Here is what we were looking for, and why we chose the iTechWorld battery monitor…
Functionality: Most battery monitors measure and display much the same information….
-
-
-
- Voltage;
- Amps in (charge);
- Amps out (discharge);
- Remaining battery capacity (Ah);
- Remaining battery capacity (%).
-
-
A couple of the most expensive monitors include options for connecting water tank monitors, etc, while some of the monitors in the higher mid-range include Bluetooth and a phone app – but even though we love the technology stuff, we figured this wasn’t really necessary in a van where we are never more than a couple of metres from the monitor display.
Display cable length: One important difference between the iTechWorld monitor and some of the similar online cheapies is the length of the multi-core cable that connects the shunt to the display – the iTechWorld cable is 8 metres long, rather than the 2 metres of some of the cheap models. (A similar monitor from Aussie Batteries includes Bluetooth, but only a 1 metre cable.) The longer display cable was an essential consideration for us, given the location of the monitor display (in the control panel cupboard) in relation to the batteries (and shunt) in our van.
Display mounting: A relatively minor issue in the big scheme of things, but check the space you have available to mount the monitor display, and how the display is mounted. Some displays are mounted on top of the surface, while others are recessed into the surface. A couple of the monitors required a rectangular hole to be cut, rather than a (much easier) round hole to be drilled. The iTechWorld monitor display (pre 2024) required a large hole (~54mm) to be drilled to provide a neat flush fit into the mounting panel. This was a perfect arrangement in our environment.
Shunt capacity: All these monitors require a shunt connected to the battery (read more below). All the current being consumed in your van has to run through the shunt to be measured by the battery monitor. Some of the cheaper monitors have shunts rated at only 50 amps. The iTechWorld monitor shunt is rated at 500 Amps, which makes it suitable for use with high power-draw equipment connected through an inverter.
Price: A quick online search will find battery monitors ranging in price from under $50 to over $800, with the more expensive units including Bluetooth connectivity, monitoring of water tanks, colour displays with graphs, etc. The iTechWorld monitor was around $150, and does everything that we need it to do.
Warranty and support: When you buy an online cheapie you are not likely to get any after-sales support, and any talk of ‘warranty’ is a bit hit and miss. The iTechWorld monitor includes a 12 month warranty, and the staff there were only too happy to help out over the phone when we needed some info on the initial setup.
Installing the Monitor
Note: The information below relates to installing a monitor requiring a round opening, while rectangular monitors will require some additional work with a saw.. Otherwise, a similar procedure.
While not too technically complicated to install, there may be some level of carpentry, cable fitting and electrical expertise required to install the monitor, depending on the location of your batteries and where you locate the display.
There are three main steps in the installation of a battery monitor…
-
- Locating and mounting the display;
- Fitting the shunt, adjacent to the battery/s;
- Cabling it all together.
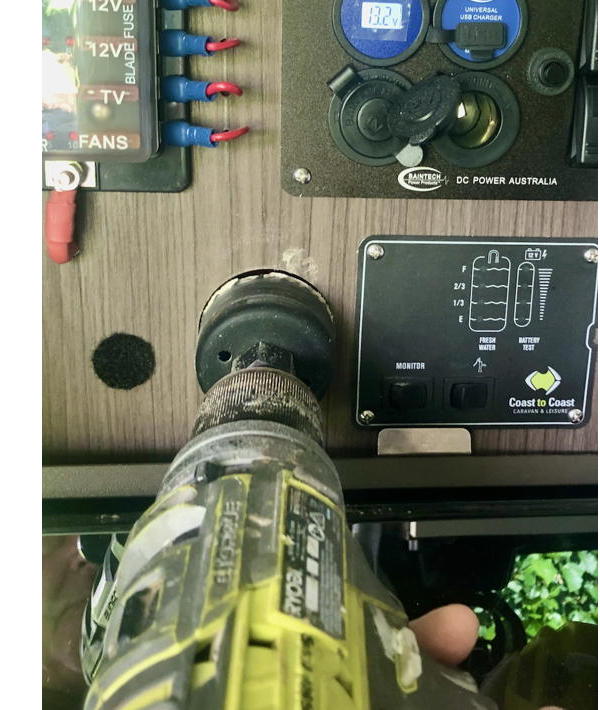
Display: We installed the display in the cupboard containing our electrical ‘control panel’, which is on the opposite side of the van to the batteries, located at head height for easy viewing. This control panel has a door closing over it, which is another important consideration, given that the monitor is often illuminated during the night.
Fitting the the monitor display required a suitable hole (~54m) to be drilled in the panel, to flush-mount the display unit. (See pic above right.)
-
- Suggestion 1 – Drill a test hole in a spare timber/ply offcut to check size and fit before drilling the hole in location.
- Suggestion 2 – Double check that there are no exisiting cables behind the panel, or no screws in the panel, before drilling.
Shunt: The shunt is installed adjacent to the house battery/s, to be connected in series with the negative appliance and charger cables that are already connected to the negative terminal of the battery/s.
Cabling: The shunt is connected to the house battery/s with a short heavy duty cable (2 AWG), and to the display unit with a longer, flexible light duty cable.
In our setup, there was a little bit of work involved in running the monitor cable from the battery shunt to the display. Retro fitting bits and pieces like this is always a bit of a fiddle, squeezing cables through already-full conduits and holes – and carefully drilling mounting holes in already populated panels, without damaging existing cabling.
To connect the shunt to the battery, the existing negative cables are disconnected from the negative battery terminal, and instead connected to the P- terminal of the shunt – except of course the cable connecting two batteries in a parallel battery installation.
You will need to purchase an additional heavy duty battery cable (2 AWG fitted with lugs) to connect the B- terminal on the shunt to the negative terminal of the battery. Cost is around $20, from your local auto parts store.
 The shunt also requires a low-current connection to the positive terminal of the battery. This cable powers the monitor display. The iTechWorld installation kit includes a suitable cable, about 1 metre in length, fitted with a lug for connection to the battery terminal. We also fitted a 1 amp inline fuse to this connection (not included in the kit).
What is a shunt?
The tiny voltage drop through the shunt due to its resistance is measurable, but so small that it does not have any impact on connected appliances. Using Ohm’s Law (V = IR) a calculation can be applied, based on the measured voltage drop (V) and the shunt resistance (R) to display the amount of current (I) going through the shunt. Make sure your shunt is rated to pass enough current (amps) to support all connected appliances, particularly if you are using an inverter. |
 A shunt is an accurate, very low resistance resistor – in the order of 0.002 ohm – which is placed in-line in the negative cable from the battery, so that all the current going out of the battery (discharging) or into the battery (charging) must pass through it.
Running the multi-core monitor display cable from the battery/shunt location under the seat on one side of our van, to the control panel display at head height on the other side of the van was a bit of a challenge, requiring removal of some cabinet panels and wall lining, along with much crawling under the van and squeezing of the cable (and plug) through confined spaces. All then neatly secured with cable ties!

Making it count
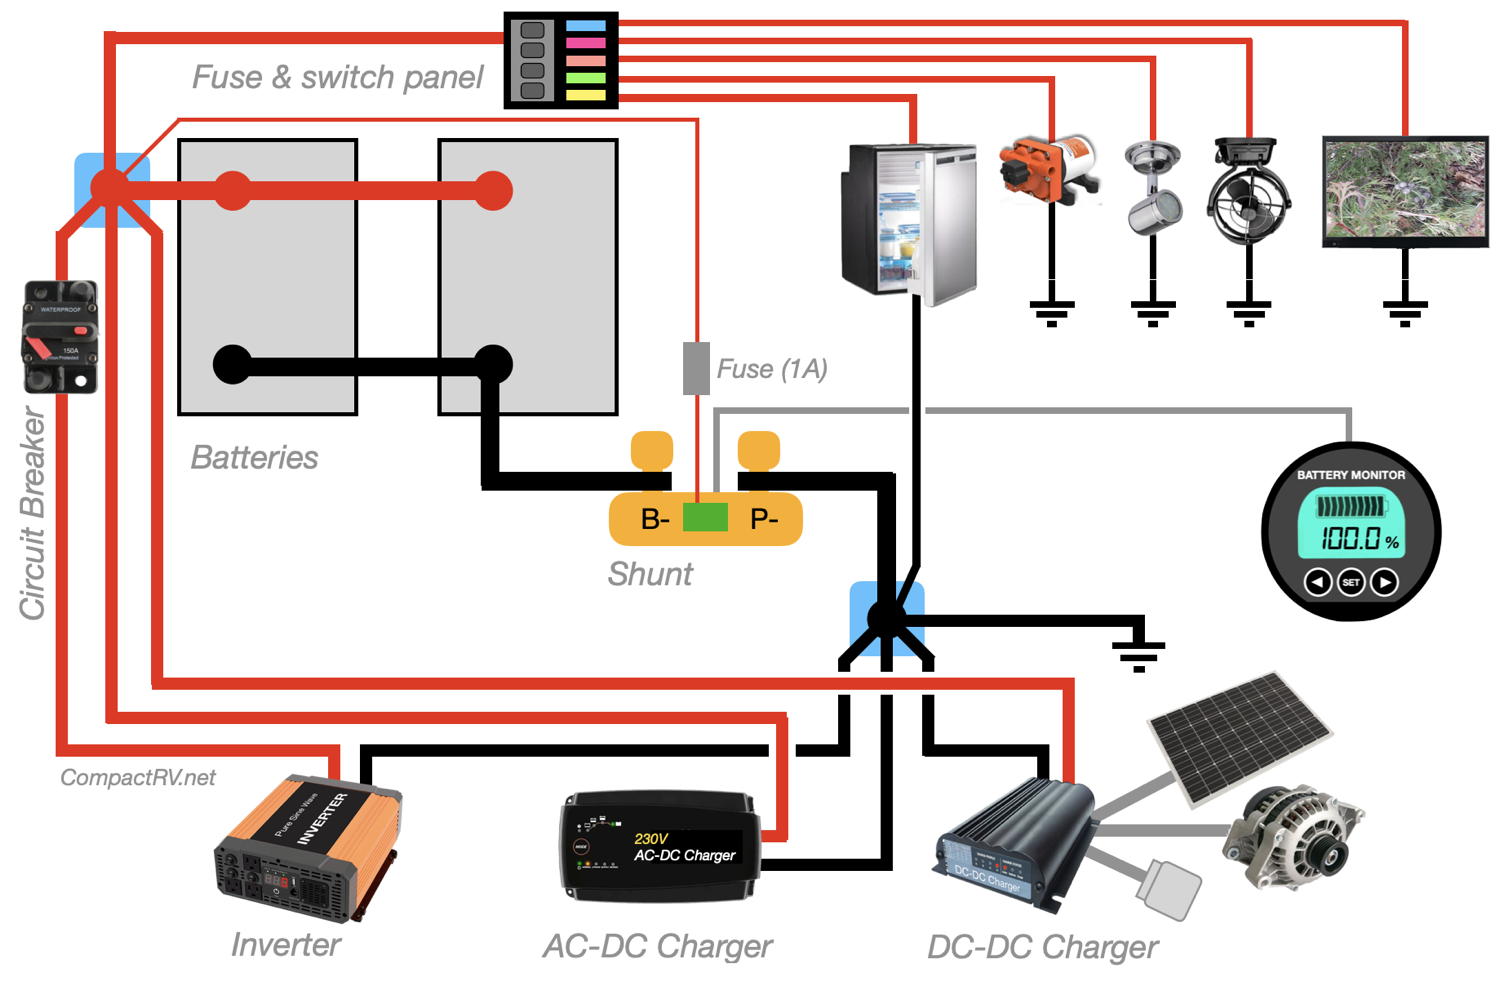
Any appliances or devices that consume current from the battery, or feed current to the battery, are connected to the P- terminal of the shunt (P = Products). The other side of the shunt, the B- terminal, is connected to the -ve terminal of the battery (B = Battery).
There should only be one cable connected to the -ve terminal of the battery (other than the parallel connection to another battery) – the cable to the B- terminal on the shunt. The monitor is then able to accurately register all the electrical current feeding into or out of the battery.
Current flowing through appliances that have their -ve cable connected to the vehicle chassis will be registered through the monitor if the chassis is connected to the -ve terminal of the battery though the shunt……
Be sure that the monitor shunt has the Amp capacity to support the heavy current likely to be drawn by an inverter. Also note the inclusion of an appropriate circuit breaker for an inverter.
See also: Installing an Inverter.
Cable de-clutter
The battery terminals themselves were also difficult to access, and would be even more-so once an inverter was installed above the battery housing. We tidied this up by adding a couple of distribution posts (Jaycar, $12). represented as the blue terminals in the above schematic diagram. All appliance cabling now runs to the +ve and -ve distribution posts, which each have a single, short, heavy duty cable (2 AWG) connecting to their respective battery terminals, inside the ventilated battery housing. We fitted similar (short) heavy-duty cables to connect the battery terminals in the parallel cabling arrangement. More info: Campervan Cable Tidy Up >>> |
 In the process of installing the monitor (and subsequently an inverter), we realised that our battery terminals were suffering from cable clutter, to the point where the terminal screws weren’t long enough to accommodate more cable lugs.
Using the monitor
While I have no hesitation in recommending the iTechWorld monitor for its ability to provide electrical details about the battery, the documentation that accompanied the monitor was pretty basic. Although a reasonably straightforward process to setup, it took a little trial and error to understand how to accurately calibrate and use the monitor to display the relevant information.
The user manual provided with the ITechWorld monitor is very basic, and overlooks some important information likely to be required for the average new user to easily calibrate and use the monitor.
In a nutshell, if you have purchased one of these monitors, here is how to display the information in which you are likely to be interested….
-
-
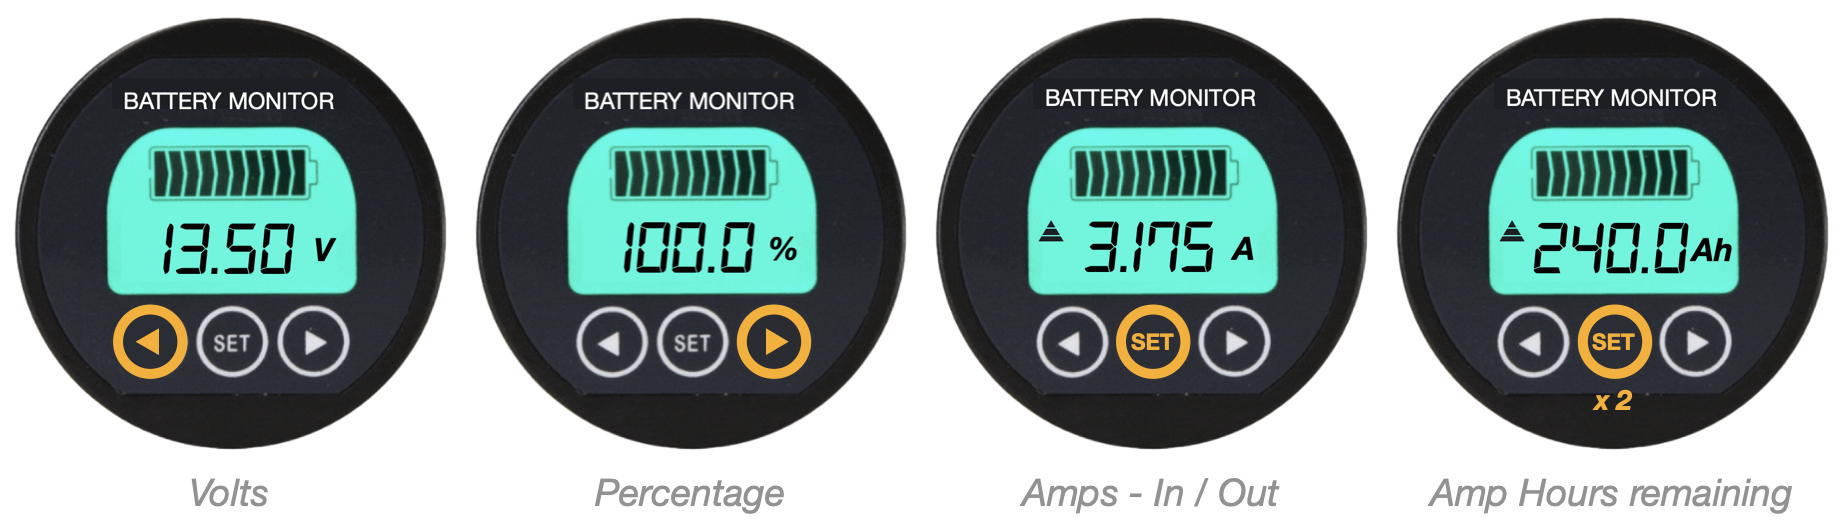
- Voltage: Press the left < button once to see the battery voltage;
- Percentage charge: Press the right > button once to see the % charge of the battery;
- Amps In / Out: Press the SET button once – the meter displays the ‘net’ Current flow in Amps, while the up/down triangle symbols on the left of the display indicate if the net current is moving into or out of the battery (charge/discharge);
- Battery capacity: Press the SET button again to display the remaining battery capacity in Ah.
-

However, the default battery capacity set on the monitor when you take it out of the box is 20 Ah. So, for any of the Ah or % readings to be accurate you will need to first calibrate the monitor to suit the specifications of your battery/s…..
|
More reading:
|
See also: Lithium Battery Upgrade | Installing a Battery Monitor | Installing an Inverter
Batteries | Consumption | Battery Recharging | Solar Charging | How Long Without Sun? | Alternate Charging Options | Solar Regulators | The Bottom Line