
Lithium battery upgrade | Install an inverter | Install a battery monitor | DIY Projects
One thing leads to another
We recently upgraded some of the electrical infrastructure in our van….
-
- Swapped our AGM batteries for Lithium batteries;
- Installed an Inverter;
- Installed a battery monitor;
These upgrades and additions provided an opportunity to re-think, re-organise and update some of the associated cabling and battery housing infrastructure…..
If a job is worth doing…
![]() The upgrades listed above highlighted a number of bits ‘n’ pieces in our van’s electrical system that could do with some attention…
The upgrades listed above highlighted a number of bits ‘n’ pieces in our van’s electrical system that could do with some attention…
Issue 1: Our batteries were contained in plastic battery boxes, in a difficult-to-access area in a side cupboard under the bed. This is a good location in an electrical sense – right next to the fridge, our biggest user of the batteries’ stored energy.
Although we don’t access the batteries very often, when we did need to it was a real pain getting access inside the boxes.
Remedy: Replace the plastic battery boxes with an alternative (and more durable) housing that provides easier access to the batteries when required.
Issue 2: Once we removed the battery boxes and tidied up the battery housing area it was apparent that the cables connecting the two batteries in parallel wandered around a bit, and could have been shorter and of a heavier gauge.
The cables connecting two parallel batteries together need to be heavy gauge and as short as possible. In reality, the original cables were probably doing the job OK, but shorter and thicker is always better. Especially now that we will be using an inverter that might be pulling over 100 amps from the batteries.
Remedy: Replace the existing cabling with shorter, heavier gauge cables.
Issue 3: When we started installing additional cabling for the new inverter and battery monitor it soon became apparent that the new cables were one cable lug too many for the M8 terminal screws on the batteries. We did consider replacing the screws with longer screws, but realised that this was just kicking the can down the road.
Remedy: Install a couple of busbars or distribution posts to accommodate the wiring load. This will provide the added bonus of moving the battery connection points outside of the battery housing, making them more easily accessible for connecting additional cables in the future.
Replacing the battery housing
First job was to ditch the plastic battery boxes. Although they did their job, they were a bit clunky. We were able to replace them with a more sturdy and durable marine ply housing, providing easier access to the batteries when required, while also providing a stable storage platform above.
We re-used the existing strapping mechanism, securing the batteries to the floor of the van using seat-belt webbing and a locking plate, but without the battery boxes. The new batteries are now sitting on (and have fitted between them) 10mm poly-foam packaging material to absorb the transmission of transport shocks and bumps.

On the level
The marine ply battery housing provides a solid platform on which to mount the new power inverter, in an ideal location close to the batteries.

The platform could, of course, be used for all sorts of storage, if an inverter isn’t your thing.
Making the connection
The existing cables between the parallel batteries were 600mm long, 6 B&S (16 mm²) cables. This sizing was probably best suited to navigating the ins and outs of the battery boxes. With the boxes gone, we were able to replace these cables with shorter and heavier gauge cables – 250mm long, 2 B&S (32 mm²).
The battery terminals are connected to distribution posts (see below), to which all appliances and chargers are now connected.
Of course, the batteries in a parallel setup remain directly connected to each other.
Spreading the cable load
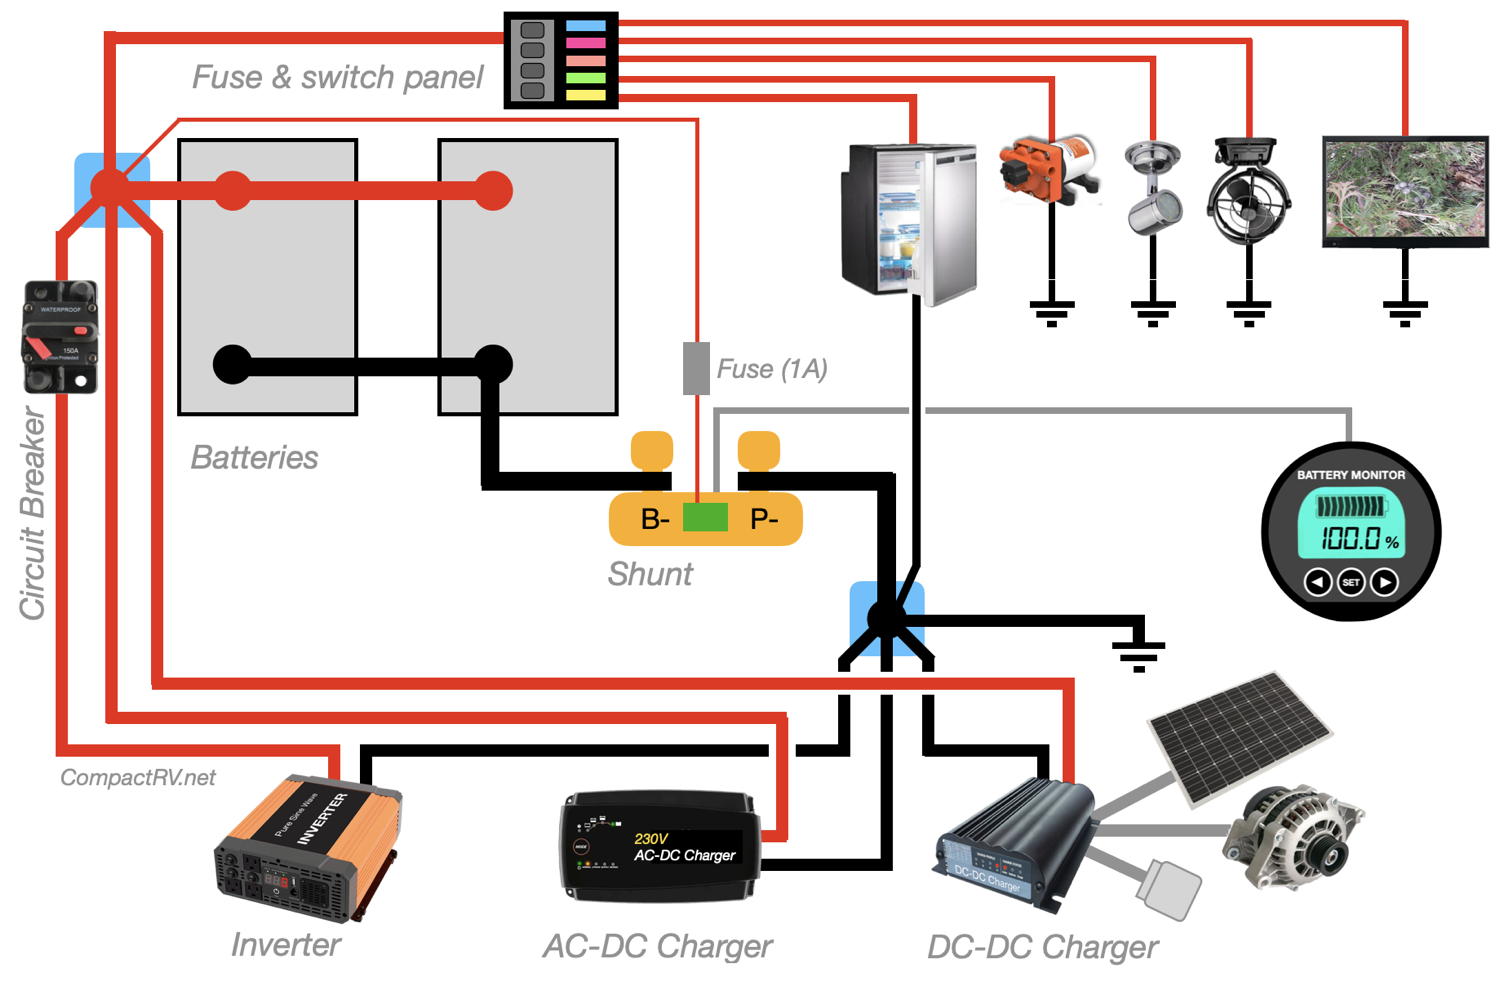
 Rather than have all cabling connected directly to the battery terminals, we installed a couple of dual distribution posts adjacent to the batteries (Jaycar – $15).
These distribution posts are fitted outside the battery housing and connected to the batteries with short heavy gauge (2 B&S) cables.
These cables are readily available in various lengths in the battery section of your local auto parts store for around $20. Though for some unknown reason, red cables are difficult to find in auto stores. Black and blue seem to be the popular colours.
All appliance and charger cabling is now connected to the distribution posts, rather than directly to the batteries.

The cable distribution posts are mounted adjacent to the battery housing, providing much easier access to existing cabling connections, and will simplify the connection of any additional cabling in the future, without removing the battery housing or requiring direct access to the battery terminals.
The Hookup
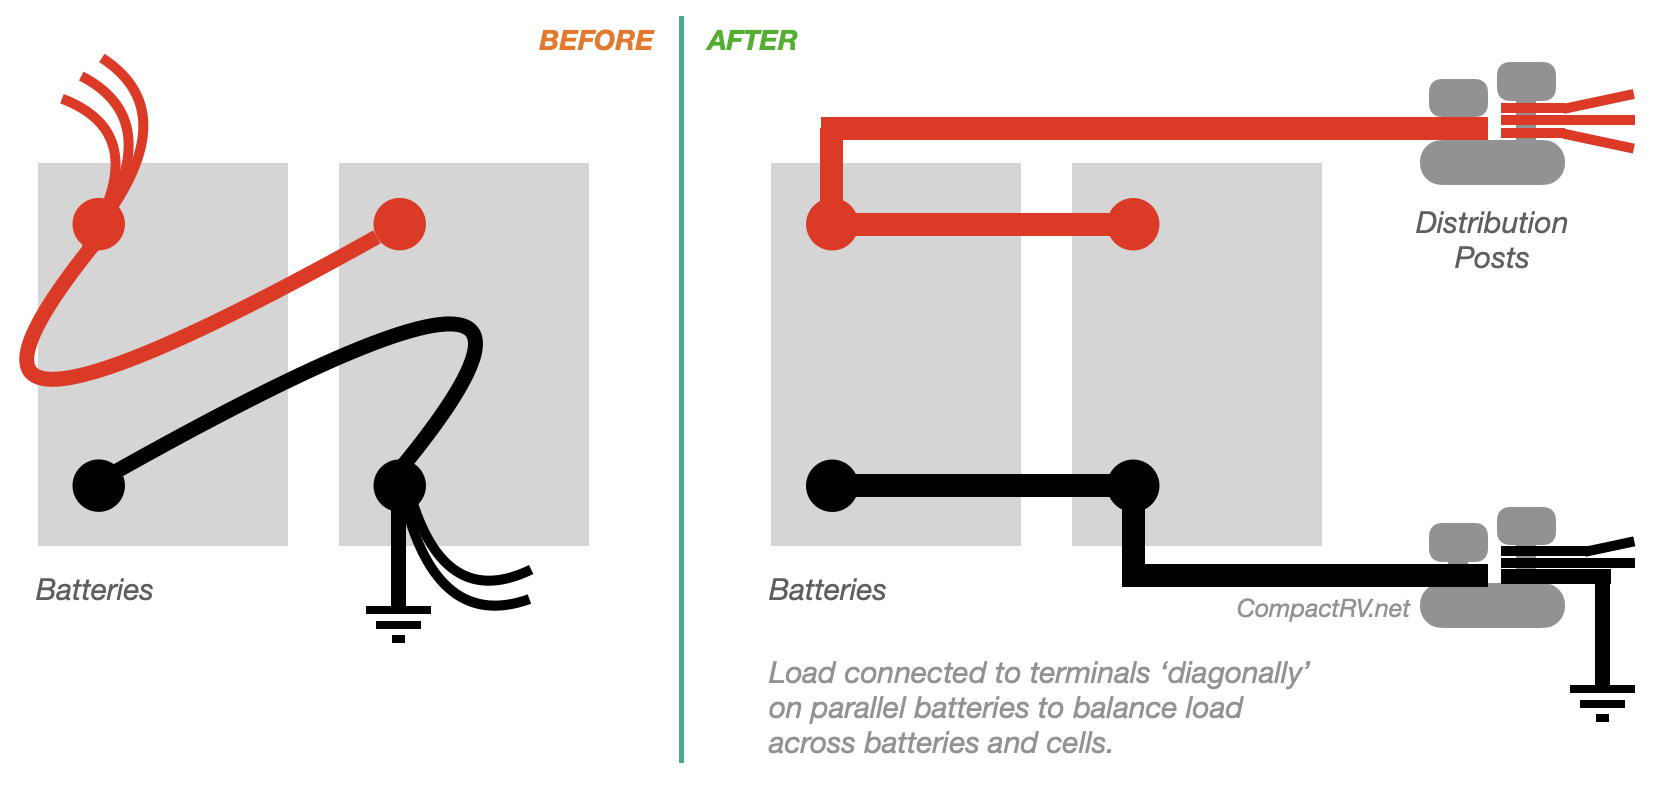
Once your batteries are re-housed, and distribution posts are in place, all cables previously connected directly to the battery terminals should be connected to the distribution posts – except for the cables connecting multiple batteries together in a parallel battery setup.
Note that the distribution posts are connected to ‘diagonally opposite’ terminals in a parallel battery installation – negative from one battery, positive from the other battery. This arrangement assists in ‘balancing’ charging and discharging across the batteries. More info at our Parallel Universe page.
(Distribution posts shown in blue in diagram above)
Lithium battery upgrade | Install an inverter | Install a battery monitor | DIY Projects