Swytch e-Bike Conversion – Background Info
Road Bike Conversion | Mountain Bike Conversion
The previous page discussed the general issues we considered when planning to convert our road bikes to be powered by a battery, or at least be boosted by a battery.
The info below provides some more specific information regarding our e-conversions, and the results of those conversions.
Another page discusses our more recent conversion of our mountain bikes using Swytch kits.
-
- See also: Kiama Bicycle Users Group >>>
-
- Download: Swytch OLED Quickstart Guide >>>
Ordering and delivery
 At the time of ordering our kits (late 2022), Swytch appeared to be in ‘startup’ mode – not wanting to commit to stockpiling their warehouse without firm orders, hence the lengthy time delays between customers ordering and kit delivery.
-
- Early September 2022 – We registered our interest on the Swytch ‘waitlist’.
- Mid September – We ordered our kits and made a deposit payment.
- November – We confirmed our order, finalised our customisations (control display unit, wheel colour, battery size) and made the balance payment.
- March 2023 – Our kits arrived at our front door.
Ordering and delivery updateWe have recently purchased another four Swytch kits – two for our MTBs and two for friends’ bikes. Delivery times have improved dramatically since our initial purchases. One delivery was two weeks from the time of ordering, the next three weeks. Recent ordering / delivery details on our MTB installation page >>> |
Installation
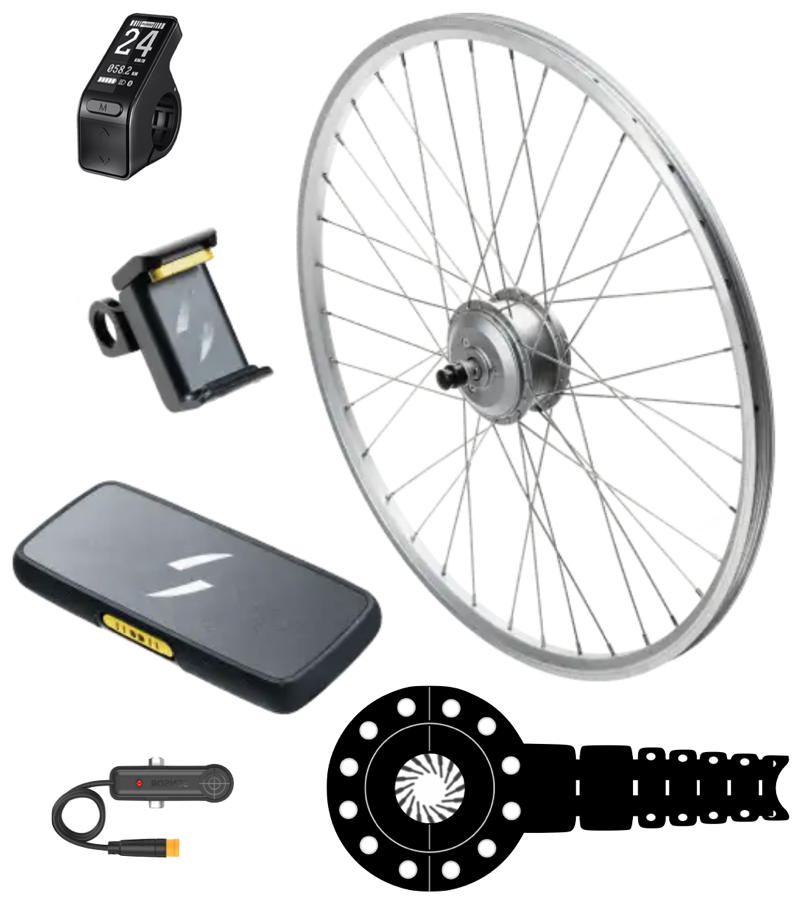 There are four parts to the Swytch kit:
-
- Front wheel with hub motor (250W, 40Nm);
- Battery & handlebar mount (MAX battery: 180Wh, 5Ah);
- Control display module (OLED);
- Magnetic crank disc and pedal assist sensor (PAS).
From our experience, don’t expect that the installation procedure will be the simple “1 – 2 – 3” jaunt as suggested in the Swytch promotional video!
Front wheel & hub motor installation
The Swytch hub motor is supplied pre-installed on a wheel to suit your bike. When ordering your Swytch kit you specify the size of the wheel, and the colour – silver or matte black (extra cost).
Our bikes were originally fitted with quick-release spindle axles. The Swytch wheels with the motor fitted have a solid axle shaft, held to the forks with hexagonal nuts (17mm spanner required). The Swytch wheels are fitted with 12G spokes, whereas our original wheels were fitted with lighter 14G spokes.
Note: If you are considering fitting a Swytch motor to your own wheel, your wheel will require 36 spoke holes – most standard wheels have 32 spokes.
Important note: The Swytch motor wheel requires 100mm space between forks, and is not compatible with thru axles – more info >>>

The Swytch motor axle is 10mm across the flats, designed to fit into 10mm drop slots in the forks. On one of our bikes the axle flats needed a light file to fit into the drop slots.
On the second bike a more severe adjustment was required, taking 0.5mm off each flat on each end of the axle for it to fit in the 9mm drop slots.
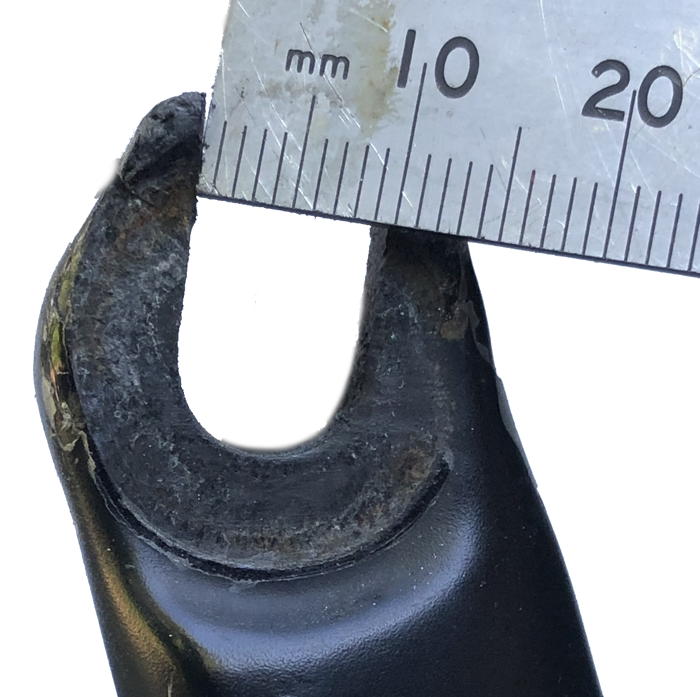
The axle has to be a precise fit in the drop slots, but still able to be easily removed when on the road, in case of a puncture. After filing, we spray-painted the filed flats with a good quality protective primer paint, to discourage premature corrosion. (And yes, I would also suggest that filing the axle is a far better option than filing the fork slots – especially if you have carbon or alloy forks, or you ever want to reinstall the original wheel!)
-
-
-
- More info: Swytch Axle Filing Tutorial (Video) >>>
-
-
Note 1: Swytch now offer an ordering choice between a 9mm and 10mm axle. If you aren’t sure, go with the 10mm axle and file it down. Even though our 10mm axles required filing / grinding to fit our fork slots, I reckon 9mm axles may have been too small, resulting in a sloppy fit. The 10mm axles, filed down to the exact size, are a nice snug fit.
Note 2: We haven’t fitted torque arms to our forks. Torque arms are steel supports designed to resist a sudden twisting force from the motor damaging the drop slots. We are still assessing the need for this, though with the relatively low-power Swytch motor (250W / 40Nm) and our use of only the low levels of e-Boost we don’t feel it is an urgent need.
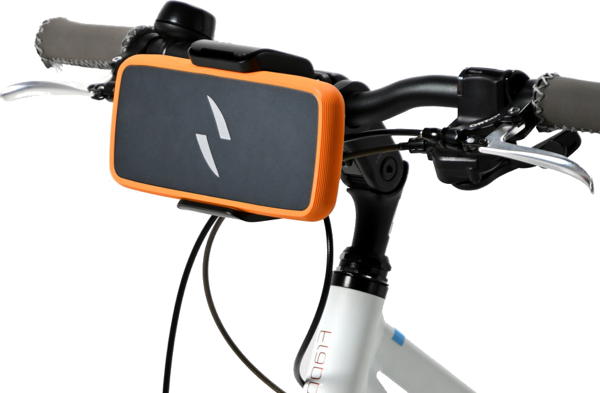
Battery Mount
 The fitting of the battery mount on our flat handlebars was straightforward. The mount sits far enough off the handlebar that it is clear of the brake handles and cables, and the bike can still be upended and rested on the handlebar when required, for repairing tyres, etc. (We both have flat bars on our bikes.)
The battery mount also contains the electronics that control and regulate the power going to the motor from the battery and boost control settings, along with monitoring activation signals from the Pedal Assist Sensor (PAS).
The mount does consume a little handlebar real estate in the centre of the bar, so a few adjustments were required to re-accommodate lights, bell, Garmin computer, and the Swytch OLED display, etc.
Battery
 While some of the Swytch kit components appear to be re-branded products similar to e-Bike conversion components available from other suppliers, the slimline battery appears to be unique to Swytch.
The handlebar-mounted battery was one of the Swytch attractions for us – preferable to a larger frame-mounted ‘bottle-battery’ or a luggage-rack mounted battery. An alternative seat post mount is also available from Swytch.
Swytch claim a range of 15 kms for the smaller and lighter Air battery, and 30 kms for the larger MAX battery, though I have not been able to find any measurement criteria for how Swytch calculate this range, other than that they use the ‘default’ settings – whatever they are.
As we have discovered through our test rides, the range of the MAX battery is much greater than 30 kms if the battery is used as we plan to use it – as a temporary ‘boost’ rather than for permanent power. (See test ride info below.)
I expect that if you were riding with constant assistance on, say, Level 2, your range might be around 25 – 30 km.
Control Display Module
 We purchased the Swytch OLED control display unit as part of our order. This is an optional add-on when ordering.
Note: After using the OLED display now for over 18 months, and riding with other Swytch users who have fitted a standard controller display, I would suggest that the OLED display is an essential upgrade.
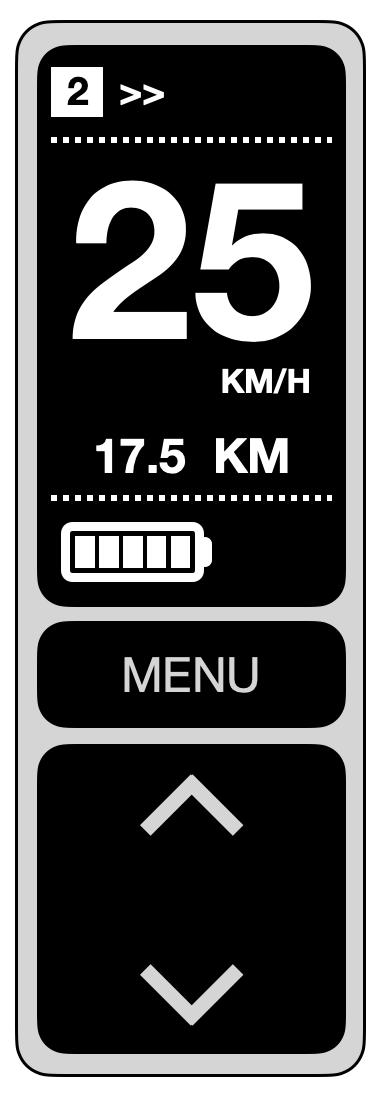
The OLED display has a high contrast 33mm screen (diagonal) that is clearly visible in all conditions. It has a tempered glass screen and is fully waterproof with an IP65 rating.
The unit includes a speed display, with up/down touch buttons for five levels of assist, (plus a zero-assist level), as well as a trip odometer, trip time, average speed, and maximum speed (via the Menu button). The display can be reset for each new trip, but also maintains a cumulative tally of total distance travelled.
Various basic calibration settings can be changed in the Settings menu, including wheel size and maximum boost speed. Definitely worth the extra $70 (USD).
Note: The Swytch OLED control display module appears to be a rebranded Bafang SW-102 display. However, due to different electrical configuration and connector fittings, the Bafang display is not directly compatible with the Swytch kit wiring harness.
Magnetic Disc and Pedal Sensor
This was the trickiest and most time consuming part of the installation. (It must be a challenge trying to design and manufacture something like this as a one-size-fits-all solution to suit every bike in the world!)
There are three parts to this puzzle….
-
-
-
- Fitting the rotating magnetic ring;
- Fitting the fixed pedal sensor;
- Getting the above two components perfectly aligned!
-
-
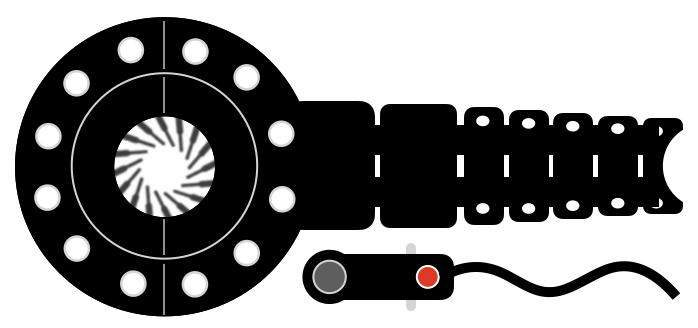
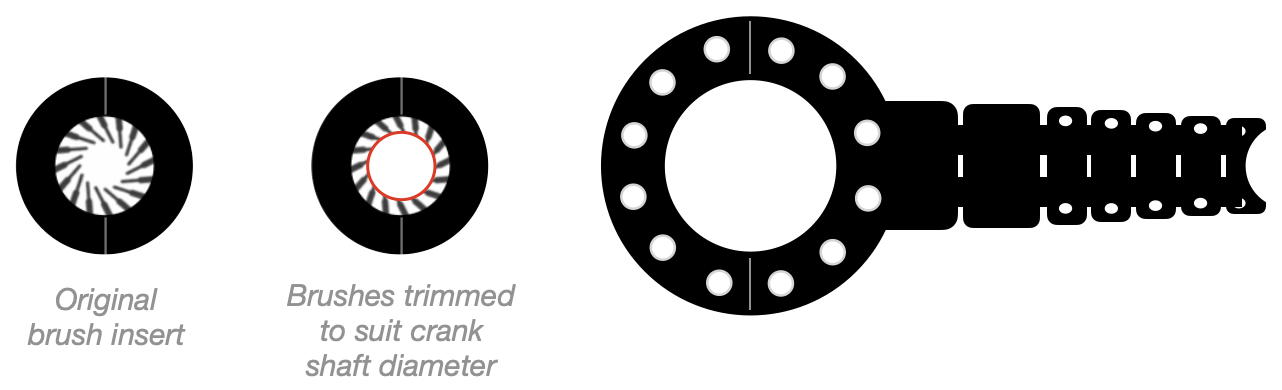
The Universal Magnetic Disc
The circular ring contains 12 magnets and fits onto, and rotates with, the crank. There are multiple options for fitting the disc to the crank – all depend on the circular disc being concentric with the crankshaft.
The only way we could get this disc to fit and rotate concentrically with the crank shaft on our bikes was to use the optional brush inserts. The diameter of our crankshafts was too large to fit the brush inserts as supplied, so we clipped all the small brush stems so the inserts were a neat fit on our shafts.
We also had to move the crank out on the shaft a millimetre or two, to make space for the disc on the shaft between the crank and the frame.
We rotated the crank slowly by hand, aligning the disc concentrically by eye – to achieve ‘parallel’ and vertically-aligned rotation – and then cable-tied the disc arm to the crank to hold it permanently in place.
Note: The Swytch manual suggests EITHER fitting the disc brush insert, OR strapping the disc arm to the crank. We found it necessary to use both the brush inserts AND the disc arm strapped to the crank to reliably maintain concentric rotation in the vertical plane.
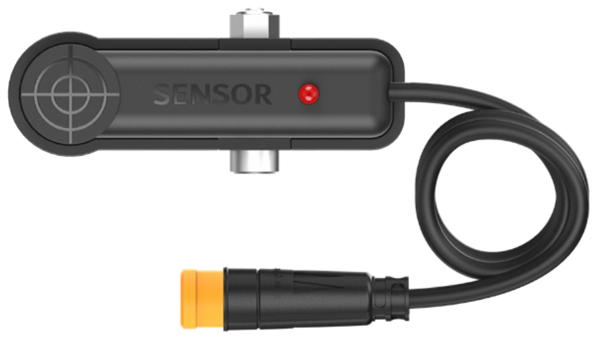
The Pedal Sensor
The pedal sensor fits on the frame adjacent to the crank, detecting pedal rotation as the magnets on the disc pass by the sensor.
I am speculating that on an alloy tubular-framed bike the installation of the pedal sensor would be reasonably straightforward.
However, on our moulded carbon frames there weren’t any parallel surfaces around the cranks to provide an easy mount for the sensor to be aligned parallel to the rotating magnetic disc.
There certainly wasn’t enough space to fit the sensor between the frame and the disc on either of our bikes for a simple out-of-the-box installation (both Giant brand with carbon frames).
We ended up making some significant modifications to the sensor mounting mechanisms, including the fabrication of aluminium brackets to align the sensor in the correct position in relation to the rotating disc….
Aligning the Sensor and Magnetic Disc
This is where you may need to put your engineer’s hat on!
On Bike 1 we removed the pivoting mount bracket and ‘ears’ from the sensor (an option detailed in the Swytch video instructions) and glued the sensor directly to a narrow aluminium plate (180 x 25mm) which was then cable-tied to the frame. This was the only way we could get the sensor to fit between the frame and the rotating disc.

(Both the above sketches are viewed from below the frame)
On Bike 2 we had even less space, so fitted a bracket (made from 30 x 20mm aluminium angle) to the underside of the frame, to hold the sensor adjacent to the rotating magnetic disc. There was simply no option to fit the sensor between the frame and the disc – no space and no straight surface.
Fortunately there was already a screw mount on the underside of the frame, holding an existing brake cable – we were able to take advantage of this screw mount to secure our pedal sensor bracket to the frame, along with cable ties and silicone to hold it in position at the correct angle (after testing).
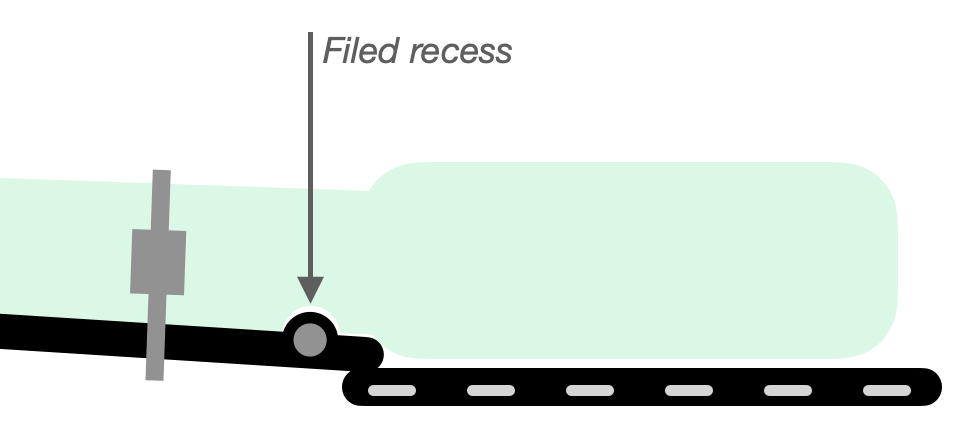
Bike 2 also required some modification of the crank – filing a small semi-circular recess to accommodate the hinge on the disc mounting mechanism, to ensure parallel rotation of the magnetic disc.
In a nutshell, there really is no easy or generic one-size-fits-all guide to the sensor mounting and alignment process – I expect the specific mounting details will be a little different for every bike.

The bottom line is to ensure the magnetic disc is rotating smoothly and concentrically, without any non-parallel ‘wobble’, and to mount the pedal sensor so that the red LED on the sensor illuminates as each magnet on the disc passes by. (This may take some fiddling and tweaking, depending on the geometry of your frame.)
Check the Swytch instructions and video and take it from there, modifying the procedure to suit your bike. Just don’t expect this to be a 5 minute job though!
Once we had it all aligned and tested, we applied silicone to the frame mounts of the brackets and fittings that we had added, then secured everything firmly with cable ties to ensure no further movement. (I expect it would only take a small mis-alignment of this sensor mechanism for the whole show to stop working.)
Integrated Pedal Assist Sensor (PAS)
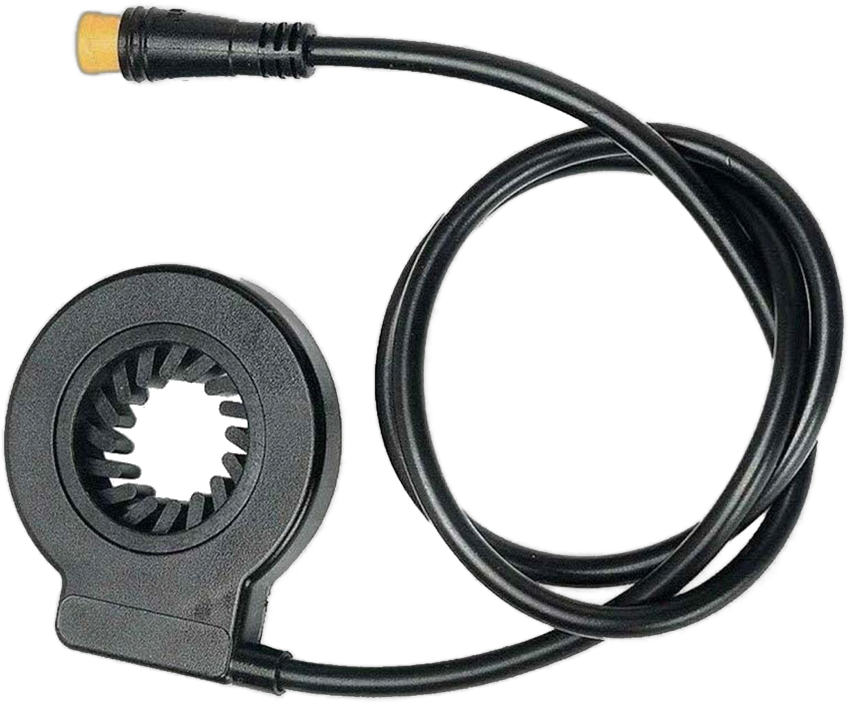
On a recent Swytch conversion project (Giant 26″ Boulder MTB) we fitted a KT-V12L integrated pedal sensor, which has the magnetic disc and electronic sensor combined into one crankshaft-mounted unit, negating the need for a separate magnetic disc and sensor mounted (and aligned) on the frame. We used a 3rd-party integrated PAS (link below). The result is excellent. The PAS unit was a snug fit onto the square crankshaft – with the teeth gripping and rotating with the crankshaft – while the castellated teeth on the outer housing meshed directly into the castellated recesses on the collar on the bottom bracket. The Julet plug on the PAS cable connected to the appropriate socket on the Swytch controller, and it just worked – no silicone, no cable ties. You will however need a crank puller to remove the crank, to be able fit the PAS unit onto the crankshaft.
KT-12L integrated pedal sensors are available from various vendors on eBay. Swytch also stock an integrated PAS. However…. An integrated PAS isn’t suitable for every bike. In fact, here in an Australia our stats are a disappointing 1 in 10…..
So, there are a quite a few ‘maybes’ with the integrated PAS option. It is the preferred option, if it will fit on your bike. We purchased ours from eBay and it works fine with the Swytch controller. |
 The fitting and correct alignment of the pedal sensor and the magnetic disc is probably the most fiddly and time-consuming part of the whole installation process. It is also the most critical part for the correct functioning of the Swytch kit.
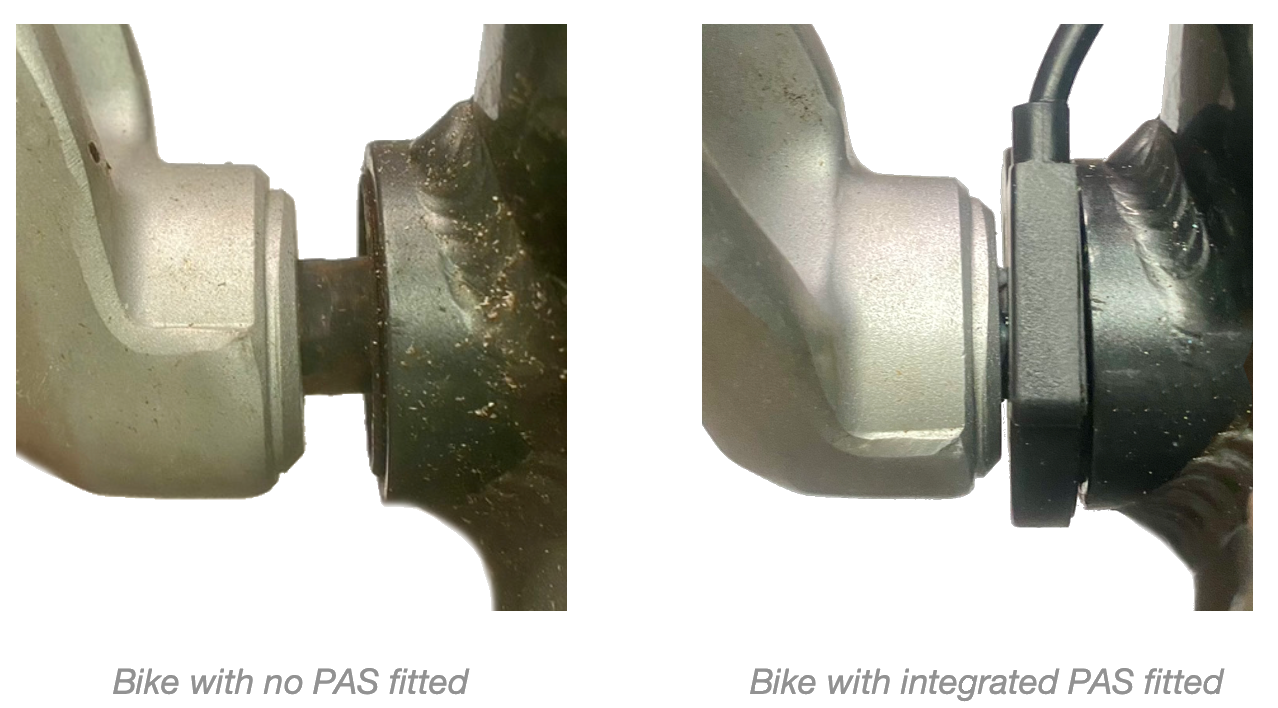
Making the Right Connections
 All the electrical components – motor, pedal sensor and control display module – are connected to the battery mount bracket with cables that are terminated with neat colour-coded ‘Julet’ plugs. The plugs are a quality fit, and I expect they will be dust and water-proof.
Make sure you line up the arrows on each part of the plug, and that they are pushed together tightly – so you can’t see any of the inner coloured plastic.
Secure all the cables to the frame (or to other cables) with cable ties.
Other Stuff
 Valve Hole Adaptors – The Swytch rims have a hole drilled to accommodate a tube with a Schrader valve. We use tubes fitted with a Presta valve, which has a smaller diameter than the hole in the Swytch rim.
We fitted these valve hole adapters to create a neat fit for the Presto valves in the Swytch rims.
Waterproofing
The only time the Swytch installation has let me down was towards the end of an extremely wet and windy ride. The motor began operating intermittently, sometimes without me pedalling. Given the conditions that caused the malfunction (which included a couple of deep-ish puddle crossings), I assumed that an electrical circuit was being formed by water in the system, and this led to an investigation of places where water could enter the electrical system….
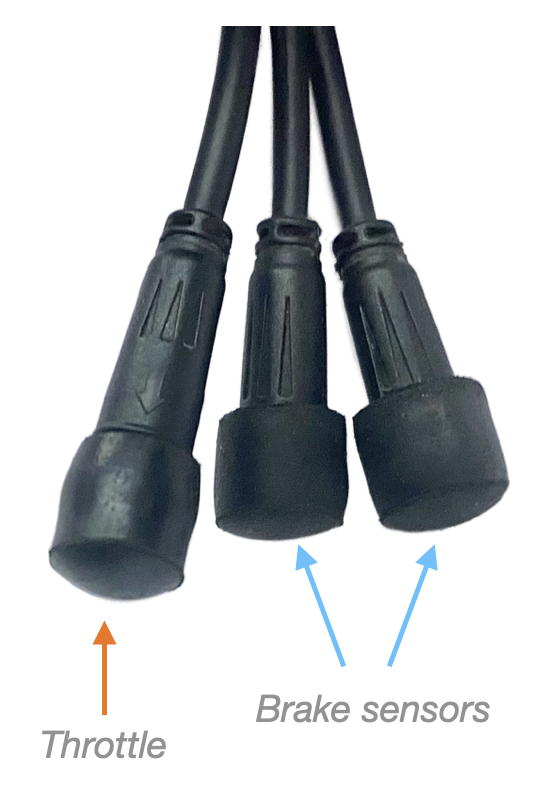 1 – Plug Caps – The controller itself is claimed to be waterproof, so after it all dried out (24 hrs) – and was working again – I turned my attention to the unused cable plugs protruding from the battery mount. To prevent the possibility of moisture ingress (if that was indeed the cause), I have sealed these cables with 6 mm rubber chair end caps, available from the local hardware store.
The 6 mm caps were a neat fit on the throttle socket but required heating (with a heat gun) to soften enough to be pushed onto the slightly larger diameter brake sensor sockets. I also sealed the caps with a bead of silicone roofing sealant, just to be sure! (Not required, of course, if you have accessories connected to these sockets!)
2 – Pedal sensor – While I had the silicone sealant in hand for fitting the plug caps above, I also applied a liberal coating to the joint on the plastic case of the pedal sensor – coz water could intrude here too, and create a closed circuit which could cause the motor wheel to spin erratically.
Following this remedial waterproofing work, we have had no further issues when riding in wet weather.
On the Road
 With the installation saga behind us, and our butts in the saddle, the Swytch on-road experience is excellent.
In the workshop, the Swytch wheel hub doesn’t appear to spin quite as freely as our original front wheels, but the rolling impact is minimal – barely noticeable when riding. For all intents and purposes with the Swytch display set to Level 0 the bikes ride just as they did pre-Swytch.
While the battery-powered boost can obviously be of great assistance on a hill, we still prefer to put some effort into our propulsion, setting the assist to Level 0 most of the time, and rarely clicking the assist above Level 1 for hills, or when pedalling into a constant headwind. That provides more than enough assistance for most of our rides.
We haven’t yet found a hill on our regular rides that requires Level 3, 4 or 5! (Though we have gone exploring a couple of steep hills in Kiama just to test the motor at these higher levels – and can report that it works very well, even in Minnamurra St in town, and out on the Fountaindale Rd / Saddleback Mountain climb, both of which have a hills with a 24% gradient!)
Where we have found the e-Boost particularly useful is riding into a strong and constant headwind at the end of a morning ride.
One important tip for new e-Bike riders: Use your gears – the battery and motor are not gear substitutes. If you are riding up a hill with battery boost it is easy to forget that you would have normally clicked down a gear or three for that climb.
Remember, gears make it easier to ride up hills, even with the motor providing an added boost to the regular level of pedaling effort. We try to ride in the gear that we would normally use for an incline (maybe a gear higher) – any battery boost on top of that is a bonus.
Better for the bike, better for you, and probably better for battery life.
Note: Swytch also supply a couple of throttle options for powering the bike motor without pedaling. This is not legal on our local public cycleways or roads – and kinda defeats our purpose for cycling! (Though we have fitted thumb throttles to our MTBs, for muddy starts.)
Battery Range
Swytch claim the MAX battery has a 30km range, when using the ‘default’ settings – whatever those default settings might be!
It is clear from our experience so far that if using the battery the way we are planning on using it we will get a much better range than that – maybe 50 – 60kms (or more) if not going too crazy with the battery. Here is a quick summary of our first few rides….
Test Ride 1 – Minnamurra to Warilla Beach and return (30kms)
 Our very first e-Ride! We turned the Swytch kit on when we began the ride at Minnamurra, but left it on Level 0 until Dunmore Hill. Clicked it up to Level 1 for the ride up the hill, and tried it on Level 2 for about 50 metres – out of curiosity, just to see how well it worked.
Certainly made easy work of the hill! (Which may not be a good thing if we are riding to keep fit.)
We rode on to Warilla Beach via Shell Cove, with little use of the e-Boost. Turning around at Warilla, a stiff south-westerly wind-change blew through, and we used Level 1 for the entire return trip to Minnamurra. This was a real help – the headwind was strong and constant.
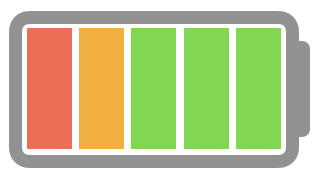
Battery usage – We returned to Minnamurra with no visual decline in battery level – still with five bars on the battery level display.
Test Ride 2 – Gerringong to Berry via Foxground, return via Toolijooa Rd (33kms)
Again, we used as little boost as possible, but there were plenty of hills on this ride, especially on sections of the new highway, and some long climbs on the old highway – we only used the e-Boost for these hills. (The good thing about long hill climbs is that there is almost always a long coast down the other side!)
Battery usage – Returned to Gerringong with no visual decline in battery level – still on five bars.
Test Ride 3 – Pt Kembla Pool to Thirroul Pool & return (56 kms)
 This is a relatively flat ride, with a few modest but constant inclines along the way. These are the sort of inclines where, without e-Bike co-riders, we would probably just drop down a couple of gears and do the required work. But pedaling in a group of e-Bikes it is very convenient to click up to Level 1 boost and keep pace with the group. We used it quite a bit, but only for short uphill sections most of the time.
On the return leg we were pedaling into a southerly headwind, so we had a permanent Level 1 e-Boost from WIN stadium through to Port Pool.
Battery usage – Returned to Port Kembla Pool after 56 kms of partially assisted pedaling with four bars of battery level remaining. At this rate we could easily have ridden 100kms and still had battery to spare.
Test Ride 4 – Around Lake Illawarra (42kms)
 After the rides above, using the battery only when required (as we plan to do most days), it was time to see how well the battery would last if required for constant use. The Around the Lake ride is relatively flat, but often windy, as it was on the day we rode.
I turned my Swytch boost to Level 1 when we departed Boonerah Point (Mt Warrigal), and left it there for the entire trip. It was certainly useful into the wind, but really felt like overkill for most of the ride.
I even gave it a spin at top speed (32 kmh) into the wind down the freeway from Berkeley to Kanahooka, and also dialled up the speed wherever it was safe to do so, which I expect uses more battery capacity.
Effortless pedalling!
Battery usage – Returning to Boonerah Point after 42 kms of Level 1 boost, I had two bars remaining – and that was after 42 kms of non-stop battery boost.
Test Ride 5 – Around the Lake – Canberra (42km)
The actual cycle path loop around Lake Burley Griffin is around 30km, but we rode from our accommodation, as well as taking a side trip to the National Arboretum for lunch – which has a good hill to climb!
Similar to the Lake Illawarra ride, the path is generally flat, so we rode mostly on Level 0. There were a few inclines where we clicked up to Level 1, but only a few times.
The ride up to the Arboretum cafe is a steep climb, and without the e-Boost we would have been in our lowest gears and up out of the saddle.
We were on Level 2 and Level 3 for the ride up the Arboretum hill.
Battery usage – Returning to our accommodation in O’Connor, after 44 kms of pedaling around the Lake and up to the Arboretum, we had five bars remaining in the visual display.
Test Ride 6 – O’Connor to Mt Rogers, Hall ACT & return (45km)
An undulating ride, mostly on cycle paths, up the Western side of Lake Ginninderra, then to Dunlop and up to Mt Rogers, and on to Hall for Lunch. Returned to O’Connor via Kaleen and Lyneham.
Plenty of ‘casual’ e-Boost on this ride – especially up the Mt Rogers path on Level 2 – but also a lot of Level 0 / Level 1 along the ride. The last few kms involved a gentle uphill climb into the wind (Level 1 boost), returning to our accommodation.
Battery usage – Returning to our accommodation in O’Connor after 45 kms we had four bars of battery capacity remaining.
More local rides: Kiama Bicycle Users Group >>>
Final e-Thoughts
 We are very happy with the riding experience provided by the Swytch conversion kit.
We now have e-Boost assistance when we need it – on long climbs and when pedaling into a constant headwind. But most importantly, we are still using our own pedaling energy most of the time, and we have kept within our Campervan bike-rack load limits,
Although the Swytch advertising talks about adding under 3kgs to the weight of your bike, this would appear to be based on the weight of the smaller ‘Air’ battery and just the motor, sans wheel.
Our original front wheels (with tyre and tube fitted) weighed 1.4kg. The Swytch wheels (including motor, with tyre and tube fitted) weigh 3.6kg, an increase of 2.2kg. The MAX battery weighs 1.2kg, plus we now also carry a small shifting spanner in our tool kit to remove the nuts securing the front wheel axle. So an overall increase in weight of 3.5kg.
Our bikes now each weigh in at 14kg and 16kg respectively, fully loaded with tool kit, frame bags, water bottle, jacket bottle, etc. However, this is still considerably lighter than a dedicated 24kg e-Bike (plus frame bags, bottles and other accessories). When loading the bikes on our car rack we remove the batteries, which is very simple to do (one click) and that saves us another 2.4kg on the rack load. And we can still easily lift the bikes up onto the rack, which is at head level on our van. (This may not be the case if your ‘base’ bikes have heavier frames.)
Range anxiety is always an issue with anything that is battery powered – so far it hasn’t been an issue for us. Our experience over the past 6 months suggests we will have a range in excess of 50 kms from the MAX battery, given the rides we generally do, and our use of the battery only when absolutely required. (Memo to self – don’t be lazy!)
Recommended?
 From a final-use, on-the-road perspective – definitely recommended ….. if you have the time, the know-how and the interest to go down the DIY path, and are prepared to deal with installation issues that may be unique to your particular bike. As noted above, we would also recommend adding an OLED display to your order, and possibly an extra battery if you might use your bike for touring.
For day-to-day use, the Swytch e-Bike conversion kit has ticked all our boxes. It can be used as a temporary ‘boost’ when required, has a good battery range for our needs, and adds only 3.5kg to the weight of our bikes. After 12 months of constant use (3-4 rides a week) we consider the bikes to be more ‘pedal assist’ bikes rather than full e-Bikes.
However, the Swytch business could do much better….
-
- Communication, pre-delivery: 4/10
- Shipping and delivery: 5/10
- Communication & support, post-delivery: 1/10
- Installation: 7/10
- Performance of Swytch kit on bike: 9/10
Note: This was our support experience with our initial purchase in 2022/23. We have since purchased another four Swytch kits, and our support experience has been much improved. See our MTB installation for more details.
Alternative e-Options
 If you would rather skip the DIY route and purchase a good quality, ready-made e-bike that comes in at a reasonable weight (around 15kg) with a hub motor and similar e-specs to the Swytch kit, check out the Merida eScultura & eSilex bikes.
If you are looking for a budget e-bike, check out the offerings from Aldi or Anaconda, or even the TDR MTB if you are looking for an ‘off-road’ alternative with a more powerful motor. Leitner also offer a range of budget e-Bikes, with a variety of frame configurations, including low bar, step-thru, a folding frame, and an off-road ‘fat bike”.
Keep in mind that a cheap bike, with cheap cycling components will always be a cheap bike, regardless of how carried away you get with the e-specs. I expect that there is a huge difference in cycling component quality between a $4000 Merida eSilex bike and an $1000 Anaconda Fluid bike (Christmas sale price). Buying a bike from a dedicated cycling retailer also provides a level of service and support that may not be available from a chain store or online retailer.
If you are looking for a bike for touring or regular commuting then a bike with good quality components will be a far better long-term option. Hence the idea of adding an e-option to your current bike. But if you are after a knock-about e-bike for camping holidays or quick trips to the shops, then the $1000 Anaconda Fluid or the $1500 Leitner e-bikes are both worth a look, considering that an e-conversion kit would probably cost more than the fully-fitted Anaconda bike! (Read the full specs and reviews for a clearer picture though – you get what you pay for.)
If you are investigating other DIY options to upgrade your current bike….
The Dillenger 250W kit is based on a similar front hub setup to the Swytch kit, but with a larger, frame-mounted battery. This battery setup was a negative for us, but might be a plus if you are after a longer battery range. Dillenger also have 500W, 750W and even 1500W off-road kits, with up to a 60 kmh top speed!
The Boost DIY kit might also be worth some investigation if you prefer a rear wheel hub, though it doesn’t appear to have a pedal sensor, and has a frame-mounted bottle-style battery, with the the on/off controls on the battery, and boost levels controlled through a phone app rather than a dedicated handlebar display.
The SmartBikeWheel is an interesting concept, incorporating the battery, motor and all the associated electronics into the front wheel hub. No wires on your frame – just take your old wheel off, and fit your new motorised wheel in its place. The motor is controlled by an app on your phone. A regular front hub option, similar to the Swytch kit, is also available with a handlebar display, bottle battery, etc
See also: TopBikeKit | Cap Rouge | TDR
A few more thoughts – on Swytch support…
And our converted bikes operate really well. However, the one part of our Swytch experience that was less than stellar was their communications, or lack thereof. All our questions through the Swytch support site were eventually answered, but it took days, or even weeks. Granted we are on the other side of the planet to the Swytch support office, and we were typing our support requests during our day time while the UK support team were sleeping, but I would still expect a reply during their next business day. This was of particular concern when our Swytch wheel axle (10mm) didn’t fit the drop slots in our forks (9mm) – the installation manual insisted we contact the Swytch support team if faced with this issue. So we contacted the Swytch support team via their website form (which was the only option available) on Wednesday 22nd March, 2023 (AU time). We received an automated response to acknowledge receipt of our correspondence, and to explain that they were very busy, and would get back to us soon. As we were in the middle of the installation process, we needed a reply ASAP. Unfortunately we didn’t receive a reply until Tuesday 2nd April (AU time), a day short of two weeks since our initial support request. And the reply was simply a reference to a video, describing how to do what the installation manual says not to do – file the axle flats. This could have been sent as soon as the support request was received. After waiting patiently for 6 months for the delivery of the kit, we were keen to get it fitted – this last hurdle was a huge anti-climax. Hey guys, we have re-organised the garage to become a cycling workshop – bikes are dismantled; spanners are in hand; tyres are off; tubes are out; we have waited ages and are super keen to get this thing happening. We have a simple question and we need some guidance – now! (Not in a two weeks!) If a substantial part of your business is in other time zones, you really should be providing real-time support – even basic support – for customers in those time zones. The Swytch delivery tracking system also leaves a lot to be desired. These days all online purchases are processed digitally, scanned at each stop on their journey, with their delivery progress regularly updated on a tracking site that can be monitored by expectant clients. Not so with the Swytch kits. We were notified that our order had been received and was ‘in progress’, then again (6 months later) when the assembled kit left the Swytch ‘Fulfilment Centre’ – who knows where that even is! The advice with that email provided a one month window for delivery, with no further tracking updates. Then one day, a couple of weeks later, the two kits just appeared at our front door. Could do much better! |
 I don’t want to be too negative – Swytch are doing a pretty good job, all things considered.
Swytch Support Update
However, maybe things at the Swytch support department are changing – for the better. In December 2023 (nine months after the delivery of our Swytch kits) one of our hub motors developed a ‘clicking’ noise, which then became a more disturbing metallic noise, on each rotation of the wheel. To my untrained ear, it sounded very much like something having come loose inside the hub. We sent the Swytch support desk a video of the issue. We received a reply very soon after we sent the email – taking into account the geographical time differences involved. After a couple of emails seeking further clarification, a senior support officer requested confirmation of our delivery address, followed by advice that a replacement wheel and motor was being dispatched. Expected dispatch / delivery was advised as being 10-12 days. I was a little sceptical, but needn’t have been – the replacement wheel arrived inside a week! Delivered from a local warehouse in Sydney. Outstanding! Excellent service – it doesn’t get much better than that. Well done Swytch – whatever has been implemented to improve customer service is certainly working! |
 Every forum I have read since installing our Swytch kits reflects our initial negative experiences with the Swytch support desk. This was in early 2023.
Swytch eBike Conversion – Info | Road Bike Conversion | MTB Conversion