Swytch e-Bike Options – Background Info
Road Bike Conversion | Mountain Bike Conversion
Our Swytch journey continues….
After 18 months riding our Swytch-supported road bikes, and with a trip to the Victorian high country rail trails coming up, we decided to add Swytch kits to our MTBs.
These bikes are very much entry level bikes in the big MTB scheme of things, but ideal for our purpose – which isn’t single track downhill MTB thrill-seeking, but rather more relaxed exploring on rail trails, gravel tracks and fire trails, etc.
Both bikes are 29″ MTBs – a Giant Talon and a Liv Tempt. The only non-base option included on both our bikes is 1×10 gears.
-
- See also: Kiama Bicycle Users Group >>>
-
- Download: Swytch OLED Quickstart Guide >>>
e-Justification
After more than a year of riding our road bikes fitted with Swytch e-conversion kits, we have become very used to the occasional assistance offered by the hub motor. And with a rail-trail holiday planned we decided to add Swytch kits to our MTBs. These bikes will be used for trail riding rather than full-on MTB downhill track riding.

Taking the e-Plunge
You can read all the details of our various considerations and some alternative e-Bike options on our Swytch conversion intro page. The information below relates to the more recent Swytch installations on our mountain bikes, and discusses and compares these recent installations with our previous Swytch installation experiences – mostly good!
Ordering and delivery
 When we ordered our original Swytch kits for our road bikes (late 2022), we waited six months after placing our order (in September) before the kits arrived on our doorstep (in March).
Things have certainly changed since then. We ordered our MTB Swytch kits (MAX Gen 3) in January 2024….
-
- 21st January – Registered our interest on the Swytch waitlist.
- 22nd January – Ordered kits and made a deposit payment on the basic kits.
- 24th January – Confirmed our order, finalised our customisations (OLED control display, matte black wheel, thumb throttle) and made the balance payment.
- 31st January – Kits were dispatched from a warehouse in Sydney.
- 5th February – Kits arrived at our front door.
That’s two weeks from the initial order to delivery. Well done Swytch!
Ordering and delivery update….
It seems not! We have just been through the ordering process again for a friend’s Swytch kit –
So, three weeks from ordering to delivery! Keep in mind that our deliveries are coming from a warehouse in Sydney (Australia), so your experience may vary in other parts of the world.
|
 Hang on – before you get too excited, or overly optimistic after reading about our two week delivery window (above) – was
Installation
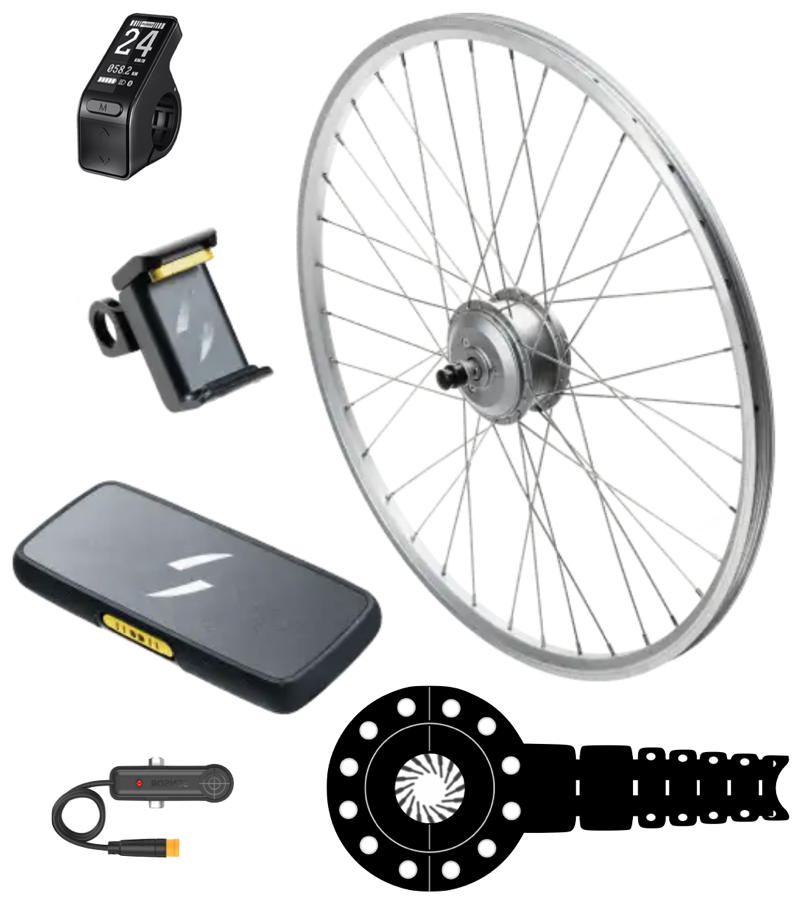 There are five parts to our Swytch kits:
-
- Front wheel with hub motor (250W, 40Nm);
- Battery & handlebar mount (MAX battery: 180Wh, 5Ah);
- Control display module (OLED);
- Magnetic crank disc and pedal assist sensor (PAS);
- Handlebar thumb throttle (optional).
Following our our previous experience with our road bikes, we had no expectations that the installation procedure would be the simple “1 – 2 – 3” jaunt as suggested in the Swytch promotional video. And we were correct – even though these bikes have tubular alloy frames, securely fitting the pedal assist sensor (PAS) mechanism is still a fiddly and time-consuming operation.
Front wheel & hub motor installation
The Swytch hub motor is supplied pre-installed on a wheel to suit your bike. When ordering your Swytch kit you specify the size of the wheel, and the colour – silver or matte black (extra cost for the black finish).
Our bikes were originally fitted with quick-release spindle axles. The Swytch wheels with the motor fitted have a solid axle shaft, held to the forks with hexagonal nuts (17mm spanner required). The Swytch wheels are fitted with 12G spokes, whereas our original wheels were fitted with lighter 14G spokes. (If you are considering fitting a Swytch motor to your own wheel, your wheel will require 36 spoke holes.)
Important note: The Swytch motor wheel requires 100mm space between forks, and is not compatible with thru axles – more info >>>

The Swytch motor axle is 10mm across the flats, designed to fit into 10mm drop slots in the forks. On both our mountain bikes the axle flats required filing to fit into the drop slots.
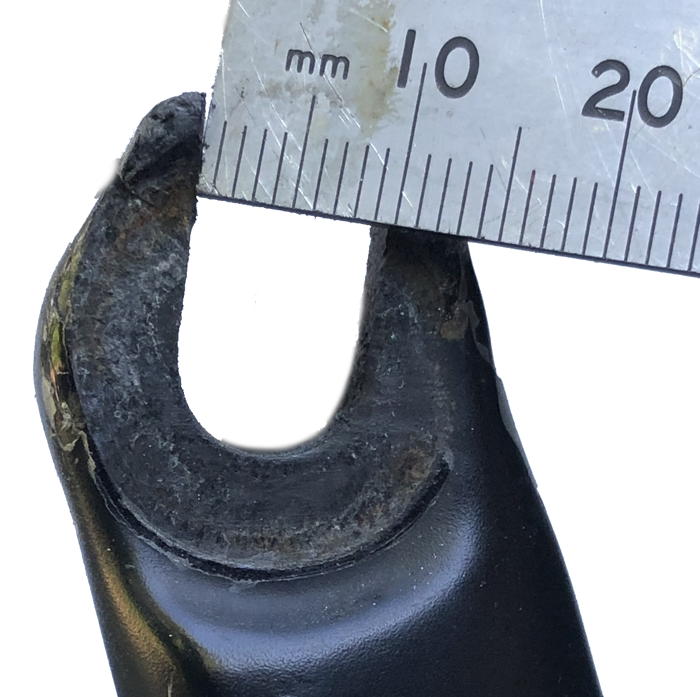
The axle has to be a precise fit in the drop slots, but still able to be easily removed when on the road, in case of a puncture repair. After filing, we spray-painted the filed flats with a good quality protective primer paint, to discourage premature corrosion.
We also filed the ends of the small protrusions on the torque washers so they fitted neatly in the 9mm drop slots.
-
-
-
- More info: Swytch Axle Filing Tutorial (Video) >>>
-
-
Note 1: Swytch now offer an ordering choice between a 9mm and 10mm axle. If you aren’t sure, go with the 10mm axle and file it down. Even though our 10mm axles required filing / grinding to fit our fork slots, I reckon 9mm axles may have been too small, resulting in a sloppy fit. The 10mm axles, filed down to the exact size, are a nice snug fit.
Note 2: We haven’t fitted torque arms to our forks. Torque arms are steel supports designed to resist a sudden twisting force from the motor damaging the drop slots. We are still assessing the need for this, though with the relatively low-power Swytch motor (250W / 40Nm) and our use of only the low levels of e-Boost we don’t feel it is an urgent need.
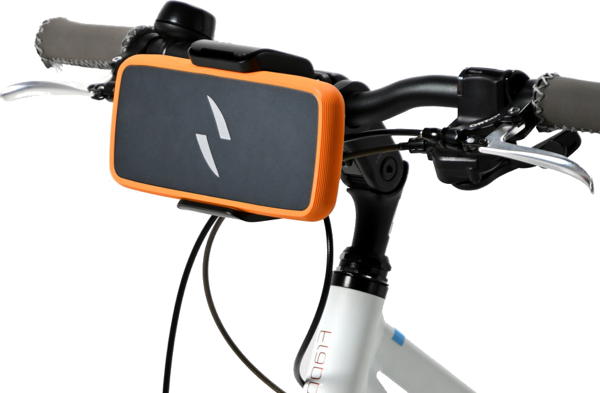
Battery Mount
 The fitting of the battery mount on our flat handlebars was straightforward. The mount sits far enough off the handlebar that it is clear of the brake handles, hydraulic brake lines, and gear cables. The bike can still be upended and rested on the handlebar when required (tyre repairs, etc).
The battery mount also contains the electronics that control and regulate the power going to the motor from the battery and boost control settings, along with monitoring activation signals from the Pedal Assist Sensor (PAS).
The mount does consume a little handlebar real estate in the centre of the bar, but we can still comfortably accommodate lights, bell, Garmin computer, thumb throttle and the Swytch OLED display.
Battery
 While some of the Swytch kit components appear to be re-branded products similar to e-Bike conversion components available from other suppliers, the slimline battery and battery mount appear to be unique to Swytch.
The handlebar-mounted battery was one of the Swytch attractions for us – preferable to a larger frame-mounted ‘bottle-battery’ or luggage-rack mounted battery. An alternative seat post mount is also available from Swytch.
Swytch claim a range of 15 kms for the smaller and lighter Air battery, and 30 kms for the larger MAX battery, though I have not been able to find any measurement criteria for how Swytch calculate this range, other than that they use the ‘default’ settings – whatever they are.
As we have discovered through our test rides, the range of the MAX battery is much greater than 30 kms if the battery is used as we plan to use it – as an occasional ‘boost’ rather than for permanent power. (See test ride info below.)
I expect that if you were riding with constant assistance on, say, Level 2, your range might be around 25 – 30 km.
Because we now have extra batteries (shared with our road bikes) we can carry ‘spare’ range-extender batteries in our gear bags on the MTB luggage racks.
Control Display Module
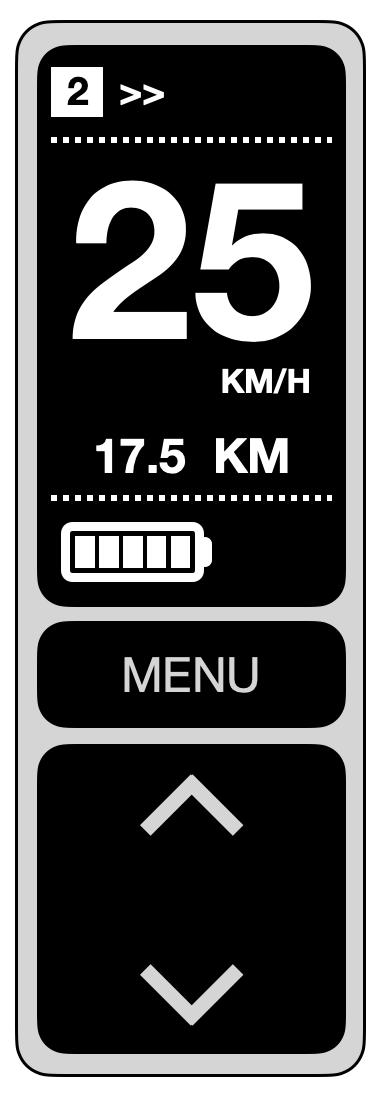 We installed a Swytch OLED control display unit on each bike (highly recommended) – these are a vast improvement over the basic or LED units.
Note: After riding with other Swytch users who have fitted a standard controller display, I would suggest that the OLED display is an essential upgrade.
The OLED display has a high contrast 33mm screen (diagonal) that is clearly visible in all conditions. It has a tempered glass screen and is fully waterproof with an IP65 rating.
The unit includes a speed display, with up/down touch buttons for five levels of assist, (plus a zero-assist level), as well as a trip odometer, trip time, average speed, and maximum speed (via the Menu button). The display can be reset for each new trip, but also maintains a cumulative tally of total distance travelled.
Various basic calibration settings can be changed in the Settings menu, including wheel size and maximum boost speed. Definitely worth the extra $70 (USD).
Note: The Swytch OLED control display module appears to be a rebranded Bafang SW-102 display. However, due to different electrical configuration and connector fittings, the Bafang display is not directly compatible with the Swytch kit wiring harness.
Thumb Throttle
 Not something we had initially planned on installing, but friends had recommended a throttle for getting started in muddy or sandy conditions on an MTB.
And they were 100% correct – turns out that the throttle is pretty good – not for cruising without pedalling, but to get a start pedalling on an incline. Very handy to get moving on soft, wet or muddy ground too.
The Swytch thumb throttle doesn’t utilise an opening clamp mechanism, but rather must be slid onto the handlebar, requiring the removal of a handlebar grip, brake and gear levers. It does require substantial space on the handlebar, to be able to co-exist with the gear/brake levers – OK on our MTBs with longer handle bars, but wouldn’t be easily fitted to shorter bars on road bikes. There would also be a problem if the handlebars were a larger diameter.
The injection of silicone spray under the rubber grips (aided with skinny screwdrivers to prise open some gaps to inject the silicone spray) will assist in easing tight-fitting friction grips off the handlebar tube.
We also removed the brake and gear levers to fit the throttle on the inside of these levers on the handlebar.
Magnetic Disc and Pedal Sensor
Even with our previous experience installing the sensor and magnetic disk on our road bikes, this was still the most time-consuming part of the installation. The mountain bikes have alloy tube frames, which means that all the frame walls are parallel – a little easier to work with than the moulded carbon frames on our road bikes, but still fiddly to get just right…
There are three parts to this puzzle….
-
-
-
- Fitting the rotating magnetic ring on the crank;
- Fitting the fixed pedal sensor on the frame;
- Getting the above two components perfectly aligned!
-
-
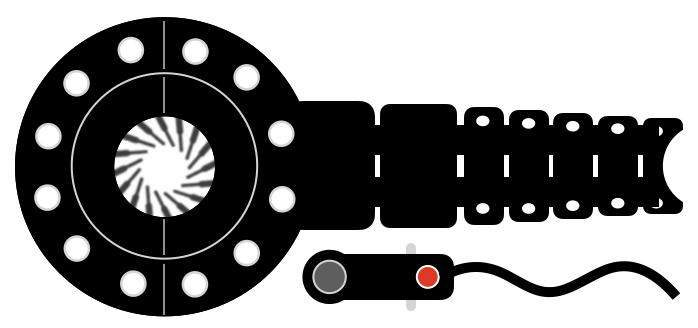
The Universal Magnetic Disc
The circular magnetic disc contains 12 magnets and fits onto, and rotates with, the crank. There are multiple options for fitting the disc to the crank – all depend on the circular disc being concentric with the crankshaft.
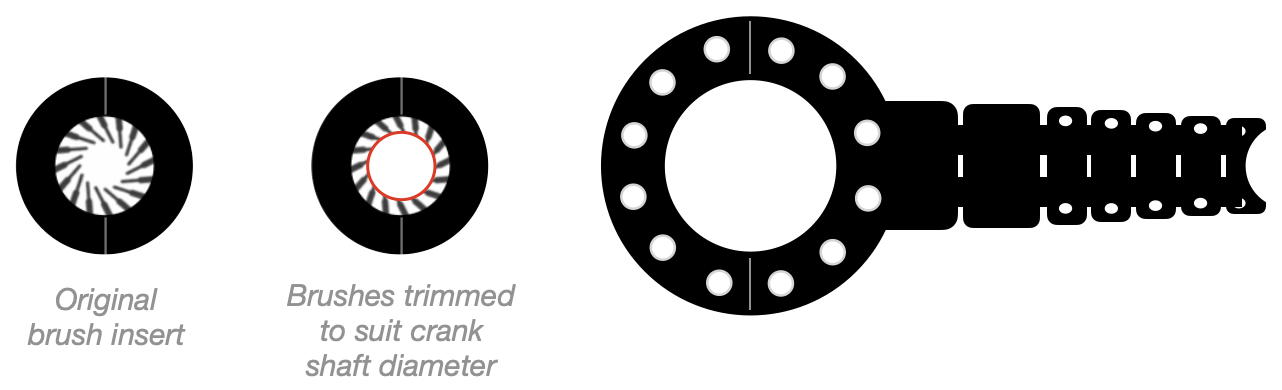
The only way we could get this disc to fit and rotate concentrically with the crankshaft on our bikes was to use the optional brush inserts. There was a small step in the crankshaft moulding that provided an opportunity to fit the rotating disc at an appropriate distance from the frame – but this required a modification of the brush inserts to fit the diameter of that step. (More info below.)
After fitting the disc, we rotated the crank slowly by hand, checking the alignment of the disc by eye to ensure ‘parallel’ and vertically-aligned rotation – and then siliconed and cable-tied the disc and arm to the crank to hold it permanently in place.
Note: The Swytch manual suggests EITHER fitting the disc brush insert, OR strapping the disc arm to the crank. We found it necessary to use both the brush inserts AND the disc arm strapped to the crank to reliably maintain concentric rotation of the disc in the vertical plane.
The Pedal Sensor
The pedal sensor fits on the frame adjacent to the crank, detecting pedal rotation as the magnets on the disc pass by the sensor.
After our previous experience fitting Swytch kits to moulded carbon-framed bikes, I was expecting a smoother experience on these alloy tubular-framed bikes – partly true, but still plenty of fiddling!
There wasn’t enough space to fit the sensor between the frame and the disc for a simple out-of-the-box installation – both bikes are Giant brand with tubular alloy frames.
We ended up removing the sensor’s pivoting mounting mechanism and the associated ‘ears’ that hold the mounting plate, and fitted the sensor unit directly to the frame (with silicone and cable-ties) to attain the correct position in relation to the rotating disc, as shown in the pics below….
Aligning the Sensor and Magnetic Disc
This is where you will need to put your engineer’s hat on – every bike is a little different, and will require some thinking as to how best to fit the sensor and the magnetic disc.
Both the Giant bikes have a small step in the crank, where it fits on the crankshaft. We made use of this step – it was an ideal mounting point for the magnetic disc. However, to make it a snug fit, we used the supplied (optional) brushes, but with those brushes cut and filed to fit neatly on the step in the crank moulding.

With the modified brushes fitted, the magnetic disc was a snug fit on the crank arm, secured with silcone sealant where it fitted on the step in the crank, as well as more silicone and cable ties to secure the flexible disc arm to the crank arm. (Use a plastic builder’s wedge to hold the disc in place until the silicone sets.)
Note: Be sure to fit the magnetic disc as explained in the manual – with the face labeled ‘working surface’ facing towards the frame.
Fitting the sensor is another fiddly operation. As supplied, it was too big to fit in the gap between the frame and the rotating disc. As suggested in the Swytch manual, we removed the sensor’s pivot, and trimmed the ears that hold the pivot mechanism.

(Viewed from below the frame)
We fitted the modified sensor to the frame with silicone sealant and cable ties – a fiddly operation, as the sensor will slide around on the tubular frame until the silicone sets. On one of the bikes we also included an aluminium plate behind the sensor, which moved the sensor a little closer to the magnetic disc. (See MTB 1 in the pics below.)
This takes some juggling of the position of the cable ties to hold the sensor in the correct location, with the sensor aligned parallel with (and up to 3mm away from) the rotating disc. (Keep a clean cloth handy to continually clean your hands or you will quickly end up with silicone on everything you touch!)

In a nutshell, there really is no easy or generic one-size-fits-all guide to the sensor mounting and alignment process – I expect the specific mounting details will be a little different for every bike.
The bottom line is to ensure the magnetic disc is rotating smoothly and concentrically, without any non-parallel ‘wobble’, and to mount the pedal sensor so that the red LED on the sensor illuminates as each magnet on the disc passes by. (This may take some tweaking, depending on the geometry of your frame.)
Check the Swytch instructions and video and take it from there, modifying the procedure to suit your bike. Just don’t expect this to be a 5 minute job though!
Once it is all aligned and tested, everything is held in place by silicone and cable ties, to ensure no further movement. (I expect it would only take a small mis-alignment of this sensor mechanism for the whole show to stop working.)
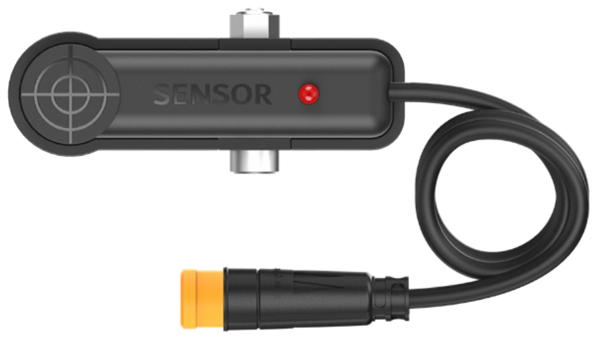
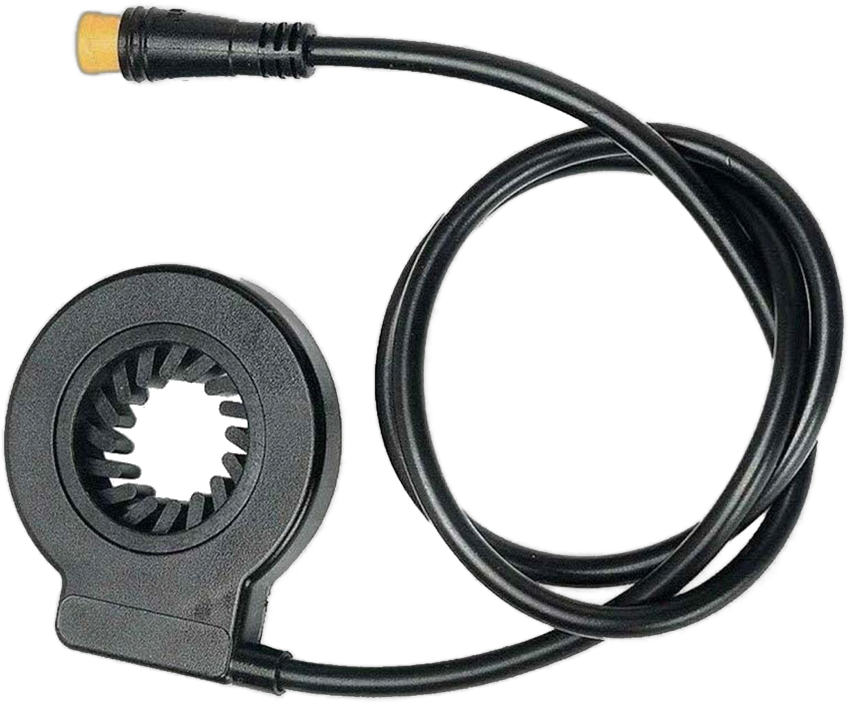
Integrated Pedal Assist Sensor (PAS)
On a recent Swytch conversion project (Giant 26″ Boulder MTB) we fitted a KT-V12L integrated pedal sensor, which has the magnetic disc and electronic sensor combined into one crankshaft-mounted unit, negating the need for a separate magnetic disc and sensor mounted (and aligned) on the frame. We used a 3rd-party integrated PAS (link below). The result is excellent. The PAS unit was a snug fit onto the square crankshaft – with the teeth gripping and rotating with the crankshaft – while the castellated teeth on the outer housing meshed directly into the castellated recesses on the collar on the bottom bracket. The Julet plug on the PAS cable connected to the appropriate socket on the Swytch controller, and it just worked – no silicone, no cable ties. You will however need a crank puller to remove the crank, to be able fit the PAS unit onto the crankshaft.
KT-12L integrated pedal sensors are available from various vendors on eBay. Swytch also stock an integrated PAS. However…. An integrated PAS isn’t suitable for every bike. In fact, here in an Australia our stats are a disappointing/frustrating 1 in 10…..
So, there are a quite a few ‘maybes’ with the integrated PAS option. It is the preferred option, if it will fit on your bike. We purchased ours from eBay and it works fine with the Swytch controller. |
 The fitting and correct alignment of the pedal sensor and the magnetic disc is probably the most fiddly and time-consuming part of the whole installation process. It is also the most critical part for the correct functioning of the Swytch kit.
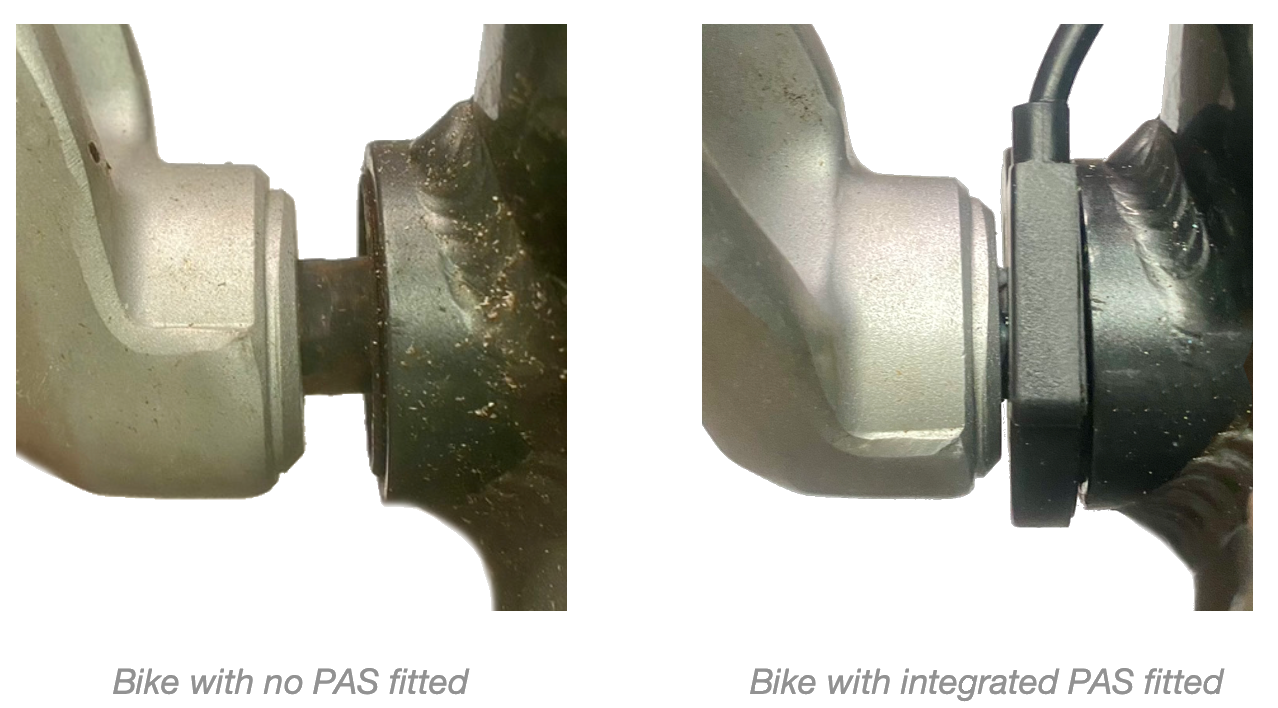
Making the Right Connections
 All the electrical components – motor, pedal sensor, throttle and control display module – are connected to the battery mount bracket with cables that are terminated with neat colour-coded ‘Julet’ plugs. The plugs are a quality fit, and I expect they will be dust and water-proof.
Make sure you line up the arrows on each part of the plug, and that they are pushed together tightly – so you can’t see any of the inner coloured plastic.
Secure all the cables to the frame (or to other cables) with cable ties.
Non-e upgrades
Given that we will be using these bikes for extended trail rides, rather than more typical mountain-biking, we have added a couple of extras…..
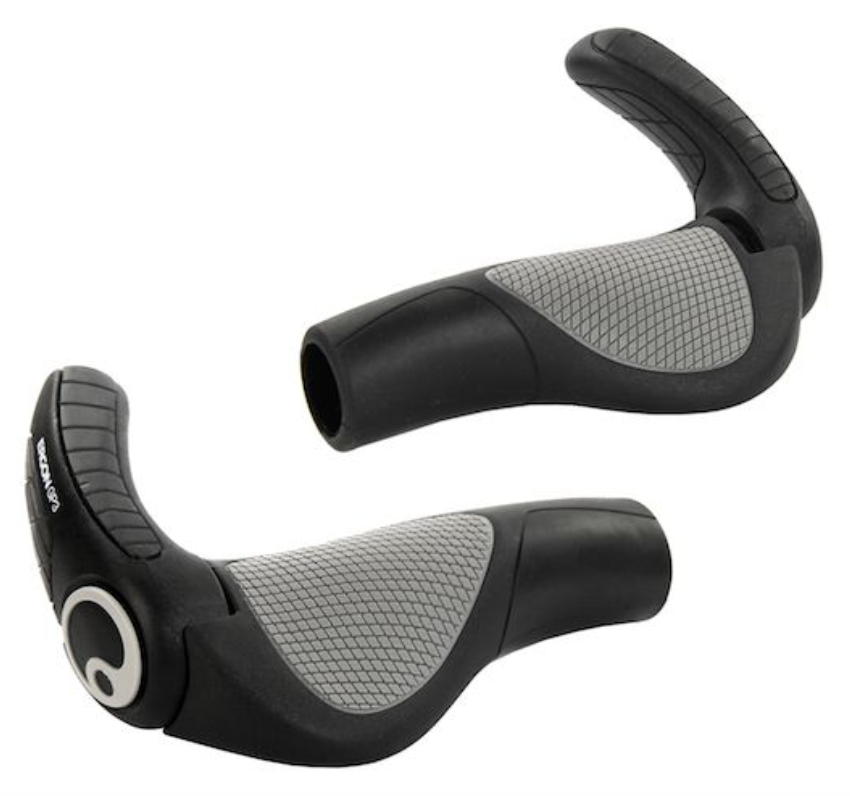 Handlebar grips and hand rests – We have handlebar extension angle grips on our road bikes, and they are excellent for longer rides – being able to change grip position is a great option to have available to reduce wrist and palm fatigue. With this experience, we have also fitted similar grips to our mountain bikes.
There are a number of different brands and options available. We have fitted Ergon 3 grips on one bike, and Giant Ergo grips on the other. Both have adjustable bar-end angle rests.
![]()
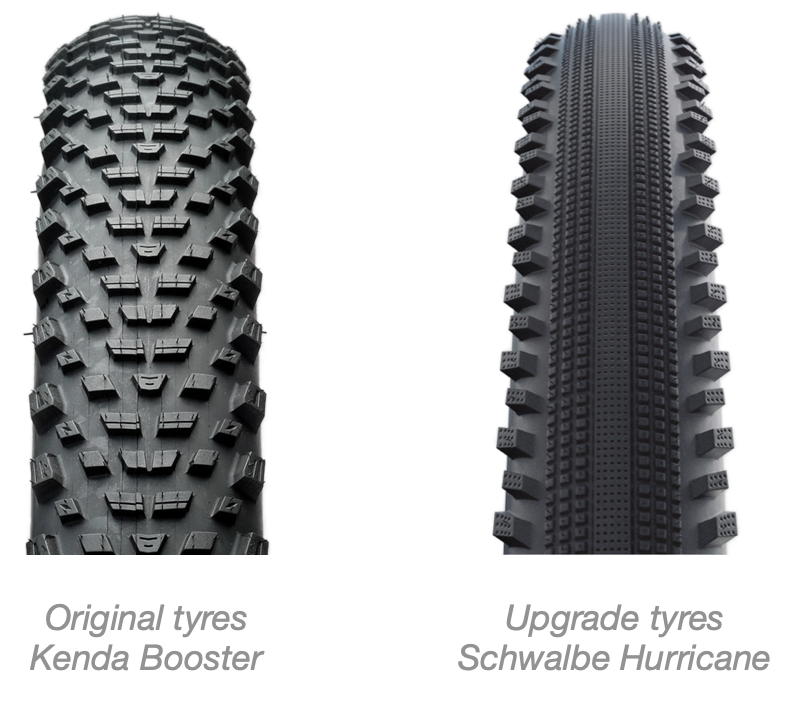
Multi-terrain tyres – The original tyres fitted to our bikes were Kenda Booster MTB tyres, with a fairly generic knobbly tread design for off-road and rough track riding.
Given that the surfaces we are most likely to be riding on will be a mix of semi-paved, paved and compact / loose gravel surfaces, we have swapped the original Kenda Booster tyres for Schwalbe Hurricane multi-terrain tyres. The Hurricane tyres provide better contact on wet and slippery paved surfaces, while still being suitable for off-road, light gravel use. (Initial impressions are that the Hurricanes roll noticeably better than the Boosters on paved surfaces.)

Valve hole adaptors – The Swytch rims have a hole drilled to accommodate a tube with a Schrader valve. We use tubes fitted with a Presta valve, which has a smaller diameter than the hole in the Swytch rim.
We fitted these valve hole adapters (pictured on the right) to create a neat fit for the Presto valves in the Swytch rims.
Waterproofing
The only time the Swytch installation has let me down was towards the end of an extremely wet and windy ride on my road bike. The motor began operating intermittently, sometimes without me pedalling. Given the conditions that caused the malfunction, including riding through deep-ish casual water on the road, I assumed that an electrical circuit was being formed by water in the system, and this led to an investigation of places where water could enter the electrical system….
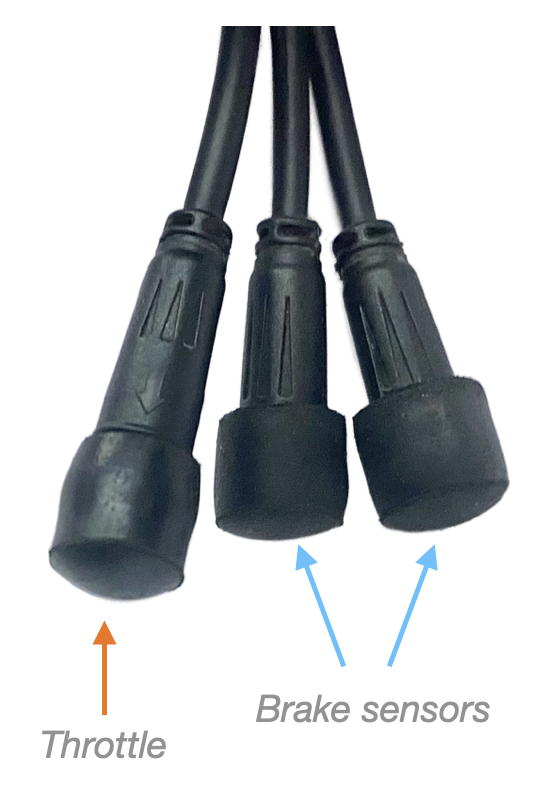 1 – Plug Caps – The controller itself is claimed to be waterproof, so after it all dried out (24 hrs) – and was working again – I turned my attention to the unused cable plugs protruding from the battery mount. To prevent possible future moisture ingress (if that was indeed the cause), I have sealed these sockets with 6 mm rubber chair end caps, available from the local hardware store.
These 6 mm caps were a neat fit on the throttle socket (if no throttle is fitted) but required heating (with a heat gun) to soften enough to be pushed onto the slightly larger diameter brake sensor sockets. I also sealed the caps with a bead of silicone roofing sealant, just to be sure! (Not required, of course, if you have accessories connected to these sockets!)
2 – Pedal Sensor – While I had the silicone sealant in hand to seal the plug caps above, I also applied a liberal coating to the joint on the plastic case of the pedal sensor – coz water could intrude here too, and create a closed circuit which could cause the motor wheel to spin erratically.
Following this remedial waterproofing work, we have had no further issues when riding in wet weather.
 Luggage rack and bag – We have fitted Topeak luggage racks and trunk bags to the rear of our bikes.
There is enough space in the MTX trunk bag for all our gear – repair kit, tools, jacket, and a spare battery!
Check topeak.com, or your local bike shop, or eBay, etc.
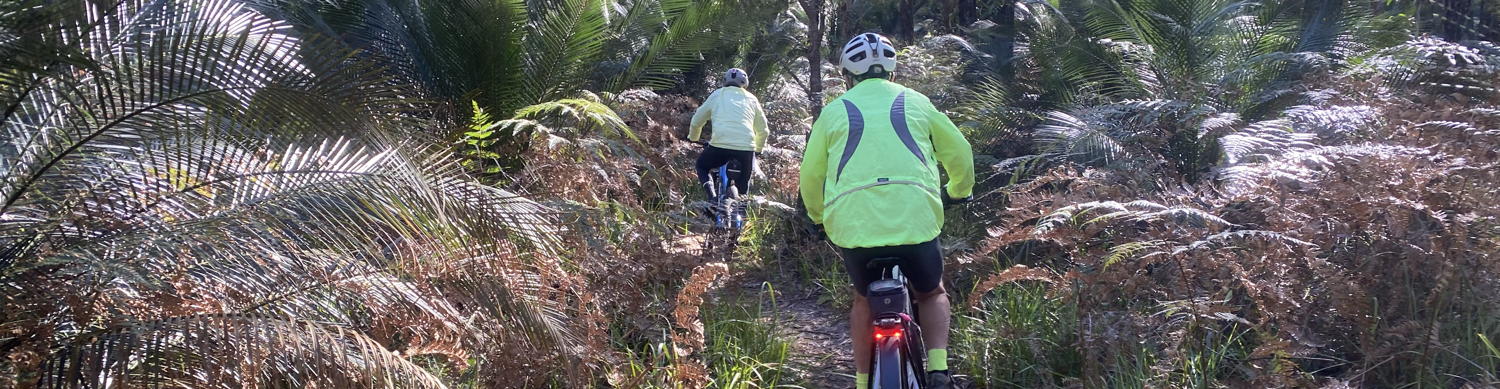
On the trail
With the installation saga behind us, and our butts in the saddle, the Swytch on-trail experience is excellent.
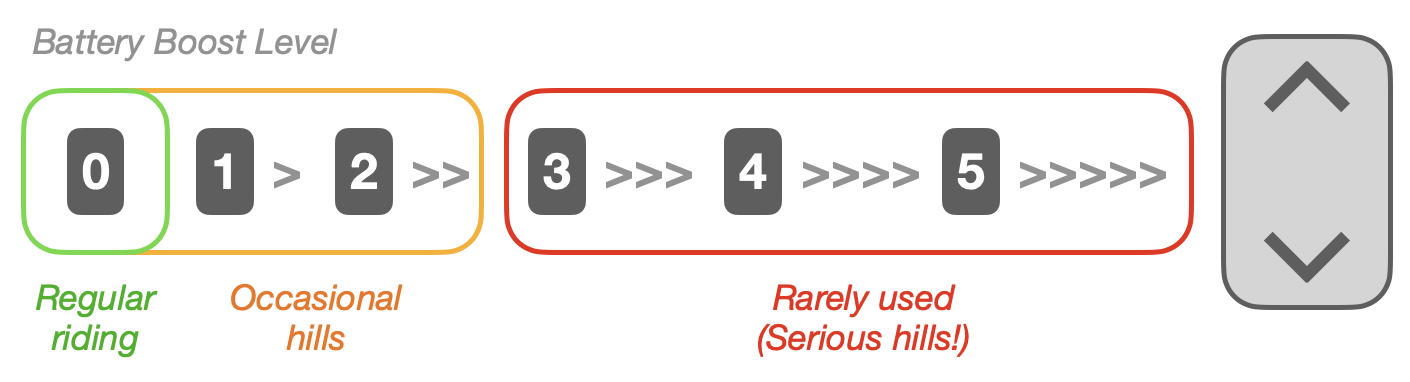
We have five levels of boost, but we generally set the boost to Level 0, riding the bike as a regular bike as much as possible. Compared to our road bikes (which also have Swytch kits fitted) we probably use Level 1 and Level 2 a little more often – the mountain bikes are heavier and we have encountered more sharp pinches and more rolling resistance on trails than we might see on our road journeys.

As we approach a hill we can click up to Level 1 to activate the motor – it only takes a turn or two of the crank for the motor to kick in – and it only engages while we are pedaling. Because it takes a turn or two of the crank for the motor to kick in, this system probably wouldn’t be great on a more technical mountain track – it might even be dangerous on tight turns.
We have fitted a thumb-operated throttle to the mountain bikes, but at this stage we only use this for some assistance if starting on an incline, or if we need an instant boost on wet/muddy grass. (The throttle boost kicks in instantly, and doesn’t require the pedals to turn.)
The Swytch kit has added around 3 kg to the weight of each bike (wheel, motor, battery). When testing in the workshop, the Swytch wheel hub doesn’t appear to spin quite as freely as our original front wheels, but in reality the rolling impact is minimal – not noticeable when riding. For all intents and purposes, with the Swytch display turned on and set to Level 0 the bikes ride just as they did pre-Swytch. If there was an electrical failure, flat battery, etc, we could continue to ride the bikes as regular, non-powered mountain bikes.
While the battery-powered boost can obviously be of great assistance on a hill, we still prefer to put some effort into our propulsion, rarely clicking the boost above Level 1 or (occasionally) Level 2. That provides more than enough assistance for most of our rides.

One important tip for new e-Bike riders: Use your gears – the battery and motor are not gear substitutes. If you are riding up a hill with battery boost it is easy to forget that you would have normally clicked down a gear or three for that climb.
Remember, gears make it easier to ride up hills, even with the motor providing an added boost to the regular level of pedaling effort. We try to ride in the gear that we would normally use for an incline (maybe a gear or two higher) – any battery boost on top of that is a bonus.
Better for the bike, better for you, and probably better for battery life.
Off-road durability
Still early days for our MTB Swytch conversions, but we have had zero issues with the reliability of the Swytch kits on our road bikes.
It has always been a concern that the pedal assist sensor (PAS) is very alignment-sensitive, so when installing the kits on both our road bikes and mountain bikes we ensured that the PAS installation was as robust as we could make it – plenty of silicone and cable-ties to hold everything in place.
So far, so good! I was heartened to see a photo posted by a fellow Swytch user, indicating that everything kept operating even when covered in mud (photo credit Rennie Dickins)….

Battery Range
Swytch claim the MAX battery has a 30 km range, when using the ‘default’ settings – whatever those default settings might be!
It is clear from our experience so far that if using the battery the way we are planning on using it – as a ‘pedal assist’ – we will get a much better range than that – maybe 50 or 60kms (or more) if not going too crazy with the battery. Obviously, if you leave the boost at Level 2 or 3 for the whole journey the range won’t be as great – maybe 20 to 30 kms under permanently-on conditions. Even less if you use the throttle rather than pedalling.
Below is a brief summary of our first few MTB trail rides in Victoria. (Check out some photos from the High Country Rail Trail rides.)
Test Ride 1 (Rail Trail) – Shelley to Tallangatta (48 km)
 While this is a great ride through the bush, it is not really a good test of the battery’s longevity – the first 28 kms are mostly downhill! The track is all gravel, with some rough surfaces through the first section, and a more compacted surface towards the end.
There were some uphill sections, and some significant short pinches where the track had been re-routed through gullies, around the old trestle bridges. The throttle was useful here after stopping, to get forward motion uphill for a couple of metres before the peddling kicked in. The remaining 21 km varied between flat and slightly uphill (3%), but into a light breeze, so we had a fair stint with battery boost to keep up with the full-time e-brigade.
Battery usage: We didn’t set the boost above Level 1 for the whole ride, and this was mostly over the last 20 km. After 48 km we had 4 bars remaining on the OLED battery indicator.
Read more about this trail >>>
Test Ride 2 (Rail Trail) – Ebden to Albury Wetlands (68 km ret)
 Another interesting trail ride, embracing a wide variety of track surfaces – beginning on gravel in the bush, through some muddy sections, then through paved urban areas, before a loop through the wetlands on both compact gravel and paved track.
The ride was mostly flat, but we kept up a steady 20 – 25 kmh pace, which requires some effort on a mountain bike with 2.41″ tyres and MTB gearing. The Schwalbe Hurricane tyres proved to be ideal multi-terrain tyres on the widely varied surfaces on this trail.
Battery usage: We used the battery quite a bit on this ride, but never above Level 1. After 68 km we had 3 bars remaining.
Test Ride 3 (Rail Trail) – Lake Hume Dam to Tallangatta (62 km ret)
 From the perspective of pedaling effort this was the most demanding of the three Rail Trail rides listed here. There were some long sections of incline (2-3%), and we were pedalling into a steady headwind for the first 35 km to Tallangatta. The surface was a mix of gravel and some sealed sections, but the pace was a constant 18 – 25 kmh.
Towards the end of the ride, with the battery monitor hovering between 1 and 2 bars, we were looking for opportunities to coast!
Battery usage: After 62 km of nearly constant battery boost – though only on Level 1 – we had only 1 bar of battery capacity remaining.
Test Ride 4 – Gerroa to Shoalhaven Heads (via NP “Sand track” – 25 km ret)
 I wasn’t expecting to use the motor too often on this ride but, as it turned out, the opposite was the case. I now understand why e-Bikes are so popular in the world of MTBs.
With constantly changing terrain and track surfaces, the battery boost made the ride so much easier. I used the battery 90% of the time, though only on Level 1.
I also used the thumb throttle whenever approaching a very sandy section, especially on the southern part of the track. With the motor on the front wheel, the throttle assisted in “pulling” the bike through the soft sand.
Battery Use: With constant battery use (Level 1) and occasional throttle use, I returned to Gerroa after 25 km of pedalling with only 2 bars of battery remaining. (This ride was on a particularly cold day, which definitely impacts battery charge longevity.)
More local rides: Kiama Bicycle Users Group >>>
Final e-Thoughts
 We are very happy with the riding experience provided by our Swytch conversion kits.
We now have e-Boost assistance when we need it – on long climbs and when pedaling into a constant headwind. (Or even just at the end of the day when we are tired.) But most importantly, we are still using our own pedaling energy most of the time.
The ‘Hybrid’ model suits us perfectly.
The Swytch conversion provides battery assistance with only a minimal weight penalty. The original front wheels on our mountain bikes (with tyre and tube fitted) weighed 2.7 kg. The Swytch wheels (including motor, with tyre and tube fitted) weigh 4.4 kg, an increase of 1.7 kg. The MAX battery weighs 1.2kg, plus we now also carry a small shifting spanner in our tool kit to remove the nuts securing the front wheel axle to the forks. So an overall increase in weight of around 3 kg. (This is slightly less than the increase in the weight of our road bikes, due to the original wheels being heavier on our MTBs.)
|
Campervan rack update – The 29″ MTBs were pushing the weight limit on our door-mounted Campervan bike carry rack. More critically, the physical dimensions of the bikes – notably the large front suspension forks – became an issue in actually fitting the two bikes together on the carry rack. This wouldn’t be too much of an issue if the rack was a regular bike rack, and it was mounted directly on a tow-bar. We have since updated our camper travelling option to 26″ MTBs. We were lucky to pickup a couple of used 26″ Swytch kits – one brand new, and one barely used – for a good price. The smaller bikes are a much better fit on the Campervan bike rack, in both weight and physical size. |
Range anxiety is always an issue with anything that is battery powered – so far it hasn’t been an issue for us. Our experience over the past 18 months on our road bikes suggests we will have a range in excess of 50 kms from the MAX battery, given the rides we generally do, and our use of the battery only when required. (Memo to self – don’t be lazy!)
With our road bikes sitting idle in the garage at home when we are out on the MTBs, we will have ‘spare’ range-extender batteries to take with us when out on mountain bike expeditions. (Ditto the reverse for long road-bike excursions.)
Recommended?
 From a final-use, on-the-trail perspective – definitely recommended ….. if you have the time, the know-how and the interest to go down the DIY path, and are prepared to deal with installation issues that may be unique to your particular bike.
As noted above, we would also recommend adding an OLED display to your order, and possibly an extra battery if you might use your bike for extended touring. We have also found the thumb throttle to be very useful on the MTBs when starting on an incline, or in heavy/wet/muddy conditions.
For our planned MTB use (as ‘trail’ bikes rather than pure ‘mountain’ bikes), the Swytch e-Bike conversion kit has ticked all our boxes. It can be used as a temporary ‘boost’ when required, has a good battery range for our needs, and adds only 3 kg to the weight of our bikes. But keep in mind, we only use the motor when we need it. If you are likely to be using the battery all the time, then maybe consider an extra battery, or bike alternatives with a larger (and heavier) battery.
Swytch support
On the various discussion forums Swytch cop a bit of a blast regarding their poor turnaround time for responding to support calls.
This has obviously changed, even since our last experience with them in late 2022. From our most recent experience (2024)….
-
- Communication, pre-delivery: 10/10
- Shipping and delivery: 10/10
- Communication & support, post-delivery: Not required so far.
- Installation: 7/10
- Performance of Swytch kit on bike: 9/10
Alternative e-Options
 If you would rather skip the DIY route and purchase a good quality, ready-made e-MTB there are plenty of options from the usual manufacturers – Giant, Merida, Focus, Specialized, etc.
Good quality, brand-name e-MTBs kick off from around $3500 (AUD).
So, is it worth going down the DIY path?
Maybe – if you want a good quality bike at an affordable price, with e-Boost when you need it. Our bikes, with Swytch kits fitted, probably set us back around $2000, because we picked up the bikes for under $1000. But they are Giant and Liv bikes, with good quality components.
if you are adding e-kits to bikes you already have in the garage, then it is a worthwhile upgrade to an existing resource. If you were paying full retail price for new bikes, and adding e-kits to the new bikes, then any cost saving would be marginal.
If you are looking for a cheap ready-made e-bike, Leitner offer a range of budget e-Bikes, with a variety of frame configurations, including an off-road ‘fat bike”. Another widely available option (here in Australia) are the Fluid e-bikes sold through Anaconda stores.
Keep in mind that a cheap bike, with cheap cycling components will always be a cheap bike, regardless of how carried away you get with the e-specs. I expect that there is a huge difference in cycling component quality between a $4000 Giant Talon E bike and a $1000 Anaconda Fluid bike. Buying a bike from a dedicated cycling retailer also provides a level of ongoing service and support that may not be available from a chain store or online retailer.
If you are looking for a bike for touring or regular commuting then a bike with good quality components will be a far better long-term option.
Hence the idea of adding an e-option to your current bike, if you have a good quality bike. But if you are after a knock-about e-bike for camping holidays or quick trips to the shops, then the $1000 Anaconda Fluid bike or the $1500 Leitner e-bikes are both worth a look, considering that an e-conversion kit would probably cost more than the fully-fitted Leitner or Anaconda bikes. (Read the full specs and reviews for a clearer picture though – you get what you pay for.)
Keep in mind too that e-Bikes with a hub motor are considerably lighter than those fitted with a mid-frame crank motor, and are ideal in a ‘pedal-assist’ environment.
Horses for courses.
Other DIY Options
 If you are investigating other DIY options to upgrade your current bike….
The Dillenger 250W kit is based on a similar front hub setup to the Swytch kit, but with a larger, frame-mounted battery. This battery setup was a negative for us, but might be a plus if you are after a longer battery range. Dillenger also have 500W, 750W and even 1500W off-road kits, with up to a 60 kmh top speed!
The Boost DIY kit might also be worth some investigation if you prefer a rear wheel hub. It doesn’t have a fiddly-to-fit pedal sensor, and has a frame-mounted bottle-style battery, with the the on/off controls on the battery and boost levels controlled through a phone app rather than a dedicated handlebar display.
The SmartBikeWheel is an interesting concept, incorporating the battery, motor and all the associated electronics into the front wheel hub. No wires on your frame – just take your old wheel off, and fit your new motorised wheel in its place. The motor is controlled by an app on your phone. A regular front hub option, similar to the Swytch kit, is also available with a handlebar display, bottle battery, etc
See also: TopBikeKit | Cap Rouge | TDR
Swytch eBike Conversion – Info | Road Bike Conversion | MTB Conversion